Full Res imgur links - https://imgur.com/gallery/uNqIBkl
Tuesday, December 29, 2020


Monday, September 28, 2020
Mars 2020 Processing Recipie, 2.5x PM edition.
Here's an quick, visual overview of my Mars processing routine

Captures are done with Red, Green and Blue filters in a monochrome camera with a sequence on Mars as:
60sec in Red
60sec in Blue
60sec in Green
60sec in Infra-Red 742
Typically I shoot R and B 1st because as I can make a false green if something bad were to happen.
Each 60second capture is stacked individually with AutoStakkert (https://www.autostakkert.com/)
Sample Red information:
ZWO ASI290MM
------------------------------------
2020_09_23 04:21:39.450 UT
duration 60.002s
integr. 38.6s
------------------------------------
400x408
exp 3.000ms
gain 200 (33%)
frames 12863
------------------------------------
FireCapture v2.6 beta Settings
------------------------------------
Camera=ZWO ASI290MM
Filter=R
Profile=Mars
Diameter=21.86"
Magnitude=-2.33
CM=61.5° (during mid of capture)
FocalLength=4350mm
Resolution=0.14"
Filename=2020-09-23-0422_1-R-Mars.avi
Date=2020_09_23
Start=042139.450
Mid=042209.451
End=042239.452
Start(UT)=042139.450
Mid(UT)=042209.451
End(UT)=042239.452
Duration=60.002s
Date_format=yyyy_MM_dd
Time_format=HHmmss
LT=UT -5h
Frames captured=12863
File type=AVI
Extended AVI mode=true
Compressed AVI=false
Binning=no
ROI=400x408
ROI(Offset)=808x320
FPS (avg.)=214
Shutter=3.000ms
Gain=200 (33%)
Gamma=50
AutoExposure=off
SoftwareGain=10 (off)
AutoHisto=75 (off)
Brightness=1
HighSpeed=off
USBTraffic=100
AutoGain=off
FPS=100 (off)
Histogramm(min)=0
Histogramm(max)=2
Histogramm=0%
Noise(avg.deviation)=0.00
Limit=60 Seconds
Sensor temperature=23.2°C
Focuser position=26457
Here's a small 10s clip from the middle of 2020-09-23-0422_1-R-Mars.avi
Clipped 10s convert from VLC
https://imgur.com/dYUlRQj.gifv
From AS2 save as png to GIMP import as layers then gif export
https://i.imgur.com/2B1EXwB.gifv
Each R, B, G avi is run into AutoStakkert!3 with the following settings, notably use of 3x Drizzle for the lower resolution I use with the 2.5x PowerMate
![3323
AutoStakkelt! 3.0.14 - free for non-commercial use Emil Kraaikamp ECG-ä'l:-
File Memory Usage Color Advanced
Status
Stack Options
2020-09-23-0422 1-R-Mars.avi
Frames
'mage Size Width
Height
offset O, O
3323/12883
a 0250
gray (ai)
Zoom
100%
Alignment Points
28 APS Clear
Manual Draw
Click in image
to add an
alignment point
024 @48
0104 0200
Min aright IS -t
PlaceAP grid
Close to Edge
Z] Replace
M utti-ScaIe
Draw A ps
remember
(HT.' SER)
Z] Auto
Range 18 bt(A
Display Options
Brightness I x
Does NO T alter data!
Export Frame (s)
As displayed here
Image Calibration Help
Cotes 8 / 8
1) Open
Limt Frames
Image Stabilization
C) Surface @ Planet (COG)
Z] Dynamic Background
Quality Estimator
Z] Laplace A
Noise Robust 4
Normal range
@ Local (
C) Global ( Frame )
2) Analyse
Reference Frame
Double Stack Reference
Z] Auto size (quality based)
Vern usaze If c;;
4010
I recording open
auffering and Image Anaysis
Reference Image
Image Alignment
Image Stacking
MAP Anatysis
MAP Recombination
Cancel___
O FIT
Number of frames to stack„
2020 lcco 3020 0
Frame percentage to stack„
No rmalize Stack
Sharpened
RGa Align
Z] Save in Folders
Stack(name) Options
Advanced Settings
O off
Olsx
@30x
Resample C) 20 X
3) Stack
12863
8 bpp
2020 og-23-C422](data:image/png;base64,iVBORw0KGgoAAAANSUhEUgAABaIAAAI9CAIAAABHaJixAAAAAXNSR0IArs4c6QAAAARnQU1BAACxjwv8YQUAAAAJcEhZcwAADsMAAA7DAcdvqGQAAP+lSURBVHhe7L0PfJTF1eg/+J+2r5IY9NoAgQ0Bm1CrYIxIgVAaDRCv4mWpFNtES4mGirltJPLn/Qmfj6Bg2huxxEZRQy1iWa7ANUBwSxOMgksEqiVRCFkJIfVWYgLc9q1Vkd+ZOfPMzj7Ps5tNsptskvP9LJMzZ86cmefZbMicnJlnwPDhwxlBECFw8cUXDxo0SFZ6HaMffn3jiJdu/mW5rHcfZ86cOX/+vKwQRK/lwoULUjJAjSqv/c60063nRAtBEARBEATRY1wkvxIE0afJys0edvLjelkjCKKrWKMeBEEQBEEQRDRAYQ6C6MOMfvj195Dlk95afs+zR6WeIIhwQiEPgiAIgiCI6IE2rRBEqPTuTSs9B21aIfoGpliGqoKA/Lfk6bRphSAIgiAIosehbA6CIAiCaIcLAWIcQXD+5rXG9/ir6uEE1AzI+pVJE4qNCatBu11MowxgCUtfl5qXstDETCCf3334N42vz/mukK2Tt2qsCM+/csqaHwPY918S3fFlOzdp85vvy7oBn9h7v1k6WlYjwYDRc6oiPARBEARBEGGBsjkIIlQuvvhiKREdhLI5iF6NNaihNChACejZHLAkXpK0aWU5X5a/+N49DXN/ueooCGm7bv71FqVh7dus9N9pJizNTio3fntdkC52M5mV9bYLNKNlX5e0lVhHQZ9C/4upJ7dn3bPpiNWt5XIsk09Y8vrq+Sdq9kxi4Nw0KKB3HJD1qxPLWYH93O5xnGTuxT7/cmLsb89bBiUIgiAIoh9C2RwEESqwVic6h7yDBNFvuHCUL/gFTQ0nxdestKlveWDRfoG9/b82sIzbE0KxEVoNi8GY21PZhi1BulhHAUsXao42ecVXMwGmMebhe9iG7R8L2cat9XL8ucAaV95z7/BfemQ9OOWePSx+VIDUCe8J/yvlE67ZIysEQRAEQfR3KMxBEARBEJFjaOKw5mNH2ZgR8R9/3ISqIx83jxgxFGVBKDacdg2CIkfxYYQzTNiOMmD0nGdHvP6zN1GtY3Fro+k4MLeTNf8ngJOG0te92bNw5wtPEnkg/vlSX/RE7Z3BvS0D+D6X37z0m9+IzTIBN+zovXBfjzLgG234Vh3uhzatEARBEET0Q2EOgiAIgogUs37zC4fItghCKDaB4GEIseCHlfl/n/JtqbVDH0WcZPHaiR94En75tlC0Aw8lPJnqLrUxtk6+K5fD2Lfnb+SxBj63ezb9VSqtvL3rrdRpGIYYfVsG8wuIuH55b8LN9w6/+bd7Jt1jRCW+7fj4mYSbf70la9b8E7+FVng9IHNPJHqvJaMbV71UM/UH8gSQWT9I3fPSpiNYIQiCIAgi6qEwB0EQBEF0ADyPQ2GqKjAjYMHHhenPNkqVhXZtxLGXmGVgf2znhfJfZ22IL3rvtRPvPZJ44m+gsXaxjvLXZ3/Jl/R/TsNjO9sdZczDj2RUPmM9a8PkNpRL1rEb92/Pz713+NztH09Kk5MPMLctpdsdD/DDUGfl3uX1j0Hg+akn+Gkdir+53xRTqv/bx5N+YXtCqrlXuWePmMMA9v1pw7f/L/+YCEEQBEEQ0QyFOQiCIAgizMCCf8nrj7DF96oFv77HBHeFhGJz4eimdJF6kCAO47QagIAxi4Sbf7mLfdv7caOpi3UUxYXyXxe89e3EJH6sRtBRhv7P7G+PyF7NowAb7xox7K5yvoPD7DbIQIEwjasA/cMb4heIYEQgG3Z0n5ul/vesOQv8YxADRs+p5GeX3jv85sLnLUeEoLeH2SNwLfqmFWsvcS4Jn8OYh+9xVO4LnFdCEARBEETUQWEOgiAIggg3fHPE637pDzyPQGYH/M9sxpMLQrExEdhgQNavimyTDiyjDMj6PqZF8DyFSX9rqBcVHfMomx6QgQaRZ4FPWrFO3qrpAkeefd2b/UiQgzAusMZVLzXPX34XM8Ugkr494uTfPgJh9G0Zw1Bl5q/P/jJrw98cIxLgAuVxG3a9jrxZw6bM+p9TmteFHLghCIIgCCIaoDAHQRAEQYSZMSPi2aRfiK0W/FX1MH+uypTlTOwu+QVbzp97GoqNCauBWKjz7vzxq3aHWVhHYfVDF2CXkEexYnVrM1AXwIe8zH+Sb0sJSPmW50/WmGMQoGR3lcPkn/y215LNgTtT4FWe7R+8sO0lEkamnrA5pZUgCIIgiGhmwPDhw6VIEARBEISFIIdxgIxVKP9b8vTTredQTxAEQRAEQfQUlM1BEARBEESYUWkmxsv+cFOCIAiCIIiwQ9kcBEEQBBEMzNdQ6FWey0HZHARBEARBENEEZXMQBEEQBEEQBEEQBNFHoDAHQRAEQRAEQRAEQRB9BApzEARBEARBEARBEATRR6AwB0EQBEEQBEEQBEEQfQQKcxAEQRAEQRAEQRAE0UegMAdBEARBEARBEARBEH0EeqAsQRAEQQQDHxmr0Kv8cbLaA2UPul9AffSwfPlyKREEQRAEQfQPKJuDIAiCIAiCIAiCIIg+AoU5CIIgCIIgCIIgCILoI9CmFYIgCIIIBm5LUehVvmVF37Tyz5T6dx4ZiW2MHX9mQlL+PlnpIUybVmbPni0lgiD6E5s3b5YSQRBEP4DCHARBEAQRDAxkKPQqD3KYwhwbWHaPxzY0rGGOmLg4WemXXPebz6Sk8ckvr5YSQfRF2lpaAoU5Hn/8cSlFhhUrVkB56lunsEp0G0P+MSQ9PV1WiB6iqqoq/T56F3oG2rRCEARBEBHjtuL6+p076y9cuLBzvqiJwAjW9NYL9cXzsbG++DbeNH8nrwBoqXWVBgRBEARBEIQdFOYgCIIgiPAx8pF3TNGIkUnHsgcMGDD9+duKN8zYMQHEAbm7pt2N0QvZOuEZ9sijDIUZs2+7rbj+0WPCckAuK+WBjvnLHqnPRUX9I8tkX4IgCIIgCMIChTkIgiAIInwcfwbDEwPU1pXjOzajtC8/KZtt4CGQ0mksKRmjIKpVCcCYUSONcIk0PXLs+LRSXt/Jpg+Y/ry0IwiC6BrqRxaPsh631zC2C6OsSmFnQxAEET1QmIMgCIIguoX5Oy+8M+ppvi7I3SVVgTFWFQAPmOzLTwIJ1hMi2CE3shAEQXQRLQGN5T/NfzRZNcef2ZYsds3tHJOfLaIaVhuCIIhowhzmwB9ZBEEQBEEgQf5zxP86O8CubTwRY/7d07AaCJ678ajY9MKP5Ng53/gigh25u1QqCEEQRPi4LTlJSgaoGflIKT5CCn70jBmlHiYlsfYKhZam6mfXry8Qr2erm1qkOjTOHXl2+xHeRQmd5cPq6r3n4GvTFmMy+NrShK0onNu73a9VvKo/5CYK8LBduJLYXyBM2OcBX+jHPIGC7TgxmMN2nEw4aHblpfvIK3I1ywbekuertU9H7XWaPa4iOQ9w4gnupdlV5PKg0PkRo4pmlzM9faTfq2ivbAsHza5leMd8eJb5j7jM1B5u9hYVvWz3Vu0tyov00Bo8zCF/WROgliAIgiCIdsH/N0P9D/T5bbtw48ndbBcbOWqMVNuwLz8pt178tfSdR+pzpz8vFEz0vXChNOmZ7Ch6lgtBEL0bmTqWVLfMeB62VYPsejp/jBGkDWQTGueObNrNfjh7XtG8eUWz77ihdfemI1qEoD1aTjawxGH8mVFXjnn4rjGdfnhUy5Htf4r53uQrGWs68e7oO/hkjNesodB+7tPWwYOvAuHKyXeh/o5b2eifSZuJ3xFOkJYjh94dPZa7QgJd4Nm2Rv+BpJ9zZz8ZfOtjmv6xxNY33ufhje8Mj333RLjiHKca67JWV0k2ZrN1c4vkqjPeWVLijEc5BJr3VbIpt4Vur+EpmltYmZC9EacwpbJQzcEOz6Z1XjaESx2cYfRyqvFw1urjVVXaq2CybAsDezetO4p3TOGpfs1/xCfSZEskaHTl/TZhzv12b9XkiY7XqrstznER/MIkRYIgCIIgusK+/CTT02T9NM9PF+uCAdOng8AP2FCtVsGwVQdxKIXv1A+CIIgug9HXCxfu3macs2HVAMefmfBEcn2pkYpmaxMyfLU//DsYFLhy6OSxo1nbSZGd0bQF8yaMXAae5iAzKbZvMUIhp9tOX3cV79xyZPuzqGyqfvZI04fV28Hy2WqV3yH78mSKpuqCav9gwbkjmxoS54wRfs62JsTweIYf505+wBJTVOQC4NGQ4Xp0w+BcbQO783s8NCIJcIH2AwFgH3uVHq+JuyqWtZ7lF3JVTAIKXcdTXZ41Ua1w49MKVmeV46rTlyrhUYkWMvoAiiKXzAJR6RSnGuscw3Ahq3XAVp4yoiIXvLe+rvUUFXoXbCxxponO8WnOEjUH60DgqbCc1YlgjJbM0Wwkg2jpKNDZ5cGp+LTa1PQ59CyNJ703JfiHIYBmlzPP1SjEvUXpI8V8ee6DS6Z+ONWVsuaXi/JEUga0SiV0ActledzyZ+Xs8Lq5etKE7Yiqi/Dswb66z0ZXntPlwbGcRZ7GZukfZDTwm4lP5yqonFKE8ShPkcxbyTPSVYYk3OQ9iZcZeehsDoIgCIIgCILo51g3w/k0u3IHZLMNdnkbndtCN3T4rUd3P1t95EMMXAyd+PDEMXGsacvm3WzsbJHLwEQuw7m923ezRK4pmj2WvVspYh8qyYKdbmM3DOOxhA9PHG1sOMG+d1fRvNk3tDbUCjPo+4noO2f4iU2HzPGFD99/V6aEaHETPyyhh4BBiqb334jVUjkA+wsMMJCY/63DtSjJuaa9h44mGNPj3VDoGs0nvcn+y90hCcnek3xZe6oRkzN4FMIh8j1WT/EW8gWtp7q8rrxx2FKee7HAsW6lWAUrTzwQwabIzAyGrfHDHNw3p9m1wTtljpY6wAMt2f45GcYcbAaKd2ZnMZ5+UpCmZggjzpXJIGpE7FxZzeaUgHaKt3IfV5quhZtFAyca60bLCJFGvPMXjnUv8Ptd9LPyrBfhgpnHXV73WuOwoqqq4xsXjF63UmwDaX45b+7OhOw9XMkvH5VeL3utkv28pOp41ep7WdaL/vkadiP6uric7GXxJvJED59P3otVVjvmlByv2jjdWzh1ZWPGUvAP8gbLTKYcLZSBjL2b1sH7lMBFz7JC7+jVPHnkxSnen6ngSF3jCSlFGpswB8ZmCYIgCIKwov6jxP80id7FJ7+8WkoGVg1B9CN8px0nbZ69gccx7DS4dU4oRe6G1aaDDJ01b/YPWcOfNq9/dns1xgLEvo87Zg3lUYC4MROLJsKyn+8WmTWGtZw718LOciPO2dOnY6/hVk21R1E492kru3XsRJk9wU6fBtum999gt2KyRtzQ4dedNsUXoO9gDJEImb27G3NGxEvkfViDGgGCFOf2Hmr1S+Xg2FygzUDyOA8+fz/95kOnE2c/LCYfPmw2mpyCpSzHU12OyRlpE7PqyjcUuTzNac4SHl3gAY0FGwtE8kW8E1obT4GkkjniuZWTNQPsJNQFKnji2VTp8AtqWAMtCtuBfPbGDD2wjF6wFJNB4vlsRUgD7FhWNnYGcJKma8GmHsfjLmevFWLqBL7yMKwwec6CoxvynIXepRvFHpbmk0eTF+wpSOMhg3hnRlZdA1yUZ9NKtqDIico0UO7kl3+qoS556VInV/JeCcNB8GEZkUcctC4s/v6SqiecrLG5udH3JkKv5OlLCybzW4rGSsZ2fSbOX2SVu3kcQ/SS32N8eq9tKHrZ0zzZWXKcB266mQEJCeL6jA3GBEEQBEGYMP0Xqaq6cF3KjDsnyN+xopbZs2dLqR+z7v0B696X8oLvwYt+/yH6Pps3b5aSP48//riUIsOKFSugPPUtvuy05dyHRypffDf2Z/Mmsur1f4oxre2btmzf/e7pwQmD2XWx7N2j3Ow75448W8nm3DUmTgnc7Gy6PKSjacv6Eylmb+f2bn//mru00zR8ff1ljQ+r19cOx0M6EIsTpKm64FDMY5buBr4L9M1cNinknIVnGKXyg8QpvvsQsFdwhvxjSHp6uqwIPEXp1RN56ELBMyMas6sKhrjyVrKlxskXzc2whC0sZ3xvSbynKO/kHHUmhnThs4fmwvK65ORk5nCw8nLHauEfzeac1L0KoGFDAncr64AxB2Y3EDOmDFbC1yl/B4a/U1pn2RUv0+9ahKZ7qaqqSr9PfxeaXc6VrKgE4wsmPMvyCo9O2egyrsN5co6UxR4T98SqjOr03yYYBkLJq7ft8/n0FI2snugXU7Ad0U/Jx32tLvmmZDbawV4rd7xYVTBZN7CTTxTx3TE6966uemKIeazGZs8LKwtfYwv2WF1FHB7moAAHQRAEQQQheJgDSuDbY7KiP8xBKJZ//qPlV/xRVgiiv9IDYY6WI9ufahsrkjUQWNhvPj12XsoJU1iBBxp8oQojmsCObN/ERBQANCeGcz9K0MxO632tkQJTFyX7CBoZ8SEnr0870AXOYrYDWTxDdXPbD40jTi3eQsQS5jAiBb7/plTQQUYGhsiIA18jS+vb9umdZAelVA60Rl4Rnac4KhsnlugLbtGgRkCgVyFbbY60mAfiChG78BtRDXlKi2z4upqvRXbqVixhDmsYwqDRlTe1Er5OwYgAVAvYUiOi4VmWviFxY4ljkx7mkMof7PNZ+vcS2I2om8lYCXYB4w0JfAJ6LzvZr5fCZ8m3tDRk494ZkPn9vz9eXGNjtmkyEcPmCFL8dY0gCIIgiCDI/zWJ3gnFOAiiZ4gblphw9NDeJrmRo6Xp/TdOj04ZygbHDH73RJM4iPTIs+rhrG1ir8q5pi27jzJxUobv/FFjU4m+u4TL4kiL7wwf3dggjzXdW/mu6ZQNHejidy4Gws8fjRksKwLLUR0cbnZrun/vQBdo3QWD+B4cg1w57IbBR/8kz1s9V9tw2mZ6Hce0ZaXZ48or9C5YytepxtYQfqhGebV4wGvzPtzOcqqxrq5RnHTBgwWFeLCGdv4orJhFBKvZU1RYznxaVrdunf+pHAJ+2EZ5ofEQWZxD1mq+6g0+kNq8MiQhGbepyCGFmW9rC1ryy7S5lmjA/vxRwFM0dZ3jxZKlS1nln8XlnWisO9y4T5zW2fxyXuFrWdn3x7PhCcmHK6Vyb5FU6kdvWI/hgBHv9R07KzGbGW/iMvEm8iCLNk9d3ltdjvLkiVnaTPK0c0mReIeDvVbt4QbN++Q+F9b858o662QihjybQ/7KJkANQRAEQRBBkP9rCqSKIAiCaIcrx8y5I/GDQ5vxHIqnDrGfzeaZC3FjptzZuvspUFa23TD7rslXsu9MvOO61t3crPIEG40xB5vzR/UjM3zy0Ik/i20Q3k6cjh1sji/4Hl/CH5KCDv0I7fzRD99/97qxlu0kAS4Q5tb4rlTK13b+UBjLkR9XTh47uvHd9z8E0S6M0jl4HGHdXPHcEc7KapZtZEUYp3sy/ugVbyE3mlvJVi91xnuqy5MXJDSu5D3mVjpWbxR/qFdRBbB3eAulu6xkrhLwGEMyhlDMpBVsXD2lcoOYyNwNjVM2Yr6H7UBAcnkhf2qLmmG8s2S1o1L2ZtJMD7so2XIt2N7D8ODFurm+YzLgxR+wwk/rFEdyxN+f7Vi5iZ9E6i5PXprQWMBt5u50rN4jrjTBWfKio3KqUP6WobLZ601O9EVOkl8rTNces9L850qmtSJ+XSYXrB7tLeQz0d7EAKET3lEevZFWoM0kuwjfL+1BKuD2Xm8hNxD3nz9ftnnfTrbg5/jGdgcDJkyYIEWCIAiCIPxRIQyToErga8FFcTfTphWCIHoXPX42R+Q517Rl86HBIm6ioR+HEbXwczrYFNPMQ8R6NkfHse4xCYlmT9HKavN+laB0cqDox7JpJUSaXc65jb+oEmeR9iY8y9KrM+yn7du60l3wMMfbb78tawRBEARB+EcxEIxlKEBz/vz5r7766ssvv/ziiy8+//zzn+YXU5iDIIjeRV8Nc5z7sLryxaP4GNbBt94xBR/govNh9fba4XfpZ2pEGy1HqquumtjZGYYjzGGciCGroQBdCsuTs1Z3JMjRqYF6B50Nc+jHYfQq9hbluSeW6I+zRRpdRS8MK7DqIwmFOQiCIAjCzIUuhDk69TsNQfRlqv5Qderzz2WFiCZeePJJKUWGny9ePOSKK3o0m6OfEo4wB9FVOhvmIMKAPJuDIAiCIAiCIAiCIAiit0PZHARBEARh5gJlcxB9lMmJkdrtvbdhr5QsUDZH1ELZHH0VyuaIBiibowcJFub41nUTpST4x5q32U/4r30EQRAE0be5QGGOLqMfRQZy4dEF8hn7+MT+IrbS7/H+6sQ1T5Hz5BzQ6w/2j27S118rJY2qeX+XUpRBYQ6im6EwR49AYY5ogMIcPYj9ppVvXTfRFOMAvrXo+zFDvs9eGSDrBEEQBEEQARiSmOz1NgvRU310wYLR+GR+8Xy76bfFJzhLbEMYjSe9Ugob13xxTURfchh/TDY9+JITIgiCIIh+g02YwxrgUHx5fsC3FlGkgyAIgiA6wt4i/Tn23USjp8jJn2nPX84iDz7KnidN8Kf0dwPxP5jCGkRko/Ekm37bbYneavHH/lMNbMoP4nlOh9PVLB4yJ2a4SUyq2VWwru7wurmiCXpuwkvo8t2LiYuL3EuO4Y/JpqdecjZRSGvN9ldqzsmKoKFifUUDNBx55ZUjrVLXWZSTjnprPVJR04RCGKZBEARB9AzmMEeQGMc/PqmWEhA00vHxnuef3/OxrHQF7ggJxR1YbzncJisCqyZ0oK9p0LbDWwLPxpiq/Xi81dyJu7Oz5vrAl2s7jnLV4QtGdx3rYyEsTvokgd5jToffqxAxvkME9t9IIZiY8F2Iddq6htuF5tGfYP7Dj7p+30iGqmMaf0JyC3ClvEfifunsEeq+TEtQpFG3ALfbdkRQQpOshI9mrzc5cYisdBPNroJC9ouNVcerqo5vXD3dW1iAgYN4p6vEmSBMIk3CMMdr1R6Yyp8rmSM+3uEQyR2e6tccw9QEGl0rVzpWwySLEryHoR7vLFqQfJOxveWwN6EI5r86S/ghIs3xZyYMyN2F8q7cCQMGDJgQoBoGYmNjmz87KytA65F9p2+9JREaxvzkJ2NipbaTtDY0sOuHcScd9NZw4N3T7CouhWMaBEEQRA9hv2lFj2iA7BfgaJe2wwfbEhPbDgZYCyjgl/1A6wUBrADcLGO+wBl7hi8L2uvSVYL7PzNoHE4mtc1tWsl9vEdONSOmZo+/B7GQ8TL4f9ufjw/V2P2NoO3wnoZE59QRsuoPzO9grFNMYtZNMVKpuxox1ZnYYJpAEGDaDYkwb91ZhwmLkz5KzE2zuvW+8G82r0N8gwicsQcDfEfHpuL30fz5Ab7X/AntQj7e44Jv3tA8+tOdN6rt8Bl5i9Sn1fr5tWh8P46sn3FBSG7NPw34dRs4U2NjU8fKhj5NXABkc3dxzz33bNu+3RTpgCoooUnWw0bzvp0ifwEQKQyel4vyZIZFs2sZ5jIUqWW8BzUj0/OWYWCCI5W8i6dopDRuRj/c0hoEONV4OGviZNwUEp92f3YWa9zXKCfA3e4twlHwVWQcqhDUZ0dJm3iv92QjXL5j4mTGJk907NzX3HjSe+9E9ej8U3+uZEvn8GqCM/te1GncNOU2HhAZknAT+EEVETl2Pb15nyHmPsGWXbhQv4w98cxxSzU8xMTEnz6rfhVqOPDu4Nt4WMGX5dFQ/cpT65+C1yvVDcIGNE9ViFQLP7mp4hVh9tT2CiM9pO2z04NjrwQhmDdLRzB2/YU179lc0aAnm5yrqdhu8s+91TQ1CP0rFZT0QRAEEW34hTmsqRz/+KTadE7HP9a8zfetAAESOtpONLDEsWMTWcMJ61KgI5xpbY2NHYRyzE03dXzpFG5GjMA5xAwyL8c+9jYkOkTjiLGppgsXC5mpDlkzaDt8kKWmWv9IIO7e8ADLvY+9balTLWtBf1cxN42LqTkU+p/T1S3uCmFxQnSVtsOH2NT5U0fwbAHBlhPDZ82fyg7ZLMrDD8YBekGwy/fDZFAsfmysn1+Lhn8wU8cG+IwLQnEb4KeB4ONDNTHjov/u9SHi4uLuvusuPdKBMQ5QRiDmcqrxsJG/cKKxjlVWO+aUHK/aON1bOHVlY8bSKiFveJkHH5pfzitkUzaKFIxstm6lUh4VyqKJ1QUbvDclDBHKuTsTsvdwyylHC1WcwiBt4r3lhc4i114MlaQVuAp4EseJRn4uBigmF4hEj6qqF7PYTQvmiFMp2/PZYYYkssYTpxoZnzCPVrDGUzCB7k5sIUJChDJ2zhfy8WNHxtw9jbGR0+4es3nHcVNVmHSd2KsGN7fJn6YqlQP+O/mMXZ94JY9BuFoHO+c99tg85/WtLhHRaG1tjb9apFr45HM1r+xm188Gs8fmj2V7KsUffs61nh58tfiJGtibTcfY1LE3stHOx+ZlJqqOYLb5o6vHzvfzzxrqjzZ/dILdctdjj82+/nRDA8U5epjDmw6H8pLWBEH0A2yyOTC0ESiDQ8Y4AiLX6THD9TiHniWBMpRuHip3Genb4s+ciMyUGOFIbNX/bGruohZzliR50eKn1DS+gbAOTVv27EGd/5QC4Vu9SNrOtPkCMoNiWlvPoByQtsN7WsdNHS5rGirKwWcpbxmfoJBg3JjWQ2KivttpdQWLLJiQrAQB/MrrFc7UfRAXb75LdhqOyYlupuz8PUvEVR2Wb6G6mkDdbSzNWOYXyNXHUg9KZWK4bdfAOo7p6kzNwqHoCpIEDW3wGWuyeTyrwuDjQ62Om2Kg2cj4wfyImJsczLooNyGGa/fOBPFyQiRy+PI4uL26LVCRGFO2aKz+hYlotTcO+X0MPO8zra08Zmn9/Hb4E+1HQLco28NjmBhGIboPPdIRyRgHP5kCAxOAx12ePH1pgUiyONVQl7zUJ4t2Fn9/SdUTTtbY3NzITqKKeTatZAuKxCaOhLSJo+vqRg+LN5RpPHoS7/xFVrnbnHyR9kTVxl+wyt/OTXfmFclgB5+Aw4EpHoJGV95vE+QOkRB8dhR+PMdvN3gxsMLib5vuLfyZVya2CIaAwcpNYhhP9WtCRfQIx5954sjsR6fJWn0dS06SMmCqhourro5vbcWogZHKwVhT/V9iRbR4aNKNp/+yr7qm4Vxi6l2PZQ5l7FzDRxh64BhhiCtTfzIvM5W1tp5rZWoLzNnPmtFJEG92HVvPno6PEeERo2PD+3vYrTNSh3IfsdzJRw3nRBiF3XjbxESuBU5/FuQ/SKKbeK89pB1BEP0D+00risL/71lrvIM/WTYQap3uH+ewMGLq/IxEzJznS6OP97hqYkR6t9gSggsTsHEmNrhgoSJWN6YuvC7ISGzQN8jAkkdkivtWXLpGptWLfszo1toWi778/FtzFORqyuvQnHcCsS/FfkUjF0h8bTorQ2RliLx39SfyhjZcwfoy6a2uQl2W+e6n4R7vA1yb9S7Z3jfA5MT2fQSUZ53WmlaR5Z+R2CrzTwJ2t1iagHdGzQ+HCezqIONvNnzXuJ/fI0R/t8ENbO+DujrrNHwE+HZtD/43frwMdV22bwSHf8PCB9CSEwDfxpbvBxHO48jIQQh3JgitNTUNieZhfW+69drbuxt+n2I745DfR2cqs91jwm+lO/TIAv9USedwi4P91a5Dbg3ETr9AWVxEJFGRjgjGOIATjSIwATSfPJpsLPLtZdycsrJg5coXNlW+xnhIYm91udy7wRmSmJyVkcaVrG7dVGPXyc/KZbM/8ZMLSlxVG38xxfuzuSI1gw+UoCLjja6iF7Qntobms2MkDGOH61RgJd7hYEw7mANIcC5d6i3kI27w3oSaYQ7fEaREN7Hr6fwxyx4ZKWvdxJWxg0WAQEvl0AINLDFz3vwZwz/bt/kpeRSoCl4AKn6BG08qd+yoPHCg4S/8xA/NSTBvdh3b2poHX8W9Gh0b6o/G4xkffpz9jBkT5rManWTZmkz0Epq2rH/jLWMrkj1Nb/+2NrgFQRBRSDthjnUvbLZmdgRJ6FBRDoxzhLREAnj2gZEgEXPTuES1TBc53nyZ6luN+ZB/5HUbWyw5DWIVqK8w/TR8IGOB524whom1W2AMirXo5EZ6hzfYX4jbQ0QmrFtPrIyYmsHcz8NiT7saYynJM11azwRwZUnnkOEZwOYuahj3wXqX7O+bhYDvo+0djjU2ATgSRc8g3S2W/lfEF57+q+wgrvCGcVfGrJRbTlADXgT+/rFOQ8fu27V94M1s8AVpAkxAwquwHLcEDsDIFLDjl2mOxrR7Z4IQm5qhx5IQ7U23XnvQu2H+FNsYh/w++r37Cv4NdDDW2YEtNiOmip9DwJ7WGPELr83HquNuEbvgVNiRkw2ANCIiQ7PXywMTHG33iq28twg3p5S4SkqemOhgWkhCwo/5kMqbFoi9LcbrCXXehcjRMM7vAOInO5cuTRapGdqgja6igsaJT/g/0jWIz06SVnC8qkDsiOHwnTIF0qnxQFmewMKHKylxoSXvUgVNvifOduOxqf2U48eOsOenDxgwYPrz8CV3V1Iyq6uXbYCpGjZirh58uvVcw4EGI5UDfiBioOFczSv8qSuxsUMzfzJ7KhO7QhpO/OVG+N1SADKGISp2n+YbT+76yU/uykyKZULpO380sDf7jmpTjIp3+NFU/5fBPIUERletxkyIaKWpqWnatGm7d++WdZ2W2r+w8Y4PPjAOfLGj5Vz7vwcRfY7POovsT0QB7R9BCry9/y9QZty1AMpgqRziLExjEfa8qwb+F/GGFucISsxNU1NjzZ5gQSH+3MujIL7/h+B/wVj/NY1Vw4/LlOjhEDMwaoB1x4ipGf4LJz1/ApZZliwQHe0WwQ0CqfMBE28AVyolxECGZ9q5YH+sdynE+9YtdOaKwkWn7oP9t2sIiCudyvg631hMB5rAiLGx3sNt4hRa+RHEGNBhL1PxhogxSKQfueziaNZrb+du+H9mO33rJNYwDXjk+R8qGGH9/Np+oo1vulkOJj5g5m/C9t2ibIVHOfy2wUUEOdkASKP+h9qronavyIZwogUmtN0rfjLP1zBk1igewdrsWVZYjokPkydmHa7kp4eC8uWV6zBO4VOy5r1FedoJppyE26bcVL7hZY9MiGj0bFpZx0MtatBGV15B40SXEXFAgvvs5bS1tETuVffTC3IYA9CYbHrqJSfUDiMfeeeCYOf8+TsvlE4bOWrMkW27GDu+a9uR2TNGmqqyU9eJjY1t/qhy3+lEIzNCBRqujB3M/lLfxNMuWk9+Jr6RfTGI1iMV+7QkC3xcS2tThesoE9EH3/mjgb1x2u/IAzHNH53kHdm5hordf7lxLPxX5JsJWtqkexBRQlNTE/wfl5iYOGnSJKnSaKraHzMmZegNbY0fSQ1rqX1D5m6cq/3tG7Ut52pf2//3E/s3C+W5t95YX7AeXu0lgBB9gZs7wuWXX9540thpSkQH5jAHHsyBZ45edeW3MN7x/fE3Qunevo5bBIl0fOxtUH8k5sCyBKMTg2LVsgVsxFc/+KLBiGO0HT6IR198fNgIAPC/kpsXCeqAUt6IKiA2ceqsDKb/WdlfIwayzZK38LH5gbIff2xU+XWKscFGOOZ/csfpf3yoBtNZjCYzRgI+ALcHbpffX371RAx8TAPM3ZjGCIeRtI/3aKq9q+ArqlCw3qUQ75vt+xg6ne4eMzwx1mbCnZ9JIILfB+s0FPbfriYCfkxgQQ3vMP/OCDqBmJvGMviuPeNbfg86vOX5PWxsgHhdmMF8B+t3vfXa27kb/p/ZkG6dlVa5ZY738n/3rWd9Wj+/Np9og0CbUkJxaw9MkXXtE0t0Ev08DrV7JQKRDv/zR+XuFT+ZP27WOBZ09WjcwbGymmUli1ae3fCio5LvJVlZ3eBIlgERpUyf+1uWXeQfsOCPZV09ZeeGubj9ZOoG9uJGnihhnD/qeWFd3eFyMRB/5YmDTtvz2Yv59LJPI/3KGftPORhjIJtae/Ylp9UhppUuY08MGJD0BBNbWUzVsBETE9/Mrp/he26rceIGS8y848bTu59/av1Tzzcw55TUWPjPIZHt2cyfbHLgqqsHM4xHgNng07v5Y1B2nGA3DhY+rOeP2niz6wgM/ouL532ojrGpdzkHN/COT23ex+6Yzw/18EVDTHKvZVpqathf0nWPomIcTz/99MCBA6XWR1Pju9cnXM+uTHa0/SnQtpQrU+4df+3w8bN/kXJlS+3e/xNzR9G8eUV3xPyfvbWRiIoTvZO//vWvx+rrRyWF7QSjz97/LHpeck52mCx79iXnpDFgwoQJb7/tC1uoh6pgvMNewDDHT8x/u4CVvSlhu+3wFlfrOP7HTmjDlHP4YcMPmOBWUpeYwQ24KZ5erdbrqo9ho1S8Cis40YH/t9cWOxW6qPGFLwZuBh0ya6Qol0vcDywMfbPW/IPe/xAOraM2HaOvMVmbJg5ULUd6gMM9jE9c1jmGjsFgDYnGfFHCZpyDMYxEd2U3VAD0SfpPWA0E4FhWjSRQR/191G8FEmDodrrbukKgSX63yNl1wJWS2zWw3hm/7x9hqU9DdTS62Xy7CmtE9VYfkzPmywr8Rkh8M9Cu3B/dBG1gGLuL9clWQXTm+Gmg4m4Dj+qjBzrrtQe5G0oQNvwzO/xEsFtnK3OBJWKSs/km6fcPkLcIeohb4jM2a4y67U0P3S0HtPpH1FTt47S0tAQ6/yJIUyTQYxxS5a+8cIH/H4d/4Ea+9gc058+f/+qrr7788ssvvvji888//2l+8Z0TeLAi/b504S/sNHuWzd2QuLHkfhkqIaKN9PXXVs37u6xEK5MT1SaiMLO3IeCzear+UHXq889lhYgypqWm3nzzzbISDt57771dNTWywtiQK6449S2RphYxDm86vHLlyuLi4ueff37oUB6MssY44BpvmoMnAHHOvfXGXjb5zkk8SNW0ZX3jmHnfvx7+G6h94zU2+RcpV/Jsjr3s3jtTmKH56O31RxLmzRLOlX0UM+QfQ9LTI/SfUd/ns88+0z8UCQn8jxWNjTYPNlcxju9+97vwnX/11VfLBkFVVVUnfiWARXt4P5Kdhl/R9/yuSCfK5xkwzBGEQGEOIgzAaskS++gIXe1PEL2fj7XYBxFdBM+V6M4wB/wqfM8991hHhBm+/vrr8MvxhagJczTvLVr5s3J8EEvyvauXPpFGQQ6iK1CYgzDRN8Ic1dXVjz76aENDA/x4B401j8M/zNH0dsFutVWFY6RsGGEOMPhLzGN9NMzR7Mqbu04+34uxrNVV5uQ9MFjJlpb4H94E2Og9RXkn51gtI4WnKL16omW+YUcPc2CMAzFFOvQYB1QpzNFT2M7TZtOKlIJDMY4IEXPT1MQG2yMOQkE8XyTiZxkSBEF0jrigSKNuAX4Dth0RlNAkK9EBf1qKcSZoCcU4CIIg7Bg4cODTTz+dmJgIP8MBU4zDzEeNH916xzy+AwVfs8czbxPG4U+08UNbrCePxsVc+26jOKy0qfHda2O69b+sCJC8YCMswTmrWWGe+dFW8c6SECMXzSe9UuoGPEXpheF4BlgH0GMcgF41xTiIaMPmCNIgkY6CKad4KgfFOCIJP9mwswns/OSP/pL8ThAEQRAEQRASFeloJ8bBWO2f2B0iL8PgypQfxuyvamJxKTfe+tHugvXrX2uLwaOj466MwSNI41Im//c23lSwm827M6W3hzl0kqfwQ5uaXXl5RUV56enpRR4ui9CHpwjqoHG58oxTqRs3cRtuxfusXFdXt24uGEOXoiK0Fk0C2V1pwEgqjMiKVRMIsKyeWLU6S1Z98EFkZ+6tPT8do1Fglbs9xnHipXsSkMWVUhVWKhff89IJKXcHlYsT/AaE64M6llLVVQI+acUa7PjHmreXv/oxxTgIgohuRmgPPCEIgiAIor8wcODA3wqCxDiAlF98Xw9ycK7/Pm5IGTpL5Hf84vvf/wXGMoZ+n1dTrmTsykl3YvZHlG9XCYm6dXNleKGw3GGcjV3nTVhaVeXbEuIpKvSKrI+JjWqPi7RZnVVe7WHxzqULkpMXbMTUj3I2UaSHiCYRc9iQgDkjq1khD3R4Nq1zrEaFY90mbmPVBCTeWWK/VyWtgHde6Wr2FM0Fb92wgaYnYhyTy7P2ijBLGcuJQEDixMdHpdQtnHjpWfZ4VnlpRCI2BvZhDgSDHepFAQ6CIAiCIAiCIIjejbZpJat8g0yAwLQORfNJr9SkTVRJFFIzJCHZe9KUNpGMDwIzmk418kQPGUphXAUt5YW8XsQKMJhi1XSKtIKNUyrn8phMxE/t6Im9Kif+XM4e/80DmF80JXfvwz/gSpX4YEj86+LFPOljcaUug0nlYpEIYqSCQOvixVLFNSde+uWKgwdXTI5A/MSWytIVo29/4AdZR9+MZJwjWJiDIAiCIAiCIIj+Aqx/cPHDUWunblr8dIWb20PaEWbSJmbVNUboiNgszNTg8CSLeGcJSBsXYGiD53dYNZ2jeV9lHWN1lfvCuWHFh0ij4NtVeuY8jo/rD44egUEOYPjwKcNVxcTBo0m/gZk+OUWX4SP8bJJKBZF7Xl5ltwvFj199s5INf+A3j48b9/je12UoJcJUvvnqj2+fwob/IOvosxH82UJhDoIgCIIgIkCjK89pbJLWZROBmmz0nqJATnqU9PXXWl+yjSB6HbDaESuixrLRK37ZCwIcwE1zbgrlJa0JPzzV5VkTbXMg4oc5ZOAAbFDVEXimBuaJ8CMzijzGFxHaWJ3F8zusGuzaQfgRIXzvC+5dkcrwY4pxYCwQm6KFcVk/UIEKJX9czzM1xGxzXmVHPxaf6XFJ4jTHEUnjpKLbOPHSs0cfz+WBmOEPPDx6ReQ2rlCYgyAIgiCIniPBWeIKbS91YyeP9L/mi2si+pLD+GOy6cGXnBBBdBRYAUmJ48vzMLLgfUkeUJF/IyZ6CdrZHGx1oJ0eaQWrHcKumllP/kR4KEQcQSrrGvHOEtmdH5kBY3AFE1tUYFTvgqXOeKtG9u0AzfzpuMK/nG/nc0KC0TN5HEg7sYiP6w9KKSA/LsPQJdBNGRsBqSwV+2PwZ0nOq+zViCV0UJiDIAiCIIhuZG9R+sh0/lomfhlVWRtSX+R6Oa9oL2+Btk1OZdnsKlhXd3jdXKcL2zpETFxc5F5yDH9MNj31krMhiE6gr55OvPRLeQQiZrmzKbmPM/mH2BMvPSty0InegsieUMggByjV6Z1KTisQJnMSvOLgDZ+NvwWINk2qu+9UU6UQm1jsNUEBc1NQBobz929qDwc9GeMAhv8gi6nMKn7MhowwHqz/GMp2Tw8dkTROxhJ4rLKHA5J8w4ov5tLYuPdxVv7nyMQ5KMxBEARBEERkOLxuLkY0phrH9De68n6bsPF4VdVxcfa+DGcAnqKfeRfsAf3ExpXGkf6HvQlFoFmd9Zo40r9oQfJNCza6nLKVCDfHn5kwIHcXyrtyJwwYMGCCrB5/xq9K9Gl8f2k9qo49ZMMfeP037JdCK9PeYek1TgQ8xPmIIged6GOo58HOrZzSqUyLPoE1xiE+HnK7ii5HDPj4lY029p0cxTM0hj/w8I9fzQHFL+tH62lXVny9J68YXSbO7bAwfMTo7jiClD9hxX8GEdy4QmEOgiAIgiAiw00LMKJRtWdBMmpONPKMDBH7KHyNeb1GpnPjSe9NU27jvyumTbwXVdAdNUMSbvKe5Ke/ERFl19Ob9xli7hNs2YUL9cvYE88cFy1GlQIdfR91Nkejlt5euThhcv3DXFn2Y6kSy6w3K3mUQzsQgOhDdDDToi9im8cBHwMpCUzVyDDlSf7p46iPpVS9/uSTrwvd8AfwK0eXAdUbQwy+ViUJC71LRIDhLGEWGBl0OBHTtLsGhTkIgiAIguhG7l3NAx/iVXJ/f/37YPQhIhs75wv5+LEjY+6extjIaXeP2bzjuNABI+FfchLKRP8D96VUvvkqVoEpt//41Wd/WT764UgvjgiiJwiyV6XRCG0ogYg2BkyYMOHtt9+WNYIgCIIgGLtw4QKWiq/9Ac358+e/+uqrL7/88osvvvj8889/ml985wS+aE+/L1346Pc0uvIK2FI8XlTJIEytnLKnxJnQ7HLObfxFVcFwbBq2aeSGBK73FI0sZC8qPXQHy5WsqMTJNIcd4ZovronoKRXX/eYzKWl88surpdSjtLW0fHrZp7IimJw4WUo6x5+ZkM02vDPq6VxWWjptV+6EY4++88hIsXeFS+yZ3KT85xmbv7O+dBqPdtixt8G3B8lE1R+qTn3+uawQUca01FTf81ZPvHTPL9lv9D+oSs2IUr5dhbEf//jHr77KyuRfhaGRJ3n4/4H2vffe21VTIyuMDbniilPfitADS4mADPnHkPR0+s+ok3z22WeXX355R8/jgO/8q6/2+8lfVVXViV8JPnvf5v+UnuLq7wX8vyzK50lhDoIgCIIwc4HCHF3HNswB8t6i9J+JhxPeu7rqiTRfk9RnZd1bzjLswhwiAlJ+04KqDh7PQWEOWRHYhjl25Q7YdvcFHt+wC3NsYNk8BvLISKhtu/ud0mmylwkKc/RS/MIcHcMaFOFQmKOj3Hf3fVLqOH/Y9gcp+UNhjq7w2WefwYfir3/9a4fOHA1XmIMIC0E2rXywYaGPp978O/v7m0+Jr6IJha4g/G/4QNYM+CBhcN4JTBcVlmvsCuJOIMEmEsF58nfI8gYZdP/96cSI0CXgBUSGUN4140LC9YHy+YkE1rkFmW3XLoQgiD6G/qRYXZ5cIDetPCHOw1dNUj8n4WhyAqyafF3ina4Spzi2owAM6AjS8HP82BH2/PQBAwZMfx6+5O5KSmZ19bINqK9js2fwHI5pd485ckztYSH6N/yBD5NX0IaVMPHZ+5917iX7E+Hmvffe+/e//w1l6MieRHQQ/GyOb2ctXYs8dvu17NrbHxNfw8e3v/3JTtMKqqL8b1Lsz/CF68pPpsubv/Z+9n73LtY5f39z5yfjxpnfICIwHX3XuvSB0gIK4f9gEgRBdD+eInwmy8i5ldOXiqBGOGlraYncq+6nPPdHBzQmm556yQm1w8hH3sGkpZ3z5++8UDpt5KgxR7btYuz4rm1HZs8YmZTM8IQOfmbHqEB7VnqYw253KC9pTXQdPNTQcp4g0Wlu7giXX35548mTsicRbq7uLLI/EQX08BGk113HDr2vLaM/OHxw3Ljgz8TpB/z9zZfLr5u3NvsGWYd17O1K7i7+/v4hNjYzc6z/G0QEJCreNYIgiF6LyNQQr7CfS/rpZZ9G+pUz9p9yMMZANrX27EtOq0NMK13GnhgwIOkJtuyRkWzkIxtmb04aMGBAdt3sRwPsWIkG5F9UAyPtCKKXo47GlHWCICx0KMxhl5HuS9LvzO6A6zKnX1deYXTk+QNZmTfJGmB2LibwgVSCSrX7puXroibEe23YAOqnnnpKm2Wo+fU2k5AoX4bJU2++6XNq7hcyf3//0N/G3WS7Qra5Oo1g174B6yEjohzfu/ba7/nHOXxX+n9V3TcT45ZabpFogHsj0O665R5ZFJYRO4eYQNDvHMuc9aFDeFsDv2s2niViVpabYah4K7530M3fCdTWH2R/K1+pqtbpqdFEq83NDweB7gYOatzwMA9KEAQRfeSM/UfVPP6zDkqQUdkLmVZqHLwxrZQneBjncMh0j3dK+XkdfQRvxfqnnjJer9S2SXW4aKp46o33NKdt773hP9y5917xMyAIjQSBrPgT5PEfBEEogoc5xDpKYFrEGHywYeWhsbixZR7r1PaGG24ad/AwOpcrayFzbJ3/rXwnu59rxh1cv/BlIYL8t3KMlUAX/hd1ztKsT9ar5dXfPrkOLB97bLoaTCSOTA8h0/+DCsOj/EP9DdlYgxngpHyD3s8OHeQmqOzCnfn2dXYTC3R1SPBrz8ZKqKj3wi/OYb3Sa2+3u6WWWwT8rfyTm1BnvFmwRFb3CO+t9aZZR+w0wb9zwvG22r9rtnfDijG9pVms/GV10/C9g3vj7wRq88bhnjJf9gjgm7Ppe8By8zuE7+eAYH1o3+S2V0QQBNGXwUgHEW00NTVNmzZt9+7dsq64cfa8xx7jr9zveEsrmqQ2HLS99xf2Q8eHHj+f8T+cjcPNHry//L2zUksQZlSAwxrpoBgHQYRIqGdz+C2mFH//v5+oJdD6g3/7pDP/u9+QmYXnP/B4gh53sHf+7az7hc0NN8EyTwZFuPzJ/4V23sX4izpfgKsZaZZyUf7B4U+yMm0vysS11337oH9EQf5h3VjswaDflq74mELX1Ttj2yHg1QnavfaOoEWceJyjXMYl7K7U9paabhHH6Ol7s3j6g1+gyXrTbEfsJEG/c4Cuv6227xpgczesGNML9N6F4oRPz/57wHzzO4bv54BgXmjf5LZXRBAEQRDdSlNT0/z58xMTEydNmiRVVmJuvvHGvzR6Rc7FKxVvv/LU+qd41OPce6/I/IsKaMPW986JHk0VhpK11b5iTgZp8vwpZtTNQ79zmvu0EhMH/z9eFTs4JjZGdJdZHj2Y3CF39YQJ6ZToFKbQhl6lGAdBhE7Xz+YYh3885tjHQtoD8wU+EBtWzA667NyMDKrw7THm1f+1131bShy+hLvuv4EFP99x7f3sZVjK8ZSWv7/51HomZrU0S7e3obOThxvybZUh0SPwg2CN9evCleV/Y8GmY7mlHbhFVsL+jodG19/WQO9ah+8G/84z06VbGlFCeb/sroggCIIgIo+KcTz99NMDBw6UWjuuiotvaxVRhubTMVmPzXssc2jbe3s//I7Iv5h9/V+O8byMmEQH+7CJW3kbT8dfe7qVhzzaGrzsO0NjeFcDb+NfbkxwsCsTv9P2jgyL+NHWwoP/jszvO8DWs38wJpXMjvmTf/ZHd7GrpibsL+m6Q7Qc2V6wfr16bYnozWiqLqhWA5zbu91+UJjSs0f83kGpaarW9NB9+16fVdOW9XqVj2VyEhR+sGtjo1UOe4zDU5SuyCvyNEt1FxFeizyyJupGrdlTlJeH42kDNrsMnSLPFXQyymWzqyi4ZUBgUG2OOkF88k5S7GGaXc70vJc7dunNL+cV8Ud+Q988l/yeahdP0cgA96kjGEMrwuO2XboW5rj2v13HgiXih8a1t0+/rnx9ud+GFaATzkUXudSEZfdBm7MSRFClosJ/e4wAOv9NJdfzhb7W+9rbH4P1Jf87+N8/+RvuTeDJCNjG+xnbMHbKP7Z36c7wP38fXK9tFPr7m2+CHPzqQrj2UPng8EG/v9/DpQvPtlcKanlLjVwc6y2yRcQF/G6R9aYFGDH8hOFtDfCuhXg32N/k1iCR5GJ+70K9peH7HgiFYHcDCHpFBEEQBBFudu/ePW3atKYmuVINPcbhR7wRs4i5+c4stpfnWWz+iJ0+x6MbMUO/w7wNbcx7rO07WTcO5iGPcw0fsu8kXil6IOfee6fth2lDQYq5+cbBf/pAJXQ0/2kz5oZsPj0+62bZJSbu2r9sFgkj7PuPZfJe/ZmEW2cXzZvHX3eMfvfQkRCfFNRhmqoLdh+VMo9cVH6QKMadfesnu6s/lGp74sbc9fCYK1vOtsq66H567F2TjW+BliOH2K2JH7yvxUuGTvxhW6Vf4KPDRCCPo/mkN3nBxirBxmxWuLKTEQN/uNfk5PJqYxEL9ayJ/NHhza68uRtY9lI14IaVuNKNd5YI1eoslrVaSFUlxtPHbeFDJAwBwbNpHRvWqQOrm/dVMuHCQhCfopOUe5Tml1dWsmRZCZXmfTtZAn/2s3pAewg0nvTeZH+fOoIa2mBvdfm94psiwnQxm+OGbL7xXv7ZP9ABHu1zQ2bWt60HZXTCOe/yyXphz08NsPv7Mg+qHDzotz1Goo+3/pMs2VtuFli4ErfUwFTR5uVPjOyPG7LFcQ9cx8YaGyu6dmduyF6rLgR4mX2PzyX41YVw7aHBoxx+QSCVqGB7paKdwS01VrI2t8iWa29/bN51xi0Sd8h60wKMGHbC8rbavmuh3o1vX/cJzxji32fzLO+d3fRuGicSbvzmELbvgdAIejeCXxFBEERU8qsf/SqUl7QmooxJkyYlJibOnz+/SdChGMfZlmaxhUTDW7G+tOVGzOaQKp6gwT5saGo9DcZDRw32NnibPmSORL2j94M/Nf/9T6W4D2X3X9hHKqFDnc3x2E9SVI+Ym+8ETe4PMdjxtu0ml/7I0OG3nm47zSVzqkXLke1bqqtNyRcfVgub6iN7t8s4hdRYs0LOHXn2xPCiO0bLKjtX28BuGCaiFFeOeXjexO8IrY+295/1H/3Z6upN755ufHezyNFoqmpITPeFp5qq3o1NGTPshtYTerjkO9/zD3x0jIjsVeGL9im3yQV9fNqcBaxyH49z8JQLTKkw8i2sGmZouAo1Bqca6xzZ2VnlGzBoYsQTml0r1zlWlxSkqQELlk7xqmAIoIIXZnyjyzgMH2JYfLMrr7CclRfyzA/LDKExz+UCpV9eiGGW59onXIDK37nu025c5hgmpJ7Fs2mnI7toCms4JRUwVSc+jt2UNMFYo2zKe3lf42HHsATG9halL8Pbbu7Fcy5edgmlke5xorFuNAZ9DGNnkWiCqrwr0IvnlRgDgYEH+1qHNmj2epMTT+JAcsKW7sItn4y989AYMGHChLffflvW+gcfbFh4+KbIbIn4+5tPrfxkerdutyAiD72tHQY+ZDuvW/qYNZhIEL2FCxcuYKn42h/QnD9//quvvvryyy+/+OKLzz///Kf5xXdO4L8PpN+XLnwQvY9f/ehX7Z4scPPNN//6j7+WlV7I5MTJUgo3extMv2L7qPpD1anPP5eVyHDY7Yb37l//+tejjz7a0NAAGmuMA967mzIyZMVbsf7YqHmZDi63vfcGj2jwjSpvlLPJPxGpFsoAhM2nx+dibKKt9pVyLxt840+Esacl5nTcDWiP6G453J5l/SSFaZ41zr33yuaWCWjfVPHUX+Jy77zZP9rS+xlyxRWnvqWWZIFpObJ9E5vy8Bhxi5qqCw7FPHbXGKaUoDkxvGjiUDB7qm0sCEqjjON4mgb72byJg32umrasP5FiDV6ovsJg8K2tb7zLgyq33jFvlpZSw8d6NxYcfufckWc3t/3Q8DyHVZpmJTsYVb9r4Zzbu/39a+6yTENy3933ffb+Z/D9KesawWMc8D2/6+NdsuLPkH8MgUW6rFjxFKVXT6wqUH9Th1X9yTklwzalF7LVGwvS4ps9RXO5wRBX3kq2lOdXGJq0ZlfeJra0gKtceXMbszUvvGlYSQErSt+QsBE6yVF8TnyAqa4zz0cC06qeuJTPx1U0t1GOjv1wxk4e8DDPEJwVehfwCUg3AM4VLg18zsXWUxbnhk/7cfmldTAJoaqqKry/EsD6n1/t/aeKnCfnuPgFgoa/HffHs0ZX3tTG7ONqjs0u59zGX2wsmMw8y+YWHl2w0eVksnu8pdeck865ldNXL70/je0tmuueWPVEmjFWvGdZXnXG0oLJ0KtobgM0DXE5Nw1ziXs5snoi77uSFfEkkWbZFwzMQ6v3wrNMfJM9kRa/tyhdGpu6p3Eb2QuuwtwqHbVH18/m6G383fYQkPDAt7rg5gKiD0FvK0EQBNEzNG5ZMHuL9ufIMLC3YW+EXnKAHmXgwIFPP/10oqD9PA7cLQKv0g8duZYNI45R16PBMXY9a26Tx4PyfSt/Z3FXcTHRcfovbX47Vtpq32F3+GIcQEzKhMH7PQGTNK68+Sd3MDmN3ad/OLnPxTg6RuO7mzEFo2B3651TxsSJTSJzWKXQHGWtZ3EbS0IMv//sqpgEoWk525qQOAyMeQ4Ib2Cn23i2hXC1+13W+mk7G0aOfsCmiM0ydzDrppXRw3ls4sphNwy28cOHxslwzu091Hrn9/g3UtyYsde9+76/q3anYcUU40gQYFMX8VSX42YSSfNJr2NYPNeuxpSL+CEJyd6TzZ5N6+rq1s3laQ1zC8sZaKBpmKN83coil6eZbzjRF/5G8kbaxKw6nhxipGhgAoY0kvjrzPMxGDInO6F6U1FR0cp15cKVykLBGUNP6wz5sAuW6jEOYebAS4uH2THR1epc+rRpgvk6xNcepdG1cueUpffzuSewRowdxjsc5StXFr3saU5wlvhiHPCzftO60asLJotLzshiIi/jVEOdw8Gv0NLrVOPhrOz7xQ0anpB8lN/GfTvZlB9w4yE/z05wbypaVrRyZXlyItyF+GGjvScbWfPLG7xL56TBQIfr1k3lCRdzf1bOoK/d0AbNJ48mL/g5H0ikdQzh8zR1R5si8Q5aWtFLKPSrMMff33xKJPPjAyDChnArWH9w3Dz6A3Yfgd5WgiAIguh9DBw48LeCdmIcjkz5NFl9F0nMzXf6Ei4c38fWzEwQ+HGhgitv/sk8aROT8pPH/JMvQGMNl2TyZA0/z34MzTSmEcCgHyHP5rhjNBucmCJuxofV63nuBio7wq13iDM++Mt3cEYARv9Qpl1cNdgulhEqTe+/cfr0G5txs8zud9nRP3Xg5FErEdmrIjHiDwaeTZWOiWl+WhGGYDxgIA/w4GB+RFpB1calExs3rDQfFqpCF7gJxmOEJDBkgjYS/7iGeT4SD6yrq9nEiXPmzMnOShaujSHUdhibGZ5q9O3HkegDSNnq3PBpNy4PMpl8dj+eF9bVHV43l+80mbvuMA80cCYXVO1ZOrFhw0q12UQggwh+Mg8fyGMyTL0aT3rVeRlyr8optc9lZUE1y5g45+dzsu9NxijJkETWeMKzaaUj+/547nzpxqrjVfLlcjKboQ0axTeFCNZhzMXaXb6DwsbGecj0qzCHeGjK2rAvWNEtQvsa+gz0tnaFG7LD/0EjCCKS7C3iG19Hppt39uqEYtPf4NkWRUWz4baILerGLZKbn32t6QvKPFukIH7ZD92SndgkqsaG6iB9o+QpAATRRYZOfCyx4SnjSSi3DueRow9P+A4NNRF3VWxjw0me6NF04l2hGRwzWJ5geu7Is+uDnyo6NGX00Vo51NnTp2OvMcVEjopTNs6d/MDahEO3nUUZZqjFVviBpgxnxbHzHIxIxjhg7WjEH7DmKdrgnTInjadpiCQMoSrkYQhdw8+7AEk856Q5Pj6toCQ7Sx7oIdFiCfG3TWGVGypl1CPeme1Yt1Id9tHsKsrbwFZriQd26R7CH3NMdKalxbN9G8pVVEMMYYQy7GZYXW5xxs0aT0EjWK1cxwezcW74tGliLM3pnx7S/TS64KapBf/GpazxhPjvYJmnOSE+7YmS7HtZ5Z99b0e8w1HXIC55r2vlSpHEoUIM1l4nGuuOirNSGj1FP/Mu+HmaOn+02etloyc6J4u78Zo8TBSce38rUjlwoJ3iLWj04GNcbIZW+M77kDEXa3d+RqmRAGLTGjL8bI5du+z3dBEEQRBE/+SC5WwOQB7LoaHO5vj3v//90NIXOnU2B989u+4wy3qxqmCyLsvmwHjU1twu4ykauSFhT4mTmXb26oRi0+vp8NkcjVsWTK2csmfdLPjFEeRH2ZLNs+Ad8SxLr86oKhhutDJNAJun2arQLaf+doT43tgye+6JBcIyUF/xt6/opHvO5pBSUHxncxDdRafO5uBHZuz+5NbZD1/1Pj4V5dbRo9896n/uxrkjz1ayOXfxvS0fVq9/EaxGj771KMOTOKTGctyGxO9MjXN7t29+gx/NMfjO2X6pH3xKbbHs6FFYXKEfOUkxqwSY3pizW7afTYc5wGTev+phdUiHAOZQO1yMbteqYTqbwxrjsO5VwQfNdvJsDn52RbmUWXJyVjY/hUJUPEV5heV1oMxaLXUWTbOL7+QADagWiCM6DPzO1+BnYaxjvgMymj1FK4Uj0S97jlOOyPEdr2HCN3gW8yaAxSljCI8rr1C6N80wgDM5bfDk8LKJ/JANq3Pl81TAcTtIVfjO5oBFPh5RgRgHZzDXspXrXuP3NfneBUuf0C+7GZuS781yHGUTXQVpe/EsDLgK2QRG2OsU/G+SuMC7cl0dXPOL/BgOHgqRxvDLRmH5YfjpKe4GzsH/HBDPsrxC7s3oax1amAHqvA/uoYAtFb/DmLr7bAQW56HCwxw7duyQNYIgCIIgQghzQBWPIAXwCNIF//liZ8Ic2v/0fnK7dMg4OD5XvrO+zIRi0/vpTJjDCDrwXwp/plYOLGXZxnVT9stWZYbCghN8j7FBMEse5jjxU/GrZHPZglVsyboRmwKOInXRSDeEOYioJdQwRxjQAh/dRsuR7VVX3WUTSdH4sHr7p98LsndGD3MEyuPQIx0Y4wA6fwQp0S2EMcwRSTr837opEhGd9L8jSAmCIAiih4DfDHC7AX9GGsdTNBW32hZ5/GT4nUPsSvBZmrYqNLsKhLHxULcu4UsijR82uo7nwVoJxYa415dRvC4n6O9/oVta6UpfguiDNMnnyxZsbrhBHFzancSNmTL40Pa9QU7haKr+U8yU9s4HQYLsVVGhDSUQRJgwjuEICU/RyPS58iTUqIbCHARBEATRLTS6Vq50rOar09WOlSvFFtO0gj0Lkm9asJH/uV6TxSnlYh0LlpvEdllX3m8TNoqV7WpWWLQ33lkkjMOSzUGEheHDU177/Rb+tjZvmR30BJPQLTnl1dygef/O2hEj4jvYlyD6A0MnhnzaaCS4cvJdQccdOlF7smwQ2j2Po1EgKwQRNtIKOrARFYzxoNBoh8IcBEEQBNEtnGiskyeZp028N2hCxPCE5NcKReIGk798QF95vnp64WvM6w1DDocP+fQ4QDuG3UQoNv2chFnrXhzxW/7cu7m/HbU62OkqoVsCY7PYOs2yQ30Jgug9fPe7343UmaME0f+gszkIgiAIwsyFSJzN4TvQyzg8Etao+hEbpuM2oDp1XR0TJ5IyX1+JybhL0BGkkg6fzUGEBp3N0Z/pxrM5eit4NoesdBA6myOa6SVnc/RNKJuDIAiCILoFnqMhHtjGPNWvBUuI4Ed4LPOwBGfJ8arV94rcDd53g9jnwo/tCPdWhbSCFx3rpqanT13neBHjF54ifEKqD6sNQRAEEQb+sO0Puz7e1bmXdEEQhD8U5iAIgiCIbiHBuXSpt5BvPClkLwY70jz+/pLVTGxaGZleeHQBP+grwVmCUYaRc9eNxs0LwxzhOoIUmFyAR1oamyDSJt6LgobZpm9yc3tIO4IgCIIgohXatEKY2bZtW3Z29tmzZ2WdIIgA0IelD3Oh2x4oG6U0u14+5byfkjaI8ECbVvoztGmlR6BNK9EAbVrpQSibgyAIgiAIE/EU4yAIgiAIopdCYQ6CIAiCIAiCIAiCIPoI7Wxa2bNnj5QIC1OnTpVS36K35+H/61//kpI/AwcO3LXL5qCmadOmSYkgOghtWunDXOjCphWCIAiCIAiiB2k/zEGnbdny3nvvUZgjOqEwB9FthPBh8bpL1q5ZUlYjKqk5rtLiDIeQeUsFy8vLwFqIeEsyclmpO0/6CIjXnZ/rtBs1ANpk3PmDdsw4U9yxefVBLlCYgyAIgiAIondCm1aIjgLrofyMQZKMfLdX6kVLiVvKtrRrQBCRZ08XkC5CxluS69w6atGhM5xDrpm1zrH58iPgXuvcyhJRDhlvxdaalKT2Yhzu/Iyxa5gc9cwhfdQA6JPJKKYYB0EQBEEQBNGLoWyOThIsm8OdP8hZJmXGclxhWzN4SzLWJrkjvQIJ/gdqmMPYrTNdpXn8j8NeNyzilqTIK4TrXjPqUJC/M7drEBYom4MITid+rP31r389Vl+fMGyY6VPfXjYH/7gcW6T9BPApLE0hEcpniP8AYv4/dmxUfnRuMn2cC53K5vj10rnYnWiXqqqqa5Yvl5XIkye/EgRBdIbl3fjziiCIrkPZHBEhdZX8OyrQt1YO/I/JOYtEjANwZOSVrkot2yH+UOytr2VB/87crgFBRCMY4xiVlCTrHcCROTO1bE2JL+XJkVl6aCHGOJbUsDLnIJFl4XWrBKkMX9qFv1a48P8MgRdoKvHlU3G8JWvKclymHzsZM3JYbT03dOcPyi+R+Viyq/9kuAFOwTd+Rr4xiGj1Yn9tqvpMTfMhCIIgCIIgiG6GwhzdAqwjjJVDSQZfW8A6IV9fKYj1ilokQGuJG9YTvFUsGXARkbH2GK/0KJ1etgVaSvnJtFgiup8EgaxYUDGO7373u1LVERx5pa6Urc6xgzL4hxm+px2AUK9K5ZlePAzKN7awmSIyesiVUubEjxB8YJzGvhO+7SSXfyIajtWkjhJ7S/hHLHcr9DJndvhMdBJHpYqvPE5SdixpoRucrmJLhFP/ydTXYnd3/lhn7UwXn8ChRWwJ7nrh3Wt3VGD/mbVr8FPqznfWpkB3nCmYciVBEARBEARB9BAU5ogINUvGyuU6/sEU1hGj1vBVTknusUW4LKmtHVUq1g+g5wawbMBFwtYK6FC7xOmsXeWCdQTUvCW4zb50VC2eKNiTdHbZZr+UAnwyLZaIbkcFOGwjHV2McQgcGcXuM4cOLUqpXTMWPjZG+K7hWE3ODEy54J/+4jzmBVg9Y+Lj4F67pIbnZGAIg1vwnxs8ypCS5OAhDn72httm84o0kTUFDGd8Ndw68hbl1BxrMLRyMiDy7pgT4sa8LYdKBoHW1JkLUSstAWiuKVuTkV/i9oqfZMVcSRAEQRAEQRA9BIU5IoK2aUUuRESgY+zYY4uMZPKUmZnQAOuHFLF8kHkMPOFBAB5giZGUwuWGY2xUIjfOnIl/ke1ZOrds8zPwLZBosUT0HKbQhqkajhiHgYN/auBjYyRQMPeOMiPSJ1OfcoG1a7eWiSAFD1YYnxYN+LCw2jUlFTtqa1iHQp58OP4TB/z63PJBBPpkZNQRRjJUGrz7IhlaMSw5GcVnzpQuGnVsDfxAMFKzCIIgCIIgCKKHoDBHt9HAd5zg9ngLRr7GmTOuHNSoKECU0tFlm5+BJkZgsTQwANA0zQ7sRfRDGgVWGQhHjEPuUNNwYOBSfNsbn3H3WmctT31yA8UzUjAq6B9lcOdjOJF/WHIWufPyinlqVJncMuKP2FaGp+UoRGqGCE/wOIkBP2dHDKJNhhsYovYzSEZJoAdTszIsjck5MvKK3WdcKebB+zXNrrx0H3muZqH1FKUXedQXDdAgSm/RaB4NlbWXMDNG8xvHprtPFVhjNwRBEARBEET0QmGObsKdv4YtOnNm0bFcuX7HzSle945aWCuIEAisGLwlO3yPaFEkjmJoDMsSqeoZurBs0w34Yk3ksnAZFk5CDt9iaXUAoCnTDuzVj5GZROE7D8V6QqUCvoX0QYJY9iRhyuOAT0fNklzfQTZe+CmASRWmMIYE2p0yKsgzm7ZWiJ5Cq4IUKZiL4chzu3Jqlqy1uW98L0qZM8MYlgcdxy5JwTNJ3fDzBT5Zwm0J3xZjuDUmA59NzPZIHMXP4BEuxATEtLUYiPgUi05gySciTe1+gPVvkhdsrJKUOOO5pvmkNzlhCP+SNTFN2CCeokK2WhiuZoUinmDRNLtWrnOgZuMCr1BZewHN+yrZlNv4aJ6i9MJyVNp2B1XlFDHDwBrbIQiCIAiCIKIYCnNEBO1sDrF4F0EOvs7IKJaHcQBbcwcN4hvsQZ+xcGatE0zXslEym0PHkVc6cys4zD2W0rObVrqwbNMNQBRfeXvuErlwCt9iCZ/7aEU2E354SzLWjMJMotJRW40gXJdwr93KQ3rGuTM63oqtap0MBLHsOcK4VyWj+JArZesa44dBLs/Zwl1s4tt9rAj5ZCxclcI/3tC+Y1SO8QnPKMYjcMTPCNchI0ihbWQBixz7hA4+7EyeE8XhP2IOyec98dDEqlVMtIzdarjVJuNL18AzeIQLMQF5Moj6kKv4pLDMqRVT1eZK2CKyIuauq6tbN5d/KS9UKRdAWkFVgR72sNHEO0sMTfxtU5K9J5ttevmiHM2uvOqJVauzpNquux8i+qIiJMrcbgiCIAiCIIhohsIcEYDvvfDB1wcZxW7jd38lpizip47KijiLAip5ecVgDzVUg7FYFBnNPjc9QxeWbf4GjMeBMtbWz5iZKhdOtFjqEdxrt6YYzwfm4bRakUTjxQf/8ENmRSW/xJ2PjwCSelxcyzSQAFkg3Kcp8sWjHNYDJ+wsuxN9u0o4z+Pg4N4uiRs+vuJO83stPtHy012MJvD5B8n4xoeeQst/RmAv+MHi96mAOnqwgDlRpu6YDZLkG806GZCUR3EGj5+lX6utpT4YgfCIhoBHNNIKeI5EMs/wWJ3FslYbCR4+xIaRQrbaF1ewagSeTesc2UZvk82pRoxUxDtLAsUnjO5gspSt5PNbyZby2ZxqrHOwfXLXipa6EWAaBNEdDBgwQEoEQRAEERoU5iA6RKeXbf4Goh2aM2ix1KN462v1uAO8MfBueUvEg0pFkgXuiihb4qytZQ38OUE876N01LHcEi8/UEY8TmcR2+q3eSJj4UzmHDRokJMtEn/u99FwzD/KEdiyRwh3jCPa0LMxiO5CbVoxtqxgtoTcuWKBZ1BUVU2s9kUYrBqRFbIhYaMv4uBv46kudwwzhU/80LqDuJIt5fPj0Q4corwSNX57VOymQRDdBOVjEgRBEB2Fwhw9A64nCSIKaTiG2xEcfC+VyO7gz/1x57FjNWW4jWJJWc2xBkdSStnWtSVub4Z/khGPkozi4Q+XESUxcO9gflGOwJY9gDXGkSBAuU+gH61B9AieIm3LCv+ib1rRGJJg3lHi0/C0ig0JGy15IMrGU13uf+iHH/7debRFbVHJziqv5jGMLCNLJNg0CIIgCIIgopgBEyZM2LFjh6xZ2LNnz8033ywrhMZ77703depUWelbbNu2LTs7++zZs7Le23jqqaek5M9jjz1me+BoRUWFlPoh7vyMHTN8UQqo1i9cdCy3fqFIsvGWZKxNKh21Zm0SNxGNKvmG4/W6K9au4Q/TcZl8CDNTB3d+fv3CYq1/QMsIY/2xZpvHgTEO/fEr1k99kA8LNEmJ6J2oPyCLs324jMLXX38N5b333gvv+/nz578SfPHFF59//vmC/3zx10vnYi9OsytP7gUxkJphm9KrJ5pOvPAUKZ0UmUUzxJU3tzFb72jpNbFaKRDNAka3djeCHlLUpiZ7Wqfh698lqqqqrlm+XFYiT578ShBENDJgwAD40SorUcnybvx5RRBE16EwRyehMEfUQmGOjuAtycg9tqiU7xLiJ8LymEciqFipO49hfWF9BoY5uCnXO0T0A/W8o7ckP5f5ghQmMxX+ALOKTD3KEdAy0ph+rAXaq9L1MAc0yQrRC8FfuHlgw+BrfzoT5vAU5Z2cU3LbPrNe4DEei5K8QKZbmDSqipiUospshjRCE8G787NCRACDB0PW1SkDEPyHMM2681CYgyCIXgSFOQiid0Fhjk5CYQ6ij8CjG86yGsZSc1aVYhjCW5IxdkkNKFylxRnMF4NQejR052fIjloyB2AyM5TmKAdgaxlx9B9rQfI4dDDY0aEwBxFp4ObffffdshIBLljCHICMcAig2k6YgwgKhTkIguhFUJiDIHoXdDYHQfRv1NGvbhVpUGfE8pNgtXNkfGfHCkNfR/88DJMZ4sizCWTYWnYfgfI49AwOwFQlCIIgCIIgCCKa6dYwR+XihISExZVCPvHSPUq2cqLypcXQjtyz+KXKE7KBIAgiHASKcSAqtEExDoIgCIIgCILoXXRXmEPELXJelTVg+A+yxrFXn33JLn5RuXhyzoqjWWV7YYXRuLcs6+iKnMkBIyIEQRAdJHiMA+E/fijGQRAEQRAEQRC9je4Jc4i4xatsnKwKRJzjYPmfLXGOysU5YPr4bx6YMpxXh0954DePj2Ov5lCggyCI8PDd7343eIyDIAiCIAiCIIheSndlc4z7cdne32T5xzlGjGY2cY7KN18F86wfiBgHIiIi7NU3eZxDbHy5Z/FiuaflHl/w40TlS/fIjS73LFZZItLe2AOj2RME0V957733/v3vf0PZIWRngiAIgiAIgiCimO4Jc0x58vUnMTdDZ0TSOMYO1n8sq8iJj49COXqEn7WIiLCjHxuxi4Ovstt/09i49/FxB1/NuUeENETCCBMbXfaWjX51xWRUIwePstzXGxvLfgw97ffJEATRX5jaBaQLgiAIgiAIgiCilW49gtSEOXgROuMez+VRk+EPPPxjGSgxckCEekru4/77YWRyiG1chSAIoru5qoNs27ZN9iQIgiAIgiAIIig9GeawxTb2YZvioQBjNDi4YrLYmZIwecVBimcQBBHNrBgwQH/5VSx12acjHDly5IknnvjRj36UmZkJJcigkW3ho3tG6SjROSuCIIjeBfxXJCWCIIjeRtSFOdiU23mGht+RHSf+XH6QsR/fPkXWTYweMRyDI+MeF89mMXgygD1BEEQf5vz582vXrn355ZenTp36+9///q233oISZNCA/quvvpJ2XaN7Ruko0TkrgiB6EFqrdxR1xy5cuIACQRBEr6MnwxwBcjSmPMnP0Fjxy8WVItJxovKlX644yH5cpkUtDq4o5Y0nXnr2VRn+MIIjos+Jl/h5o3TYKEEQ/ZHi4uIrrrjihRdeyMzMvOaaay699FIoQQbNwIEDn3nmGWknuH2Qidufcz93++3Peb3P6U2gkB0MOjQK8/MmnHGN8goVXZZ2dsO2QxdmJQbTNDGC2NjYq6/OlPYEQfRCwrtW79VBkxAnT9ENgiD6AD0Z5vi4/iBj45JGyKqPKU/uLXt89NEcsQVlck756MfL9vqlZoz7cdKbvxR7U8Y9Llt4nx+zFaLP5BXsx6YeRDfR6vlD8R88rbImqsUVDbIWVcDULBNrqIBFksC/qaECLsMwb/VU+C6QIKKMI0eONDc3P/roo/DrrNvtnj179vjx46EEGTQFBQXQqu/gePMM59CTt9zy5CEhvvlQomxihgp48yGHVAr0UaTKwHYUjvLmSl78IIYvDixe6xZtCu9zt4/dOtMYFizH5pssgtClWalrNDQHV91yy6qDra2tn31WIUwJgiB6dwiA4hcEQfQfujPMMfyB1/WtJCKZw//JsYrhUx54khsLXn/yAfNjWpJ+IJtff0C1DJ+idzF6THmSV9HKNAEiQrTU1xthgLY2Fhcn5WiitaFi5/4WWVG0trRcf2e+IFOt9HhcYz8bn58/nu3n4Y2GA21JabGyiSCije3bt8+aNQuEPXv2LF682Ov1fvnll1CC7HbziAG0dv1AUzVKIIKNkjj6FhRuefJJ9rRfvoZ77WL25O9USCWj2JVTdzzkhI4uzYogCIIgCILoK/RgNgdP5ggQ5SB6MXFxcS1tbSg31LOkJBRFXgdPiRCZEA0VFR6h+ENFA7ZYUysEKueioQKTRERihfIjvWp+0VcF9vIf1EfDgf0s6Xqb+EtcTIyUAtDqqY+5RQuBEESUcfjw4bS0NBBKS0tRo3jhhRegvPnmmz/44APUtMOBxWNx/4Zl74gaJRDBRmk4ekBK7I6FM7dqCR3e43W3zLxDzxvJKDblkQSjM7MKfI0EQRAEQRBEL6Xnwhz8EbA/ftiXjEH0FZKSrv+oHkMTKsrR6tnZNv6n+fn502PadoqYw0dtcdPz83+a1PLGASlgn+DwxIok7mc8qz8A9rFp94nkC969vhVaW3jr9JgWnqlhHdQgMfO+zCRrQKOtraV+pzUsEps2nu0vLt7Pxiex+raYJErlIKKYtra22Fj+PdrU1IQaBWpgRX/u3DnUtIPa0GEJNahRAmEzigooOOt8CRuOhx41JXQYuPPRelDou1Y6M6vA10gQBEEQBEH0UnouzMF3k3Ri/4i+CYWITuJi4lpaWjHKIRMf2tpaPnrj98XFxb/f/xHmesTFxMByJDYuTgmiTzuA2Uf1BzwNrTxQwX3L5I7fix0o4DiJByFik5J4poZ10HaISRo/fboIi9RbwiL5+TBg24G2pKQ2/aAOgogyYmJiWlv5d+/QoUNRo0ANrOivvPJK1HQaNUogbEbxnYLhF1HI4Akdu1F2jEw+sHU3Bj0yirmpK0dUQqMzsyIIgiAIgiD6HD15BCnRR4lJSmL19a1alAOIE3kVAv3ci1BpqP9IfE3M/Ol08L7zDyLQIE7NEH7vvF40S2LlgSAdHDQ2MVH8KdjobkJsWImpVwd1SDVBRBM33njjgQN8U8j8+fNRo5g3bx6UBw8evOGGG1DTadQogejAKDyhY/FidJax8ElmnE/Kce8ok1IohHNWBEEQBEEQRK+FwhxE+InlcY6d+7UoR0wMD3yAoM7a6AAtDRXFb2CUA7ofaItJy7xv+nie/SFSNGJFAIK3G6O0evbr1VAHFWa8e0N9S1wcj3f4QWePEr2Bu+++e8uWLV9//fUPf/jDVatWjRgx4pJLLoES5Ntvvx300Ao20rqzqFFk3Z+OjpKx8El5KClzPPTmmUePyt0tgwY5metMcYZsa5fwzoogCIIgCILopQyYMGHCjh07ZM3Cnj17br75ZlkhNN57772pU6fKSt9i27Zt2dnZZ8+elfUO0eqpqE/KTGurKH6D3clTKHhgIu6+zET4yneWxF0/fnpmWmxDxR9abrkvLZZvOvET2oy6gejHrr9zPNsvGsDujY9aGDi6U3kFp0msnvHunj+8wevXM5ZkGVR6lBgTA1GfBHeOvtHMQF4YOBFGMCOLCdH/6PSHpRPP+wh9ff7ss89eccUVv/rVr0zPVb1w4cKvf/3rzz///OGHH5aqLtA9owQB7qH1noRxVvjkRSh1vtaA6vnz578SfPHFF+B8wX+++Oulc7E70S5VVVXXLF8uK5EnT34lCILoDMu78ecVQRBdh8IcnSRYmMOdn1G/0J0nd597SzLWJrkD/UHSaHW73RkZyga0Y5fUyErqqkPKWXfQpTAHQfQnovPDAqvukpKSxsbGWbNmjRs3btCgQWfOnDl48OCWLVsSEhLy8vIuueQSadoFumeUINiGOcI4qwsU5ogwFOYgCKIXQWEOguhd0KaViOPICxjjALDVW7LGHGrKccFv54JujXEQBNHbgZX8woUL77///j179tx3332TJk2CEmTQgD5c0YfuGaWjROesCIIgCIIgiO6EwhwRx1uSwR+I6M7PLynJGDRoENRAhYJsda9dUlPmzCixe6oiws1KuAsv9hXduX0At6KHz0pkmOhVgiD6OGPGjFm2bNnmzZsrKiqgBBk0si18dM8otmRnZ0vJQg/OiiAIgiAIguhxKMzRfZQdSyo9c+bQzFrnWinsEAEJfgDfqtQcl3/WRpmThyUAjFqAYomztlakf4gcD+i+tYKHLGzdektyjy3iT28sHXUsl8dG1rCZvLqIbV0r/RFEn6ahgj9qWOA7gNaq1DTFxX8QzxFu9YinFHM6fF4u0X30lo11nqJ0SVHQxzMZdoZVsysPFT6Vz5XVl7k7QRAEQRBE/4XCHN1H6qhEB2OOpBQl1NYHTq1Qm1aMHS/8iA4eCZF5GersDlu3Dcdqypz8aQVjl5TVHGsAZdnWtSVub0ZxsB004aGhAheLnQDWl/7rSt8aVOjl+rPjD2vxA0exjMUxKW1tTPA5GUZw6abp6R6srRzeX7thvCr8actv7BLKZAgJ3Cx+Bq7gp+Nb3hB32FYJXC91+fn8HNpWz879cajhRnTPia7gKUovZKurBKtZYeAghKeo0LtgY1XVxgXeQm7U7Fq5zoEdDRVrPulN5jacgjTsJzF3JwiCIAiC6M9QmKPXkJLEkz14XoZI0zjjykF9AFJXCStOcQbLKD5UOoPtyM0w9rREjFbPfjbe/FSTztLa0mIsQcVDW3bWJ/0U5Okx+zsbSOHEpoXxISkNB+pbDLECLp2vjZmcXmtDxc79AVs1WvDBt5y2NhYXh2LceH6x2AUW27Fpdl2JQMTFxKAA77eIX3Bslf7wFvn9EZuUxJ9bLGSC6ASe6vKs1UZEIq1gdVZ5tX0MgkcwptwWz1j8bVOSvSebWbyzxAhlGKrmfZV1jmFgY8XSnSAIgiAIoj9DYY5eRsMxKBw83LGjDDW2JI5iuKXFK04GgXJtQ2Jesbt0VdAUkq7TWl8flwRrRJV6YOR2YCpD8R8qZATAyMvAqkx0ONDGKzpqWQq0tbGkJL4wjY2L88UFAOlMumuo0LYaQBOM72+g5sbxb+LU87n4J05II2WiELGLO68XcmtLi7j02MQknF7Dgf0s6XoZs7C0+oiLi2uBaxM01MM1ouiHuA3WrkQAYtPGx+3/PX/TtDfSVgl89AbXAVpWjQDewbiwxeyIfgiPPiQMkRVgSEKgGMSpRiOCET/MUdd4Siglnk3rHNnOeG6T7N1guzUlWHeiZzA90pggCIIgiO6EwhwRoWYJ3zDCySjxW1AFgO80CXoEqSJj4cxaJ7hdy0YFy+Zw5JXO3MrnkHts5sIMqC5ia8Qelq1sUUQf3ALLdS0woeA5HiIRYzyrP8A3jOxsE6kK02PadvIoxH7Gq9NjWozcB6StraV+J19+ivgCOMZVfqvJjP/9XaQ9JPG0iMSk6z+ql3ddRBqSYv0NsEliafqIJd1nJFAgptlKLQDzbkm6xUgMsVx6YuZ9mUmGJsCNESSpGftFOVpwSV78+zfYeBHe4R6MeAjRDomZ4n3NT6rn91C+mbZK36YVv/SOhori/TE/DV/eD0F0Bk9R+oaEjSKvI62gaunSpWLLysaEDbQ1Jcq5IB5ITBAhQnExgiCI8EJhjgiQUSx3iwDuvAx8oGxGsTxi1F+Qj5sFWX9wrOUhtD4FHkHqLs7LE34CuDXsuKGh5VWoR/RoDp6zEGfz1+/YuLiP6g94Glr50j+Rhy8+eoOv4X+//6OWNgAW8NCL7xGQHZCYpPHTp8Pyc3pM/U5Pa2za9KR66PWHA8xkJ1NFfo87RHxxjob6j+JEAoi/gR/mpuuNnAu1W8E0W1QC4ftbf1wMjsajHL5ltbFpJf/OmP0HxPXAbaQ9FB2ERzZ+Or7Ff7uPrVKDp+/sj/mp/a4WgggVX2pFs8fTrCddmPHleWgZIPwQ0g0JG0ucqkt8vBL90kJsuxME0XuguBhBEER4oTAHEVEa6j8SXxMzfzo9idXv/IPcDqKW8OLUjUDEJibG8oUmLO+xLlIv7suMa9PDFUYySH6+3D7C4xywggU9RjksBj6CNGnYzpbnlIjtDm98BF8qGoKnWgRtjUmCe1Pf6h/l8JFI0Y2Owg9w9aXj1NeL6Jut0kqr5w+/bxsf4OQOgugIaROzysWRoPGsem56eqF3wRz/o0MNeECkcl8z8x3A0ezKm9uYXaXFODxF+l4Vv3iJtTtBEARBEEQ/hsIcRDjxSzdogWXlGxjlgJXjgbaYtMz7po/nBrDml9tPxDEZRpWvPIW5RLRyfYNYkUJVPjBjfwse0oGI8AFUWz0ypsISb+GbYw5AL2FnNVBYm8T85YioMc3WwNjukn/n9dffmZ+ZyK+dJ5Hwvvr0kHZaeZxj5377KIcvRyZQsgxhJjGTPyWFp+kAv69PEptPbJWAOptDREEaDuyX8SuB+bwOgugIaQXiASvp6YXlLGvBArZubp5Ly8LwkVaw2rFubnr63HUOcWapZ9O6OlbOewp4LzARroCVbKnYx6IiH+buBNF/oO0evQh6swiC6DYGTJgwYceOHbJmYc+ePVIiLEydOlVKfYtt27ZlZ2efPXtW1jsEj2fE8X0pIPx+P7v+zvFsf8st96XFNlT84Y2PWhiLu/5O1dwCtfHTM9N4vgWvxl1/PWNJ+mNQZC/ZSfUa77+dwOg9PonVMz6YoRLhB4vBdLYT5nhLi5hpjLlpZ1tcy0cf4YjQT1yNMa6crYmGigqWKcbB6Rqz5RgeuGxt5bR6KuqTMtPaKor5w06hRXZhKkbkGxc8iJuJaqLn6dKHhYhuMIccSp2vNaB6/vz5rwRffPHF559/vuA/X/z10rnYnWiXqqqqa5Yvl5XIkye/EgRBdIbl3fjziiCIrtNOmIPoh3Rt5Qar9gNxuOgnwgxFOaKOcIY5vCUZY7fOPIRn7EAll5XK83ZCouM9gsJns6SG5bj4A6kNbJURwp2fUb+ww5fTkV7t3bELFOaIMBTm6BwDBgyA7z1ZIQiiu6AwB0H0LmjTChFeYtOSWMCTHYkuII4RoRhH36ZmyVq3FHsWb8VWturQGf9whq0yQnjra6XUETrXiyB6FRTjUNAOCIIgCCIQFOYgwk1iJiUcRILYNL/NLkQfJHXVKrbG78HS3pIM+aRpQ+Jf8/Mz8HHV7hIpYJ9ja0V1UL4RK3Hni7qh8fVVFhxQo5Xhx50/dkkNfyy2bqYp/f2o7pZRLDM0zUfragyNeEtyxVjGFdvZAKbu9r18F2Gj4nA1V8Dk/PQEQUQ5FPEhCIIgAkFhDiKcXHXVoG54ycEIos+RuXDm1nYTOmpqR5WeOXNoFVuyhqGwtYIHAGrK2KIzvF7r5Ot1WL6vGXVIPEjaxYRG9fXfiZK7JMUlrFKW5IpIQkbxoVWpqasO+eVt+CuVH+i+daYYxZVTtkNO3XaG1vm418qR+dD6ZTvySsVY7jyHzfQMzN39e5ln5c7ne4K4yrhBAnd+LkyRX1NGsd/1EgRBEAGhVBqCIKIcCnMQ4aTlrYWvmx9motGS+bsVy1f8biEvXx8nlf6044Eg+jaOvEWmhA4rqTMz8TwJJUhyZvBluiNzZmptvZc1HBPJFxxnGeMawNyFcTPsxzJm5NQc8z1LKCjKjyPPXcpy/Qexn6F1PomjUsucvJ7PAoYYgkwvSHfrrLz1tcZkoFGaw3ycbFG4zjMhCILoN1AqDUEQUQ6FOYhupOVqNmX94+mf8fKeg1LpT9yktfdcL2WC6Idk8ISOClnxAct9KXWAHEx24HT4NM8QcecPGnuMJ5GcceVIVWBM8+HxBp5cgdEKlWARKkG6hzir1FWuVbXtRZWiiP9y5dXYPo+22VWT5/ov5qnjJUH4oD+5EwRBEP0TCnMQ4aZu7u9WLP+dSNZQqRkfvb7wrZZxr/8x6e+V81aI8vWPhrz1u+UruGVmC1q+Ne711zM/El1a3pr71kfjXhd+oJWxca9z44Wvv065HkRfhyd0LFmighqYwRDS4Zq4PcNbsbUmJckhkh1wCW+cPmELN5PbOnaUpY7qxPkvmG0BvbEaCMt85BcRrXDlqFQQfwJPr53uplk5klJqcG+PCIIY53wk5i0y74WJWppdtY3Zqc54WdWJd6aWOL/B0pKzG2tt4yBEf4X+5E4QBEH0TyjMQYSZv7KPHnx8fTqbYIlHHLznR/XXTln/uCgnfXpPS/r6xx9fPivu6i1vDYHmv1be+emnaAlcXfnHOz+d8kbypxPqWljLWxM+TQbj1+M+pcNNib5PxsJVqSg58hbliFyF3GMpUhWY1By2BkzHLklx8T0ZsP53pYhdIobGFn6iRa3Y++Fkro7nfGTMwAkO2sFyZEgmAJb5cAUTfWHs2lWl+tg8KiEOEw08PZvuqpfNrDKKD83cKvfM6J4yiuWhH5E5gtRTVJWeXpVedMKVV+fBtIuiujyuOS2yM0RrelURtLHTRem+ZA3oKJSK05sqB89JQ9nU0cjmYCxtzuDKTeCZIAiCIAiiPzNgwoQJO3bskDWCYGzbtm3Z2dlnz56V9Y7w5fv/31vXiF0nH8393ad7Z7F7sPrR6ws/nbR2UgtXPnjNZCjTW+b98a+yF/vuGwviJmxhrz846VTLWwuhy6RPF2IVO17zlugex5M+oHXqdWdkR4LoUbryYSGiHPwzOJQ6X2tA9fz5818Jvvjii88//3zBf77466VzsbvAU5e+4RsbS4bHg1DIVlclD3HVzK0czDUiNrGSpfAsDGitHlxVMBg0cxuHg8CaT+TN/a/sqmQZ1gAMGxBtO0oNj4CcGFaidYxeqqqqrlm+XFYiT578ShAE0RmWd+PPK4Igug5lcxDdwLg6FdHw0TplwfLHHxcvcU7HNdecwgbEVEXirvlMSgRBEFFO88l/Jk+5hu8ySRuchSrGpEbsNFnKanlSRuGnzPvPZtDcNji5/DRP+th3mi0YrocquKuEb6Js7ejPP0/SvhWCIAiCIPo1FOYgwsynnw5hbMhHdVfLOMWn415fcac1yhEXx+rq+F6VUB6tYhgPeasqSaoIgiB6NZ6iKp67UZVetfoaqYofnp31abXnv/ZVsim3fUMqLdh0JIhohA5AJQiCIHoKCnMQ4aZl8ooV86rYO/dcz+KSj31aeeen333jR9+VjYq4Sa8n181bsWL5lpZjk9p7tErcpHeE8T0t17RKFUEQRJQTP+ybdZWf8tQKz+lyVPmTNZFvQvFU+04lSpt4TfmG2krHcNNRo9xV4z9lxa6jwT8b6745zO6YUoLodi7QAagEQRBED0FhDiKcxE1a++A9Gx9/fPmD+LzYuIoHhXz9PfxkDXb9xgcnnZIlOzXpQb5j5cF7KqBFPUcWBVWVHdlBYfx6MhjwKkEQRPSTlrzacWJuelV6NVObVhQ8olHIjxGtZtewuv+Su/TShi9g/3SIKIYfaYOzjP0p9h2R5n96swb3hoM5CIIgCIIgIgcdQUqY6cqpilddNUhKYaXlrblbKpP+zti1333jwXsOnj1LR5ASUUEYjyAtLi6WEtFD5OfnS0mAf4jm545qyNNHBVBt7whSRfOJvJVsqTh5tB0CWza7ajYNSy0IGsPwFNWcnGP/0Nnog44gJaKZAQMGwGdcVjpLWJwQUQIdQUoQvYsQwhzu/EE7ZpwJ+DTCyOF1l6xds6SsRlRSc1ylxRnyEYDQUsHy8gJOyVuSkctKrY9GNC7F196Zi9NG77F7E0miMMxhgsIcRJQQ3jBH5uOZshIBKlZU9Hb/j2dG0P+KiooIhDn4A1ZwX8k3F2xsP/rgKaoqLGdZq9MDxDL+y5VXy5YG9uOpyzs5XDxvpVdAYQ6C6BEo+NI5KMxBEL2L9jeteOtrU0clyko34i3JdW4dtejQGc4h18xa59h8Nza51zq3smBTajhWk5JkjnEAGcUYkvC1G5oOoI/eie59m7Nnz3TDSw5GEAQR1aQl84NC+SukDIu0Am4cOF/jG86SoH7SkntPjIMIO3TeJxEiFOOwhT5BBNHHaD/MEShkEGG8FVtrchblyfwNR0Ze6arUsh0izuGtr2VBpwQGOTOCRB+6FLlpd3SCIAiCIIhuhdauBNEV6BNEEH2MdsMcWkjAnT8ov8SdnzEIyMh3e70lShbtYCxbbZUZ0LnEUHtBRFPuSaj8cWTOTC1bU+Jrc2SWHlqYwfejjF1Sw8qcg4Qn2xEbjjFWb+gzSgwXfP7CREVuDA04RWPE6GJ17j+6cqhZwlXK8USrvEe+uREEQRAE0VuhP/kSBEEQRPTT7tkcsFiXp0+IJT7DIzJA6yxLXeUqzRMyWnCDYzMPFec5+LJ/rJO5QMstmesQ9BG62lWH3Hmiey325p22zuRKOaAP6JDrLKtJTc1ZVLoww2EYiGEWqSlZRuRTdpbliDF1NRjjgRxWQXpGh1tTXO7AzoVWjY7d9ctRluhq1aKFeJGmgaKZMB43QBB9GzqbQ0Fnc+DZHHdO6B3Hf0YJdDYHoYiqAyPo9ArCCp3NQRC9i/ayObRkjoZjNamrfMeA5rjcYksJ38SBOPLcZ4rzmBdg9Yzxft6SNWU5LuzjyJiRI7Z7cCV4Er2h06KcmmMNwoEJR0ax+8yhQ4tSateMHevLyoB5GFtSbEbEKa8SMQ5uwQetreddVQ6HVUB4iGKJjHEAts710WV3vEa8Gdp40Jo6k8c4fJYEQRDtc+qPE269dcCtt074Iz4qdH/uz6H689z9otZONUROPfPz1bukHG7/cv4hOuy4f7Zr9c/57VndgS4dYtAgeZRyTEwMCgRBRJqoCitQjIMgCKK30042h5aGoGck6LIvmcNIvkhlKSmsrCzFdaaY5Q9aM0qlarjzM+oXuvMaeLaFUBjkiESJYIjcCJH0AeMZLu1G5MkcYhQcUsxP2DNjzuBqbRKPZehXIexkromoBnTuG112h8vRrtGwyKyQowD+A0U9lM1BECESiWyOU8/8fAV7/IVHhkhh1Mafb5v0QunQ/bkrTj76wo/qVwerjkRnNujZFqd2rV4xfevIne8WThMxg/D6B4fH5r7wCAvJYUf8y2yO/asnvDXpncKhcBF8nCGiucvo2RyDBg06c+YMrHNiYmJaW1tBUMhEDgFUrdkcB90voBOiXZYvX07ZHERHUXkWtgkXlIVBRA7K5iCI3kU72RxaGkLDMTYzE0VvxVafbKR7uNc6a2ceOnPGDRTPSDGyH7TjOt07yoxKjks8QMXAHOPwlmT4jtQQOJJSUODJI9KL/YgwCm80gGqqmKtxKXzyKjHDmA8M6BfjCORcG13vbnwF5Hi+UQBK5iAIIlSGPPICrt2HjOKL/lPHjo+8ezzUxt898k87TgWvCgftsn/jE+yH87+LlfD7n1aI8z8pamH3f/zk8TGTeJdpk0ZufifES+4AmMoBJaZyxMbGCjVBEFGBimLYhjMiF+MYQGeyEARB9CqChzlUDEMs39VSXV+22yzhve58Zxku/RNH8XNEecBCKNGZTwnakgyb4zkdSSk1S3J9549C5zW+aIUxJR/aiDwQUbO1Anvy6EVZziKRe2E8fUVNWGnASmxWCZBtoTnXR1fd/S6HXySfp35btLtIEAQRIvu3HR85akhTHRueJDVA8GpojC98p3BCsqxEwD+wf/WAWX9iD0wYGX7/9SdY8lApR4IzZ/gjq6Fsa2sDobW1VagJgujXqABKt8U7KLBCEATRFYKHOXyLdX2pbi9nLFyVsnXsICB3x6icVNHKHHmlUpu7g6XKWAEoXdJ07Jpji0rNuRxARvEhMFkjbIDcNWyRTLVIHJVas2SsyPWwHbHhGFvlWnQsF/sdm8lPIgW1yq5QE1Ya99olNYw/PEWCURdb59rovnQNv8thLjFPv1sElkbuC0EQRCiceubnL7EH+KaSXsn4wgvvPp780kbj+I/+yPydsC7yY+d82UQQRDTRoYACfJSlFGG6bSCCIIg+SfAwR0axsZ/EkedW2Q4BZEdesVtsQXEXc0l1RK17BlNnd+LhogK3OtLUBDeRNnzniDLjB4OCQoxpNyJ0y8sw3INe9lPztApwkX6YJu53Ob7RVXeutVyOX6smEwRBtM+u1SvqHni8dDyIQ5PZiXrUcoJXO0Hk/A8ZNfL4sVNh9580nNU1STmqeX46rJ0kE545zo4/88Tzsokg+jHwgZBS1EABBYIgiL5He09a6Rru/EFyS4rXvaNMRTkIIgjwXWPdxxQhvCUZYjDraTAE0VMc/+PPnxj+eOl4PFuTBwu27Wfs1P5tx384Y0jwqujRMcLuXzzD5RR2GTmqHYed8D9y2Mgjb/Euu946PntCZy45OIPCfzbH/J3vPFKfm5S/j1duK67nmR0XLtQX3yZaLRqo1+/cKXT1xfOxURkTRDcQ9kiE7hC+n6VkR1iGjkQkJQqjMwRBEEQQIhvm4Ds/asVuEL6dQ6ZJEERg+ANv/B/D0y1Qyg0RNZza8ae/7vtfswaIZ7I+c4pNK3yAvXTrgFkvsQf4g0iCVztBuP0PeeQB9sQs7DJ3Wvj9s/GFy9hLA26d9QR7IFyPWdE5E+azOW4rri9NembCdMzkuK14wyP1ubBgGpBb/8gGHruwaoCRSceyeQ4Ie+RRhsKM2RTnILqN4JGIThC6w7APHS5sJxah2EeE3BIEQfQrgj1Qdtu2bVIi+iKBHoTZcw+U9Ypn/c7YIR9RrAEtucf4c31rxMOHVTBEPYpYnCNbo6mUIhWfoOPvIRFbU3NyWBlbJOq5rLSU5a49llJWxl0rz3KsnFWrao8ZjwhGAg9h7W5owMY6BNFricQDZSOE/kDZSNAN/uUDZSNDhB4oO3/nBfi5MkAGOUT97m1YlSKzaI4U129g2Un5+26zCMJHn4EeKNtPgEU7fFhkJWoIy6yi89KICEEPlCWI3kU7YQ74DV5WiL5IlIU5EHe+bZhj7NaZeAwtjyawUiEapvB1zSgj1DD22KIzC+vFF3BiNDF/D9jKhSUpGPbAMIevF85BeQbByfS4hHJiM4TRhm71qfL4imkIohdDYQ5FXwpzILh6gVJHRjgEUA0e5rituP6dGTsm6OEJCnNoUJiDiBIoWkGEAoU5CKJ3EWzTyt133w2/vhN9GPlO9wrwgcJAw7GamiX4EB5nGaut94oH28hWfkhscQa3kUfBZMzIqTnWwCXlgT/7ZtVC3urIW5TDNT7kA3ISR6Vyx5pn8MMbfAQbwpE5U/S3TpXb+A9BEESfxO9EDoMjx45Pu1s8cGX+3dOOHztipyEIwo5QtnKEYmOFYhwEQRB9j8iezUEQESHHxZ9rIxCpElFML5oqQRBh47biR/nBJKU8BcRg53y2Lz/7mSShLGUYArFqCIKwAz4kUgpMKDZI5wIiSFf6EgRBEN0DhTmI3kbiqNSyNeKxKF75nBRHUkrN1grMjHDnD8oo8XKbHeJxLe4dZTJ9QuHInMmWrDVahSoQPs8WS9shpLG3YmtNSpLDZqoEQfQL9uUnwVLIH7EzRTWIGsesgTqGO6wCQRBhQgVE4KOHgsKqMRF6MIUgCILoKYKdzUH0T6L0bA7jkAsOmIR8BKmvrnkwWlNTU2tS1CEapSxX2mjWcqycnJwy5j8tuyFCOILUOgTRawnv2RxSInqIsJ/NQQSHzuboPwywHH5h1YQC9gqXtyCE3WFYiM5Z9R/obA6C6F1QmIMw09NhjugkhKgEBS76H/Rh6cPgcgJKHRnhEECVwhxdgcIcvZcwrrcvuugi+DTJSqfoJ4t/inH0OBTmIIjeBYU5CDO0ctNQyRjGU2ODQGGO/gd9WPowuKKAUgcDHAhUrWGOXy+di92JdqmqqqIwR28klPV2JNbkymcg5xQIICIKhTkIondBZ3MQRBAyiuX5oSEcIOrIc1OMgyAIgogCYM0vpc4SyEMooYQuhhuCT55iGYquv8sEQRB9FQpzEARBEARB9Cm6HgvougfbRXgoK3PboU1K8GNyZdsrlOHaJSxOIoH1kqN2qgRBEN1MGMIcR44ceeKJJ370ox9lZmZCCTJoZFt003tnThAEQRAEEc20G63oypoc/Nj6N6Fsgo8FrWhgaxbKQIBtXxOh2HSFEKdKEATR5+lSmOP8+fNr1659+eWXp06d+vvf//6tt96CEmTQgP6rr76SdtFH7505QRAEQRBEHwDX5NaVf6fjBSYlVG3NdNAGZoKTgbLdLgqTJXqwopuFYkMQBEF0nS6FOYqLi6+44ooXXnghMzPzmmuuufTSS6EEGTQDBw585plnpJ3CnT/IIN8tde3hfe72DtmHRMdmLqeA3P6cV2jE107hzrfrq7n0jaddtTYJv3uhT075tR+CIAiC6NN4ivJczUpOR4o8oWuaXXm+VqJvEmRFHZbFdrtOTAbWlb9tLKDdXmCgK7GqNHoToLzpNoDJSXBCsbR1qEZXhD4oQRAEEQqdD3McOXKkubn50Ucftf6wBk1BQQG0+u0BgfW4k7nwOMdDT9Y5Q1uIe3dvZU8eOnOmOEMquo4+c7fbPXv27PHjx0MJsv3MgVv4HDiu5MUPdi2C4D1eJyUN73MPHn30zYcc4jaN3ToTR3MxeZd0JdcakQ4/PZ/bWGzIKH70aBenSRBEt+ItyZDxSk5GSe/9/LrzwzP7zvnpSC+45735RpvgAYr0wnJZY56iQra6Cti4wFsoAhdWDfNUl2dx1eqs8g0iPOLZtM6xuiCNtxF9liAr6s4ttk2/B7brxGSgupv8QFXXdNRtoFEQaDVpkOCj2HYBAukBW4dKGaQjQRAE0RU6H+bYvn37rFmzZMUOaN22bZusILeMTkTB8dCbZ4xFvQx3GBL/mp/PMxRgxe7OH7v4wIHFY8WyHlpwAeBLZ7CqVMKIsrGgZr5nz57Fixd7vd4vv/wSSpDdbt7LZuaKxNG3SIljHh/q+flyBmoCflPyPveguCL/II977daZC0UgR4R1fsdvDZCx8NCjd5iVLKPYlVO2g3t3r12s6UVD3XH0m7Fw5ta1xgwIgugNpK4yYpYhPNknavHW10qpa3TOT7hG74XEO0uqNi5IljUewJgowhXxt01J9p5sttFYaHZt8C6YQ0GOfkznVt24aO/0il2t+U0RAaiaNIgaCAVVIqKFY5JtXSG6pcJWqTvRDUzObfvaEmRWBEEQRFfofJjj8OHDaWnBfhu6+eabP/jgA1kBHA89mrx4rLHcD8aButG/g9/zizNg4X7oyVt4JkVxhve5B2XegrHI50EQqeLZIeDV+9ztT4/GdYKLcYUtaualpaWoUbzwwgtQmmeu03D0gJTg92nrlBgrYzN0jXlKjod+J65IBHkM3DvKkkdiHfwbIuBwZDig4q8UsRYezvAer7tl5h2aHu6X8uu4Y2adMSeCIHohPNcgP5/neIgQqcr2wB9tvtZBGSVubJSpCYGivVoXX5PJ2H9Qy6h29n6xXW9J7pKamiVjxVSsvY3u+SXQD3X2s7X3Y8m98I0gDYOPbqPicDVXwFT89H2E+GGOusZTsiJQmrQ5C7yF6TwJJCvbGc9TOeAL2hD9kq6susOyYlcBgkCRAtDjQEqAEo31CehmqNEx2SsPCtW9c3Slb9Ry0UVd2udOEATRzXT+Z1ZbW1tsbKys2AG/SJ47d05WBBnFYrl/ZsYOy2+ZfpjW7ojjoTd/xx7kHZ1lTOQsaKt8nh1SnMHDATz1QzeyQc28qakJNQrUQHfTzJnhdpCzzpc+YZ0SIDNWZCQipCnxCzHyXDqL7Uoh0B0gCCIagfU5fozVar6mdlQp/MwszoD1uzWoiq2HVrElaxgKWyu8sGRfMypgtFc6PLSqVjTZGqtB4eeKCiVjB1t7v9iuI690VWrqqkPuPIfNnN35zlqRsjLj2JIargg4W38/S1LEhkdXypJcv0CHe61s4U1r2x/ddDmIOz8Xbh/fGAn/R4Vxf2SvgKeACArSZCqH9fwOol9jGyYIQlfs9eACCtaltckAARmwjU2gxqS3NdNnYjWwEtwmlPsQik308PXXX0uJIAiiN9D5MEdMTExra6us2AG/Sl555ZWy4gcPdxx6su5pv30bepqEHbCOH3v0UfydVarsyJGnfwB+CRMaauZDhw5FjQI10Nc8c3U2h+41fFPyYYRH/DArZXaHY2Tyga27UY8hpKDzIAgiulGbVtSWldSZmSg58tylLJeHQJxlrLYeP/aqVQlAwzGeziCiJZqpgbR0ZM5M5U22xsqbt77WkGF8EUq2tR+Fsd1RwqUP65x9DjNm4A+r4LNFwCZnhog+QK+aYw1CicCYZU7eOZ+ZIxTBRjcuB4DRnWxR790iFArNJ73JCUNkRWDVsGbXysopS53x2mkd1RTnIEJb8OuEbo+LfGWPQQpTXMO6tA4SGtCHRhmMg9ibsM4c++plIKytVm9WQrEJndCvlCAIoj/Q+TDHjTfeeOBAsMjEwYMHb7jhBlkBeL6B+vOZd/dWYx/GgaP8t1bbgzlN4G+67h1lWNVX+eD89ue8iaNvKcPgCT80Q/vDoB9q5vPnz0eNYt68eVCaZx4E05SshDIlfiHiJnD5jplMHXLKbxk/xMNPCVpnGY6bsfBJTW+ah3mnC0EQvRceVD22iIdAQghmaqHV9s/46JAxELp9iHPu6AR0eLiC52ZgsMPvB2yIo6eucq2qXWPeC9MHSJtoxCma91XWOYbF22g0aL9K/6aLK+TOdTct8rEaJGUARgH0XqiRFW0aul7Z661WwVaGvrYyoMuAPiuFsjEZRwjbORAEQfRbOh/muPvuu7ds2RLoPyTQQyvYyDrAz9moE393A3jqMP9bmuOhR3PE76cPHk3Wz/a0kjEDDQftYDkyNAIeZ26VfwdkrjcfcjgeepM/bQTqYxcnuwIlH6uZ//CHP1y1atWIESMuueQSKEG+/fbbbWYeCJspWbBOiQc1TEeQgiOVreHrAFdVJw/xAKW6VH6txp8tQX/m0aNS79fC40byD6AEQfQF2g2qIjzBAZftxokTOjVbK0RTxdaalCRHO8aOpBRpL6IGGSXe4PZWzLFp5dBQheKQ28hdJzvKZOoIIvuIYIcrx5IMEnB043KEmJi3yLwXpnfCn7Qyd11d3bq5YsNJWsFqxo/dAJ18dopVY6AdPcqDIeK0DjqLtD/RuRWyHgJAIRDWBb+toGQEq6qEUawDgUY3QBnNlAaVqEEZBeUNBF1GAS2tTXpftFFKlBWmjl3E6p8gCIIIwoAJEybs2LFD1jrIs88+e8UVV/zqV78y/fCFH+i//vWvP//884cffliqooyom7n3udvXjnwzUGCmE7jzbz++sP09MnZs27YtOzv77Nmzsk4QRADC+WGBJXsuK9XzGfw0sC538uV6Tk5OWRkPaCYarcpMCYYtT5TQf6pwg2MprKysRmsyGZumAdWxeIqG0SGgvf/w/ICMpLWmOUN/2Z2r2Axd4xvBQPnJY8YszCZab77lh08j6Oimy9GnvGaU6LIDJwXgygRKna81oHr+/PmvBF988QX8x7HgP1/89dK5ojfRPlVVVdcsXy4rkSdPfiXCD/wqBR8HFKBEOTiqiw4qlROrW5MBlAhqAGVvarX20qtKtnaEUtcgVj12tHa3Koney/Ju/HlFEETX6VKYA363KykpaWxsnDVr1rhx4wYNGnTmzJmDBw9u2bIlISEhLy/vkksukaZRRhTO3Pvc7Q+y33UuMGGhC0EOCnMQRMj0sg+LLyTR40TRVAKBKxModWSEQwBVCnN0BQpzhIWeWkV3Ylzrsj+QjOj2plaoQqn31auA1QBl1CtAqTTKAJVQXnTRRfBJx1blQZexr7IXje0TonGHfBLdAIU5CKJ30flNK8All1yycOHC+++/f8+ePffdd9+kSZOgBBk0oI/aGAcQhTN3PPRmmGIcgPZgWYIgiGjBbTwSauzWmaXRHOMgiN5CT62E1bi41EdBl1WpwC56R9PkdXsl6710pa7RZSiV8qKLLsKqyRirthoAlVCqGAcABkqvG6OMJRpYUR2xqroHskf0UQiCIIiO0qVsDqJPQtkcBBEi9GHpw6jVi45I45BAlbI5ugJlc/RqTKt9E7atuKo36QNZohK7AKYqYPWDAuhRVl2sfQE0M9kobDVQ6r2s2DahUjXpNkFcEVEIZXMQRO+iS9kcBEEQBEEQRH/Ddj2vStvVOyiVHsyUJQqILgO6PVYR1CCqFcAmJVx00UUgoBnvZrRaQRsloyVqRIscHQTVhEqUsdR7KVCJpS4AukwQBEGEFwpzEARBEARBEBLTQj1EbBftgVyZVvsqUqA0KKAGqyBfdBH/rRUEZaD6KllVQVBmgGpS3vS+CtTjQIjVDG1QwEiK0mMTlKjRMSltbQiCIIhwQZtWCDOUh08QIRLGD0txcbGUiB4iPz9fSgJcukCpI/erCKAahZtW0iuulZJGVebfpRRN0KaVaAOX6LLSBXQ/ajEPGl2GUl/n6/a6JaCq1l4AKvVYgxX0aZUBkK0OdY2qYi9d1lFuUVBVxFRV2OoDGRM9Dm1aIYjeBYU5CDMU5iCIEAlvmCPz8UxZiQAVKyoez4yg/xUVvd5/hMIc11xzjZS6heTf+63ZkLqf9tiq6dNPP5WSBQpz9AFCWZODDQpoiVW9l9Iob7pb1R0wKaGETyLGOABliTKU0AQGIGNVNZnMLr74YigB1NsCrcqJjlVpq4EyiFkocoh0ogsRIhTmIIjeBW1aIQiCIIgIEhMX120vOaQ/Jptue8nhiQ4CK1UpRR9qbihAadJYgVU3YjIQXX0akMEGZTRGUKmaQIMCgGbYhHreQQAybjzBEi2VGQqIngmiXOk+EVTyDtpA2ATosrUvgH1RRkE3QxkJJLeL1RVBEER/hsIcBEEQBEEQ0UKPrFT1ZblpQa6jNDhJTGvSNQia6SUABiibLFUVZDRQAspBSgVWwZXyhjKgmlAPgAarphItMQFE6XVQD0CTstdLFABrX9RgE5S6MhRUF1tMbiNBRJ0TBEGEHQpzEARBEARB9HGCL1P19bZaMKMSZSgBFQJAdFlHeQMDffmtjwKoKgiIXtUFBP2gElAaNYqqQonoGixVXwRlKFWr6q5rlBLQq9CKYBX0WDXZoABgk64JEeyiu0Wwiq0hujV5CJFOzJkgCKIHoTAHQRAEQRBE76Cja1Rl36FlKhibOkKpBKHmoAyWCtQrQRnrrRdddBFWAdTIin8VBaWBEryJFg4qUaNPCZtQUE1WA9zMAjIKKGMTylCq4UBAGUo0ANRuF9BDqcu6pdJg1ZbgrTrgVnlGTNVQ6EQXgiCIXgeFOQiCIKKK/asH3HqreK3eJeq5Pwf557n7RWsY2LX65+B+wuqwOTTR2/0PEsgKQUQZHV2jdtReLblVx1CW6GBstUeNtTvqv/76a5TRAEruQpstysq/0JmVIKAfhclShTOEzhdhwSqATgC0v+SSS5SsWlEGUI8GSsYSQSWUKOsl6NESBR3VqrA1syV0S4IgiH4FhTkIgiCiieMnj8//X+9eeBdehdP4mv4l9sC7F7Y8wF7643Fp0iX2r36CPXDh3S3L2EvPnJK6cNLL/Q8aNOiMICYmBjVXX301CgQRPXRlcYt9A3nQl9zKJogA4EpeCegBBESY+LlVBlBiTgTIWAKm9AoAqwrUoBPVCwTUYCuGM0BAGQVAbboxBUcUaIA2WCq3CGpQUFUorWArosvKHpQIVnVsfQa3VK22Zh2i6x4IgiB6nO4Ic0wNDWlNEATRvxmZPFRKjJ06dnzk3eMZGzL+7pF/2hGGZf3xk8fHTOIOp00aufmd8McJerv/M2fOYDZHW1sbVGNjYz/77DNsIojoQa20OwEujG0X0ojyrCx1Y2wFjUlQvUBQ9igoG4VuoOzRRmlUVTXpAgYvdD0AxogexYCqboZVBDXYBEATlOfPn0cBQUvQKCUKqqMSTHqF6oh+UEANVFUrAk2q1YTJ0oRqDW4WCl33QBAE0eN0UzbHe+0h7QiCIPo59SeOb14hdqn8ERbxTXVseJJsCQv1J5gWRQk/vd0/gNkcIMTExLS2tqKyK7S1tHTbq+6n5vUJaEw23faSMyAiQ+hr0UDL5kDonk19oQlbQa/MUIDSdiDUY4kGSkAZBUB5UA5NGkTJel+Q0RjAVA5AWaomZalrEOiFoRMs0UyVgLDioIx61Og2ICslyqBXgm6jlFAiIJssCYIgiM7RTWGOjuHOxz+mCW5/zivV4cT73O3BHYOBnAAn3y3V7dOu53DCZ9mBuREEEf0kTXpgw+PvXnj38eQ/rYjIrg8iJGJiYjCho4t82u3kjPynHJsxkKW2h5DzIHoUXDmHiGl1be2LBoHMbJfuUF588cXQZOqlu1JN+ogYcQD0VpABJQBqUJMSS6UEAZ3YVr82Ho4LMoyLJVaVpQndg+qLQBVKbEWgijkmut5kiTKUCCqjFv1CCIIgoo0eDnM0NTVNmzZt9+7dsq7IceHf084cmrl1bAQW8o6H3nzzIYesBOCWJw/JSbiYs/tCFwRB9GtGjh8/cgh8HTJqJJRDk9mJeqEPE0nDWV2TlCNBb/ePDDI2rfRGckb+oyrz7yBACTIqiX6O7YrUqkSN0usGIGMVl99QqlYlALqsg0EE7Atgd5MGufjiizG+gFVTpAMDEKiBVhQU2HT+/HkMKKAxKsFYyYBSooyIFg7qwYmuBFkFPpQGSxSwF5SAalIGSomCklUJgFLJQcC+IdIh4yBY/YQyVYIgiJ6iJ8McTU1N8+fPT0xMnDRpklRZcTz0aE7ZDjfP8PBFGqCS7+apDPn5MvHDiIT4kjBQw3Mr8vOF7vbn3NjI/aicC3OHANwy8w4RFLExD+CBq1Ehk1Pyn4P5goIPjVOSNdFqXB1v9Zfga6DLvH3tUawTBNFXOPXMz1fvOgVf9287PnLUkCGjRh7fth+rP5zBwx9dZOSwkUfe4g53vXV89oQwODTR2/0D8MP1jLFpJTY2FpW9Dox0EH2V0NeuaGm7ItWVyiEolV43ULJyCKhetvMBAxWkUIAldsQSBdUE9lBFDVShPH/+PJSoxFbsAjKAXVDALroGYysgYBPIKp8CMJmBHlFddECD3aELGlhtrE1QBSUKuj1UUYNK1QRKVVVKbmQxU8p2QZ8EQRD9jR4Lc6gYx9NPPz1w4ECptSNx9C11x70ZC59ki9eKVb73uafLcmZkcLGMzRDZFiISwlse3DpTpGAYGuBA3ejfnTlzCLo/zVDYutsXLxkrOxx6ss7pF6aAjovH8lgC4CxLHsmjHDb+A3hw5z8IgxXDJN35zjqRFjLj6OIDshWnBM3gcHGySFxxJS9+EMMbNlgvE3v9bnSd4ZIgiL7BkEceYE/MunXArJfYA/xJK9MKH2AvYfVHPL2jy4wvXMZeGnDrrCfYA49EIkrQy/3DT3z44QoCblppbW2lJ60QUUigtat16RtklYvGWOLK2dZY96nbqO6oUWZQxQU/ygA0IahBQbWiDEAvjDgAuj3oQcYSwFZsUoEMDEAINxxQooD2KIDBxRdfDDJoFFAFPQiqFbugBqoK9IAC2qAeURoQoFQydyRkVfLOwpVo8d0NBSqhlHWtL1YBkPVqN9DNwxEEQXSRbgpz7N69e9q0aU1NMtU49BiHD8cdM28Rq3zv7q3syYUiysFuGZ3Iv2AkRGxF+R17EAMTTGi4jUzE8AkK7/E6QwldRVRCQ9u0klP2NI9BWP3bejiweKyTPYp7YnwGGTNyuIKjZtJw9IAM2EDrgaMNQmnF/zJ9N4CnuvAGgiD6EOML3+FPk32hdLysl76gV7vOtMIXLrz77juFYXNoolf7h5/4KLS1tWE2Bz1phehF6GtR0/oZq7oSjHE5DSUKoEQZDawo/8oGu+saEL4W2z1UUACqKGCJcFNNict+DDRAqQxABj2CflBGAxWJADNsBdAblAhqAL0jlugcBLAHVKxEmNuYAboHkKEJ9Qg26QICVQCd6KUu6JiU2F1WwkRwh9ga9kEJgiC6jW4Kc0yaNCkxMXH+/PlNgg7FOBqOHhC5FHL7Cl/kW+IVEnf+oLFHH8XAhFSFBSMGEaL/W550PVkn4iJdAa5bSgRBEET3g9kcskIQvQ1cKvP1sUCtrkEW7RylRMEkI1DVPaCsN6EeZdQrAbnISO5AYyWjGZagBOH8+fMYbgCNagJACbIqMbgAMljqNgDqUalKxKrBySgZmhClxCqOAqB/QPTzXTuABqjHqhIAYeIbF6sKtAyC8Gr2BlhdhU7wQbE1uI2JrkyGIAgi7HRTmGPgwIFPP/00Rjo6FOPQd6jwaEPZ0w9uTZaJEragrXtHGVaD4xiZfMDYweJ3+IcJcGfMweQ/gIfEhx6Vm1B8BnZzShyNGSqiVeZsMMzq8B6vEzUrjjtmGvt3QrxOgiAIgiD6LMFXmHyJrK1XrWtX7B7ECXqART7YIKgHAfSoAdASmwDVBDKU2KQ0WFVKKFXMAkuFXgV7MFN9VVxDNMoRz58/r9xiE1QBDI5AFz07Q0UuEJwDKNEASrxqkKFUvdAGZQCqeIYICAjIaABdANQg6ARL3bluA5iqiHDGO2IrylFCVE2GIAhiwIQJE3bs2CFrkWHq1KnvvfceCP/6178effRREKwxjptvvnnPnj2y4s7nm0Iktzx5yPdMFO9zt/N0CtwbApUH2e94o5KMnjk5OWVlzHWmONFoUSYo/I49qKpj8cyMHDDHUAbHp+cYbRb/oDR5UAOB7dOj+dxlJ96HzdCmxLv4eqvhpfktOTmsbjTYMWWvXKtet9xyy4Fk436Ei23btmVnZ589e1bWCYIIQBg/LMXFxZmPZ8pKBKhYUfF4ZgT9r6jo9f7z8/NlRYC/svMlhQYsgRRQhYXNV4Ivvvji888/X/CfLx50v4DdiXZZvnz5NcuXy0rkyZNfCR+wVIZvY1kxqmr9rKq6Es0A+AhAqZpQVh1BQCWYoaAHDqCKTUoJVd7B8KPb6K2AVUYP4EqfEgrCSjZhia1YYhPICGhMw6FDpYESYxnoilv4X68ClOhZVVFAwF55xiaQdRu9amrqJ0TnVcOPLCkRBNEb6NYwRxD8whwB8a3zeyG9ZvIU5iCIEKEwh4LCHBTm6CgU5ugGAi0XO7euVk0goEaBTVYDVKIGgA+OUmJVJVZACVxkZEBgmAADCmAJSgSUWIUSZFQqM90DVAH4kGIrOoQmZYZVbOJeDFk3AwFKkNE/tGKkQ6G7AtQ0sAqYqgj6NAlQojFqdKWqogFWQ6Gj9kQQKMxBEL2L3hPmwCQH/5SL3oCRAGLKS4liKMxBECES3jCHlIgegsIc3QyFOSIKrm9hBQ7fq1KlEWT1i4tqaEUBMVUB5QFHsdqDEmWYABrjnhGsYhN6gKoywE8WKEGGzxc2KUtAVVVwATsqYwCHUALa6L1AqXeHUqFmCzL2VVUA+4IAZliFEg2UGcoAyFhFDZSoAVmfmLIEdBu9qqO7apcOGVvpYvc+BoU5CKJ30U1hDikFJYRsDqI7oDAHQYQIfVj6MPjLPZQ6sDhRQLXdMMf8nRcePTYhKX+frN9WXL+BZWezDVD6tBFi/s765Cf0UWD0dx4xnkp8/BltXj5whjYtFm9dhsIc4SX4ilRvVTIIAHwzox6AqpT819igh6owtxkFlFCiAVbBJ1qqEhC28jOlgiAo4wdKKXVj7AuADRqgEkqQsS+UaABKbAUNGkCJvaBVhVFUL24tqiiAGYIGAMpQon8Q0AyqAMhYohKrIICl8ikM7W8ytkITaqCKer1qbbKa6cpAhGJDBIfCHATRu+iOMAfRu6CVG0GECH1Y+jC4JIBSBxYkCqi2E+a4rbh+GduRNKouafrzStMdAQ6BdSxdYw7AtEcEZk5hjrATZCkbqAmXygqwQUvdXrdBWW9CWdlgFQMKqFQCKpUN8PV996EQPVz+xz/CJPUgBepxzqgBQMBrQQPUqytVZirHBLsjStb12AVL1ADYauoeIp3rRQSBwhwE0bugMAdhhlZuBBEi9GHpw+AKAUodWMYooBo8zDF/54W7tw14Irl+mYpzYLBAZXOARek0xnY984yIhRwprl82qn7aNFCxXbkDoA+3H1XPpk0byY4/k7tjRukjXBDRCdlXs/TrC75E5oaetKGHKgyZGRke0lDNMKC3zbONnJAACSGhQmGOjtKhhWuIxrioBksUFFCFb3J0Ym1CzyhgRACqaAlAR70V/QC8swAtQTg/d+7FGzeiDEpAxUdQCaAH5QcENMZSmQFgcMkll2BkAe1BiRplD3ossRUsQUA/wL9/9KPL//hHNEYNyNgKGvADJTZBCXrwA0qVJIL2aKMEHVSazNCbCdDjJNVYUCpL1Z3oTijMQRC9CwpzEGZo5UYQIUIflj4MLiSg1IFVhwKqQcMcGOWY/rw1uCDDHHXLZEIFj1gwGUwY9TQPWmh935mxA2x4NMIQfB64T2lq21eNi+gasILBwY+vl5iM8h/Im6HwXSA67zgU5uhO9NWyCVx1mxbbaGlSItAEK3Bogk+B6otKbFUyottgk+r49X33qTAHlKC/WJxIiq2gxBK9oRm2KnulB/59770oRA8XvfIKCvoVqQnjJagmQAnKBu0BdbG6jZI7TVic9BMozEEQvQvf/0MEQRAEQYSF24ofTXrmCR4C2Jf/dP0jy+ajWuO25KTjOzbzkMPz23ahirHjx47wL0eOHU9Kvg01aKMJwJhRI0c+8g6sTi7wlA5pau1rxeh1oTTpmez8feBn1zYRp4A5jBw1RtgggbyBYlop97CTTe9CjIOIBHw1bCyPdYIvZaEJe/G3VVtCoxJBPWouEgkRuD4XjdIYNLoZ9yVAWemhuzAfcLE4kVRVQVYxDlCiHkrsjlX0o7j00kuhi7IHzeWvvQavb27Z8g2Xa+DmzSDACwRQXvHHP+ILqkoDApQgozGMhBplgK34umzTpks2boTXpa++iiW+UHnxH/6ghIteeQUEmA9eF5ZWMHKBl4waAGQAlAg2oSWgNGiDSgU2IbocBKsTgiCIvgGFOQiCIAgivMxf9ogKRPBIxLRHiwNFHjrJrlxYxiB6xkY7HH9mQsc7+bEvPwl6T3gGgx07reEbImLAjVdlIOBNCWQATVLyB+1VKwiIrgQbNINSKRV6yAPAiIPowQF70GAvqJqMAWhSrQhUMWgCMgYyABHKkEAV7HE3igqXcF/aCSBgg07Q5pJLLgEbENASWrEjylBiLzU9MEMZ7UHGvtgL9GiGzrEKYJPuWSlVCV2wVEqUlQYBWa8CqFHddSWgKwGUUU8QBNEPoTAHQRAEQYSV+XdP08IQPCrAZsw2xTn21dWPRCVYoypkeEoFBk5uK67vQqyB+7lb9IY5yPyN4MjxRLAjd5eRSEJ0C6b1rZVABkqD344o4+od0FuxRECPNiBAFQVA2YCAMpihDSrRBpuUDGDUQEc2GF3AAP2ArAygVIEGKFEADegxvoC9sAn1IIAGh8O+AJoBX3311SWXXAJN2IoC2gCXXnoplNhLeYMSuqAGPECJTQAIODGQoUnZoKxKJUArCArsha0oQ4kylKpJaQD0oMxsbZSgmgiCIPobfj9tCYIgCILoGrcVP8py/fZz2G5ceX56br1I+LibqU0rIbIvP0n2feeRev+hFDyM8sg79UGzSPblZz+TJLaglLLcoPkdhjcGIzPRw9j4Ig2I3gC+cSDg8hiVOrZ6fS0Nsl5VrUoQ7VKAEsMB0AqCnvUAiN4clWcBMpTQC2WwwSW9iiMA0IQ+MVSBBtiKAmgAaL300ktBCX1BxqGhFeTLLrvs/PnzIODpodgEoCuwBwHmAAIoQVDzAbAJ9aqjjjJAbwjIgN4KYBNUoYSqLiCiXWqgI1YBNTGQlZkSEFOVIAiiH0JHkBJm6FRFggiRTnxYoIuUiOhGXz+gjAKsMebMmXPmzBmQgx5BGjrWw0L7BXQEaXeiL6ShBFkXVJOqwroal9NKqfdCJWrUChxl1CsDQK3tsVRugS/uvfey114DAZouvvhi+ECBMVYBlMEePUAJ3kBAn9gkDLkGuv/jf/yP/3j9dWWvhgbhyy+/vEQEU7ALaLA7KKGEKihB84977vnGli0o43AgQBUmhjZQoj2A3sAAZGhS3rAL8OWPf3zpq6+iDDaoR2Nlo5S6AQhQYisKeqvSWNFtAhGKDWELHUFKEL0LCnMQZijMQRAh0rkwB3SRFSKKwZUAlApYwCjCEeaYbzwStqtPZu2l9KswR4hryyBmwT1AK5Qd7at6oaDLSgPf7ReL0y5UyODrn/4Um6KHQdu2wdzO3n33oO3bMaKBE4arUKETMAMllHiNugGA+Rr/uOeeb/7v/w160ODFggwfcHCIHfFuQCt0xL6oByWUAFTBBpqg/GruXH4i6cUXgwfwg6NDk7JEQEYlVnVZgTayIqpQKktdUK0mbN3aKolAUJiDIHoXFOYgzFCYgyBChD4sfRj87R9KHVioKKAKixwR5ehiNkc/hbI5uhN9QasWwyiY0PVKUEooz//kJxe/8oryBsAaHsDFP1TRGD4jGB+BEqvYiqD87x/9aKDLhU2oAT/QHVyhT2gC5SVigwkYXHrppV9++SWaQRXN/t//+B9Xbd0Klv/vnnuu3LoVNKo7COANgI6ohBKdwKzADyqhCiVU/3HPPf+xdavyDD7BGD7d4AGnBwKUIAM4Nyyhik0IKr/88Y8v27RJmYGNaJSABodQevSJrgDUKwFlKNEABaUMF8o5YYXCHATRu6AwB2GGVm4EESL0YenD4O/6UOrAIkQBVVgLmcIcv146F7sT7VJVVUVhjs4R4lrUaqavkJUAJcggKKWOWoqDgK0Y5gANxgLQAJpAUPaiKweqaAklVKEE0BiEfzmd3/zf/xv0X375JVTVFhJMjgAZgxEA2IMGbODjppRQBZt/zJo1aNs2EM7NnHmV2BWI88QuOB8MlIBS+QQBmkAJVZDBFdB2551Xbd+O14WWMBzo0R5tQAalCrgAoISBALABPbTiuP++995LX31VtQIggw32wiGwFarYqgTdWFWxRMFkCVWTBm0AW1lXEiFCYQ6C6F3IHZUEQRAEQRBE9KOvWlEwgXp9Hass9S4mGeyxi26snKj1OQJVWKiDAepRVlUQUAlV8HCx8SjWS43nmAAgAGgAetBALygvEWeLgjFWoQSwFwiXXXYZNCGgxO0kAFZRACU6gSr4Bw2U0B0HUmaggVK455a6PU4DZBgOXYEGlVieF4eYYnfQgCUK4AFGQQFlAGVQgo3qhWATAK1oiUr0iV1EOwdl3QwFMQgHqlDqTUpG0EYXIo1pAgRBEN0GhTmIrnLVVVfhf6WhAMayG0EQBEEQHQH+G5WSQC1WdT3I1kUsrn5Rj4LJFS7UQdBLFHCxjRosUQCgF8rgEGUwRnsoQQlLemEuJ4BpHdCESgCqALSiPcjgBwSMI4ABGuP00BIF1IOANiiIFt6EoQQowQkKUF522WVgg0ocEdC7A5deeikYgAY7wjTAEvQgA5ipAYCMfUEGe+iFBpgJIjxxlGcosRcY4LWoWycMOWiDerSBqmpSJaD0ICgZQANUYndENXU/ODpBEET3Q5tWCDMdzcPH/0plpT06ZEwQUQ5tWunD4E8qKHVg7aGAKqxYYNkD0KaVTkCbViJHoP9qld520YtNsDIHwWQAVQC+7aH1q/vuw00rqkn5xI4ANoExAB8TrGITVC8ROREg/Mvp/JZ4Ngo2gRI8QCt+vqCKHcHy0ksvBSVWsS+GIcDsszvvvHbXLhA+nTZt8M6d0HSx2GyCo4AejaEjeoBeUIIeLwf48ssvQYYhTk+bNuj//J8zM2fyYaKJAWVlKMC0edW4BKHzgTdEL01KNCM6B21aIYjeBYU5CDMU5iCIEKEwRx8Gf1JBqQNrIQVUYflEYY5OQ2EOW7ryX6ptVSlBQD2ASl2vm4GAAQJVhRKAb3soz//kJxf9/vdgADI0YStYojHoMdAAetRAL6iCDE3CioctMEiBR36iB2UGVRTQCQIGUIUS9GCJZuiwJSvrmp07oXp6+vTr3nwTBDBQ8wcBp40TQz8gXCrOFsVxldvT06bF7dzZcued/23XLjx5VIVX/v3vf+MEoK8aHWV0DvZqCBz68x/96Io//lF10QcCV1Di3NAYSzRQGmmfna3CHFbQGFFDmwikJzoEhTkIonfhy6wjCIIgCIIgepBAy1Qp+YPG2KovZVGDVd0GAQ0u3UEJK21UmgAb3QkAVdSgrHsAQICl+6WXXgr2WAUwhwIEVaI30Cv/50VMBI2hI2igih6gCcwwHKCUCFQvv/xy3IQCgAaGRhnsoaqO8IAqTgMAPTjBoMNX4ihTqMIQ0BcEAG2gBHngwIHg5Msvv8SpwnCgxCgGGoCAMgyB3kBGn6BX1w7dQQOggejElVDiTBDUgwBNehUBWemhBBlBDSpRjxpVIrq+c3SlL0EQRI9AYQ6CIAiCkOzx588GlZWVWFYJ9greeuut6upq2ZMgIgYuUwOBrcrGuiJVGrABoIoaUxUAATXYhBoABKwioIF1OwigBBlKWMNDCet2XM+DDKABxi+wCzRxd0YUAFAajAKAHruDAIBw2WWXQUf0gP5BgBLjLBjdgBJDBqC/4ooroONXX30FMvT9xje+AfaXCzAsAsYAjgglyCoyohzCuKDE0VGD08PJgAygjFWwAQE74iRxeuAWlSiAJchoiYCMTVBCE7aiAIAeSzSAEqcKYEdlBrKw8gmqo8KqCYLyg3SoL0EQRDRAYQ4iavCWZAzyke+WajukqbDR5cCAVUaJV1YiAZ+G3xwiPiJz5w/q8Aihzyry8yeI6ORmjXH+jDW46aabYJHTdOqU7EMQHcG0huwE4CGQE9v1LYJV1REF1EOJVe5XADIuy0EAcN2OVWxFM1x462Yo43IdStCgjPYgo1uQwQxKkPX1P+rPi7wJjEdACa3g5/LLL4cqfPTAHmQwu0SES0RIhAvgAQwGCrAvaFCALiB84xvfAAHtoQldgR6r4AFkKNEVGuBM0BVMA+cAAoC9wMNXX32F9we6QxUM0AnYYEcVoMEmVALq5ihL9CMM+SigQT9Kqaqowe5YBUAG0AxAwVoGQrXqPgmCIHojFOYgoonUVYfOIC7mDLzI9lZsZdyyOMNfDoIjz+3Oc8hKn8Bbsoatmrl1bfDwTufpe3eMIDrI8OHDR4wYISv+1NXVNXi9IxMTZZ0gOkIn1pCm1alYzNo4QTNoUvYgoIwLZpBVR6sH1KA9yLDkVva6EwQ1WOLiHCxx1Q0lgAt+EKAUgQV+HgeYYSsAMtgA0P2yyy6DVgAHBcDgvNi3AjL0BQPQqJgFyBizwDlgeAJKnrYhgC5YXnHFFWCJMgJmoBRWl4MMGpTRA5RgD/5B89VXX2F6CFZBhhGhCpMBM3W93KmRh4JzgyoYADA3ZYZVAARVheuFVpShxL7YCigzrAJ4f1CGVgCqWIIGS1UFwbbUUd4AaytBEEQvhcIcRLSSOjMTFtm+nAIlufPHLqmpWTKWJ0/oskhvQDCtgvfIz+e5Hvlu7A1lfr40UqkXsld+CTT6xwzAXDRpDi3dpU3G2mNYN8HHxTkMyihxS1txGWbngHUmpivScK9dkjIjL3Nm7Q7VEmR6mgao0NNAYAje5DP0v98WPREZpoaGtCYiz/Dhw1FwOMzhvtra2uMNDYkOx3e+8x2pIohwoC84g2A1Uxp9mYqLZ6sGjaFUYBUssYoxCzTGJqyCoJQApjnAqh5LaMISbUAJDkEGARyCjOt5APUAmOFYsLBXAoYzwBXIl4swBFZBjzIowSfIWEIvKAcOHAjC1VdfDSXGIMAMhG984xvg55vf/CYMqmtwzsC3vvUt0AOghF6ggRKMwSdosAolVEEJ4KBoAE0AmAGgR59wIVCFmwNNoIEJQxUvFnqBASqhis6VLBzwW403SjUB0FGVypVSogBgd10AAskIaKA76vWSIAiityN/gBJEVMADFoizLCUpQCpBRvGhVak876M4Q5dhPb5mFCaDuJhTLuprakeVgkJL9ShjM4RJThnGB9z5zlqRQzLj2JIaYWHgLcndOlM4VMaW7mCzJMUFitJRtf69feAcDq1iS9YwFLZWeG2cW2Zie0US946ynBkZzJE5s3aNFn6wTs96CYxlLoTJYBqIt2SNcMSjJvw6wDJFNgkC6YkI8F57SDsi8iQkJEhJkKhlbRw5cuR4Q8PIxMSUlBSpIvo03bnqU+vV4Kh1qS2qCVbLKKM9lKCBEkADQMkggA2aoaw0CNpgMAKqamGPZqhUHWEpjpa4wseQAa7PlRkA1csuuwyqqAEz1KMxCBhfAMAMj9tAJ1dddRUIYAZN6ASF8+fPf+tb34KqilyAExXjgCpmdsAvGbGxsaABS1BCCR3RA5YDBw7EocEeWlEGS+iC8QiowgTAFQjgHLpAFZrgqsEMpgolKLEEsAuUevhDvUEI3jG8FQjIeL0gq1IBVWjldoYeZ6ILqgkFqx411pJQqHtFEETvgsIcRDShbVrJKdOX7yHQcEykdWCMhNXWi86YEqKTOkqsVxJHpQoTb32ttMmYkcMbfDjy3KUs19+fqbvYMbOQx1AceYtM3RVqDvpkrM6tM7G9IoG3ZE2tGlcPP5iuzvYSAEfmzFQR9lAXAD3KnNwwnxXrUaFAeqLH8T53+6Dbn5PvKVSUHA7QX+e8qhQkXwqROz90P+G+lM7R2Nh44sQJlL1eb0NDA8qYxzEyMTE5ORk1RJ+nx1d9pgWqLdgKlmgMJWiwhCoulVGPgIwGKGATCAAYoz2UqEEZbZQAeiyxCqAZxgtgwQ8yrNvRDATd22Ui2wJdAWgPZqABMKaA20NQA9VLLrnkP/7jP0BzucjvAGOMUOC43/zmN9EntELHr7766hvf+MbAgQNBz0/pGDgQLK+88kpQQit0AQ9ffPEFGoMMfaEJquABAxMwKPSCEucATXAJGO/A2ASflnFFoMcmkKE7OAQPODEUwBLKL7/8Eqog63oMbYAMfVUXAKpSMsDhlA3KSoNuVSs2gaD8KAFtVMeuEy4/UYu6dQRB9C7kT1uCiDJgqV9zTK4sEFj0SykgOZh3wAnDsRKwWht7bBF35goUweg8ITq3vyL3WtypI3CWsYARoYCj8KhM2Q43j3JgaMWR5warQ6swqOHLHAmkJ6KCA4sjmmHjeOjNNx/q2AfJ+9ztTia/aw89WecUEQvv8TrZHGZ8W6oEuK/KEmYxrIxvX17v1LfykSNH6o8fpzwOIhqwXXqBUoGLTyxxLY2YVssKUEIT6JWxbgZKfSF9XhyZgQYACKBEA1jnQyvY44JfrfnBBgygaprAxQIwBi4XD21FG2iCEjSXXXYZeAMlpkigMXi4QvDNb34T/WAXbIVeaAMajFAMFCeSQiuU0Av1IONMYAjQ4JTQDzShDTShK9ADoEcluEJj0ABgAEATaMAPtIIABmgGEwAlNmErKAGQoS+UWMUuWAVvKENfVUUDBJpAqUowQxtsUiWg6wFVNdl3GuWHIAgiqvD9xCSIaEJuyuBguMNbXytqAeF5B7jc78gqxpGUUrO1QiyOdpShSgOnYNeCODJnGrs/AhsFwuTcOpNAVwTtWvjD2AYjG80EuoSMGTlla3K3piwS0RM5gAhquHJ8iR8NAfREVHDLk0+yp02ZD97nbhdreiPTgydH5OdzXb7bJ0OrGw3RTPXy++Rwe2jW4gbKrdJZP2m3jJYbPBwPvXnmzYcc3uceXHzgwOKxGPGwDmQ/tlBbnfuDUTj8EKSyHPHNzNOijKwwkX8kN14dWiX3d4l6xzOTMMaRNHLkmDFjpIogugVcRnZ6LSrWthyU0RuUSqOjbGBFDYCMS2soca2u1rSwVucdDA2uxrELtp4/fx5K0EMJejRDAwCjDKiB8hKRlwHywIEDoYsIHfCAAuhBCTII3/zmN9Hgsssuu/LKK6EVPGOE4l2Px3PgAAigVKkcAAiYpgH2OASGLcAhtEL1iiuuAAFG/I//+A/QowecT0xMDAyHBgBooAkngwYgA+AQLg1K0ON9w1YoEZgkVsEJ2qAegHGhCiXMBKso4K0QJhLdQAEa6I6APWp00AxAGS1RFu0SVBIEQfQxKMxBRBPa2RwMFyIi7YAnEuQeS0lFowDAiseVIvqP7cgqJqNY9trBTGkVPBAg9mvwFlNqiYEjr3RVrTBaUxt8eiZsnFtmYn9F/Akr/pdn2riiEewSMhauYjUpMpTEh2LCEm597apSI3MkMYCeiBLuWOj/sB0eUkgWMTBX8uIHMSLBDtSN/p2x5kf50JNs8dMMha27vdDL7gwXg4xi3iRab3nydw85eATi/2fvXMCjqq63fxDIZSYXUEFbVDQIKKitKFq1qKhBLFTFmlbFFrQXFJSmXiv+rdpWrIh+FCVKrRpt1baxBStUJVpQWhVQ2oqggAQQ8YZKLpMbQf1+Z79ndk5mJiFAuO/3mWez9rvetfY+J5OEtXLOmTt7p35qTN7l1/a5wXwXWzrv8vtvP+642xeq45G4UGlhv4DyL/6wQaWFl7G/Vn8bN7Yuyp6dtqDZ5/oA8wgcc8NXK7Bq1aqVK1divPnmm8uWL+956KHuOg6HHYXW1KKmpA1qWjECsbaExjaqQMAUWJsRFzUzNgZR1iVeU0p3Rj+LeY4GUwE9ULh4aTDUj8BFtc+4ceNGk8nvCAAYwJRwMYS8feKJb51wgl7/O+aY/xx99JvHHbfgyCMXfv3r/+rVi9erffowkrTdpZfyYlsvdO/+8mGHPX/QQc9+9auMz3XrNqNr11kHHPDUPvvAzMnLe+YrXyk98EBcKOf27Akz+5BDCMH4d+/e7OaVww/nwOYfccSLPXq8/rWvaTlWZzOL+vfXKfIPtX170/3I1Jlhyv7V7BA4BJQ6fIBgw4YNHB1GQJnzKcMqlV/AtlO5iBXJlFQYcjHKDo8WCVOlYlRgK7FZYgcHB4edAe1OOumkmTNnBjMHB8+bPn36iBEjKioqgvmmwC+/hF+iLWCzxNsXZUX5o7ypO8NnqG6fnew8x7sLY3O/WVrA6aefvsmHjB577LEvvPBCMCm7b9Bl3v2zLl9ROOidsfd7lwWTTjOHBBcxyOwRyPyvczwkL6XR7wb/j6GeaUh4ho9nNe+RIF+QuqDx8iB1MIJJIyQaWUKIXQU65ULh+EBgAgNqUwi/l1l2wuL+Cxb4t7gFOXD385/qy3Ts8k2+6znDnGcM/aRiXLRokXocffr0obToTS1kGh+4Pv/889dff/2EE06ggKmrqxtz04N33Tjcz+LQCsyZM6frLbcEk22P0cG/uwPsb9KWf6XKS22skphp4AhBJPW2zWNDcMFjQKrAlrj+wgujJSW6bwWBXCY0uIpBvMKRiccGuDrGr3oAq0855eCXXoJhFaALNPhukuatE074xpIlaojAQyoVrszMzPLyckb45w844Mti/ydSuxEjvhOLhTcGSThpRTICpiyBF5tNYiPDi/L5r371y0cfbXfJJV8+/HD+GWfApJlbZvQNPv+II4594w2U9fX1kOynoaEBjZLY/EwB/IdnntnlH/8Qz360EIESQGrKiFdTgF4khpjPf/CD9o8+GmZkkASDUUwCqWkyWnAJm8xg0RrN7oRbtuPPKwcHh62Hu5rDYQ8HVZHQb9qwHXuxwnbcib9Uv3HBDSsOuzby/Qs6ngsmWwbeD/2WXquLLAIqAWXm+o1Q3yF021SqHgfwrwFZePuSJjfVbHohg+NuL0kIbBGlk8cFj5gBLDt1qv/xSqzea4K5OiR+a8ukfP+ij+tGr9B3Wus+Idlex+HuVXHYIaCSDKwQEmpLNGGZbEuqZrakHb+89FJeX1xyCa+NI0Z8PnKkXkwbfvADDMgN3/8+I6/6iy/GZuTltW9ffcEFdcOHY9dedFHse99jqlfF+efzqiwoKP/Od9afd96n556LweuTc875+Nvf/nDIkI+GDn3vzDPXDh68ZtCg1Wec4XXsuOr005effPKKU09dedpp7Q30USl66AbTvcxVEhnmWaFABmdg//33z87O1oM2hnzrW+eec470uqQCQyMHyxmwfRZCkFmXxJnxZ5TisoDBpf4FGfiZAUkGViQJgTqNarvofhZyRsyn1cIwmjQ+8KrbIg0uYrFxyVCPQ1slFkY8I8AFKQGjNYyz0St9slejgJ2QCoRtIIHGltEajYODg8OOgmtzOGwt+J8BvyNbiYT/RuwEsBfkt8VTS7cK23EnWqrVfyx32KmRd/m13g26QMLr0fu4+M0gM4vtQzJagRYfQ1Na2G/ptaFuhr+KuhBliQ/Q8Dtolih7btr8Poc2fTMnPpLm0D7zpz2nfgOxwZM/vB7+vS/xm242Af9ZNU06dnl5dtLkaTL6gKIe/riwvFWfkKzrOHr17Lnb9zg+3S4IFnNoBfh1KcNWkpYRwtOwJoG3pTJ22CV0eOSR9sXF7R56aK+HH8Zgyqvjo4/KxuCV9oc/yEj/4x/18j7/nDHz8cez/vznyBNPRP/0p5ySktwnn8z+y186/fWvnf/2t72nTeO1z/TpvLr8/e9ffeaZ/WfO5HXAc8/p1f3553vMmdPzpZe8hoY+r7xy+MsvH2merMEmM8wHrOgyDZiN5kEbkB3MZ8FmZWVBYnQ0SDcflQKDRm0RAnMN0CPIzs6GwfuF+ZwU/XeFc4JNfsIbGhoIrK+vV54wCIckFSEY7ARSqXCRVqkAU7xqfDBlhGFEz8hC6rPIi4vD1PUduCSTF14MBiSjDKCzYacW0iiJvGE7DHi5hLAgpTiwHBwcHHZZuDaHg4ODw66N/LG3HyfLfw7GEvMwlQKvpJnLLJLR5Bku85cmPIamtND/NJ/gCS2mEZF3+awSPYGj3w19mj4oJn+S/4gNSf3rkswVIH4vwzyCNMVCBAybZh7m0XTL+ZPM00WCWQvwHzmqz1E2KC0M911CT+koKxq1eZdJJfc4evbsqTtWAOSRRx4pe/fAsdsYwTIOcbRcSSZXnskMgDTVa9DFsCMltPSMwEgCrzXw6tqBhNLazxvPbJWMFkxVolOrM2LLgCchoxJiUL3LVnkPAyKRiLWBbQFg21YFgjTzLI+cnBwywKenp/trt2tHOAJNMzIy9t57b2S5ubksgcGGN27cSE5CiGWKgSsrK0utCtJisCJATx5GfvywCjz2+d/5DuM5Z5/NyBLqs7AfFoVBQwYS4iIWF5m1H9bCJi0CbJ0QeAyRRInEC8Mom9FuXlOSawnAFOjE2ilQCIBUVBhhrwwBpRhG67KGRThhstfBwcFhl4B7NodDIvbUZ3M4OGw2duSzORyE0sZnhggQenJI//ELGy+MCskCQRN3I/RsjkWLFi1dtkw9Dn5k6acWlUbPnj0lA2io7naPZ3N8+umn27oTwdt7n332CSYG7tkcyWjhV2SCK3kaWPFSVmNAxQXW5duXXrrXww8z5Y2tohoeQ1OgKw5Qwtj6HKbuggsif/mLXBqVRNcpwFDDw2zcuDEjI6OhoYERsr6+nlKfsh+eKWI0i4855qj//hee8IVHH33S22+TgXBCWPGZr3zlrA8+YArIgywSiWg5MgDE2A9/+eUI88iP3zc0/MRcoKHmAi6+K9FwIArEZhvKptjq6mrSSsBY/MUXwz///LG0tO9UVjLFhaa2tpY9g1kHHDDko4/0YA7CYcjJCMPqyDRlBIQv/cY3DnnpJQxIRlJhsG1NyUAeAI9NCDajbJHIsDd+//sd/vAHMYIVYAAMTRk1tTyjddlR3jCa41vAFoTs6nDP5nBw2LUQtHsdHBwcHBx2PeRPSrj9yt791aSJEZIFgubvDbPXcSRfr7F06VIZb775pgwHhzZEC3Vj2EWFGVhxJAQypZy2la0Y2QJeKVVmy5bBiBJeGWA6mLYFkAEjATajOiCyESiqoaEhM/7RsEwp1zHwYqSbj5JVfgKZIoCRnZ2dHYlEyIkYBj7NXH9h7kTJJRwXU+lBfX09I2JtAxfheOHZJAYgf11dXU1NjR60gYs8bABbt7EQhQvGJmQnOpbq6motx+rwG03vBhdROkDWZUVSMWWrKGHsqcPGhR4ghtQIL2ALiImyjGQwABc2owzxEgBIpqyCoVEGkABDAomBNYBsvJq2HgoJp3JwcHDYqeDaHA4ODg47Bfwr+1tEoHPYxjjyyCNT9jiEt99+e8mSJcFks7G2ZPSpASbOS6TiTBjzJp46umRtMAGhBKc29TjsfmiuhqTCTKhLEwpXTdEk8Aq0pF9DG1i9vOBzcykHtTTARfmNAWnigoIcMbb0Jo0PGJRU9Rs3bjRNBr+jgRgDkhEx41tvv/3GokVfPvpomoEeugFwMUWPmGlOTg4MIDOB2dnZSpKenh6NRjMzM3XTCiFami1hMMLEYjFslNi4MjIyyICL5PCsSB6YhoYGeVEqFSN7ZqoGB1MrY1Gr52yQDYMjhVcLhiilRQMwlJAVI+bppGiAXBoh8QKm9rTLS36bCjAFGJIlkCitOMFGoFFKkQDDMg4ODg67GdxNKw6JcDetODi0Em1404rDTgJ7W5D9SYUhm9pDdtig3mj9TStrS0YPXz1izjXHN5oHlIy+zbuxqKBb2GkB94Q3sGz1QUVxGibQmxbII90fk711SLppZdVD551y6+u+dVHx6tsHGuIq7+6/XXqwcW8B3E0rbYWUv0ZVsgp4w1OgqXjGoKIeOdJ//mj80gDJgN7elOIYlOjU8JB4qcYxmNZdcEG0pIQovGggVXVT3hO4znziyU6FMebBGew/Kytr/fr19fX1uiiDbeNtMDe5cCDg4c8//1Fa2u8///zCujr0fF8zEosSb0l29nnl5cTCEMJPfmlIojNAqlgsxglBAP77ta8duXBhTU2NzipKnUCU1pYSw+zU/xqRCpemJMRuuPjiDn/4gxhilQElOWXAa0SModGS4mVYpjnYDNibFO9pcDetODjsWgiawQ4OOx5lRfnmQYQBmnx+QwICaUuSbQGWbd2HUDo4OOyiOL0pTotj4MCBGnUdxSkGJ5988oABA4LIVqBbQVG8jdHtxIF9yt5du/bl2d7AE02fIuSMY94TU/IGFJw4sGxuius8PO+A7n38f9baCzza6OoOv8cxY+iLq30UeyPPe2hV4HDYsQgXn7ZwtSSQnTzKS0nM1BbGgDoZm1FTIFsdDQxV7wrEBXQlAgIrZqTml0Z8t2eeOfC55w6aNavH7Nm8er74Yp+XX+77yitHzZ9/9Ouv9//f/05csuTL3/9er2+9//6QDz64qKaGXV4Qi31n/frhtbW8fswGvvhiTHr65R07jmrfvjAr68rMTMifZWdjX9Op02UdOsBct/fe3saNYyORKzIyvIYGphhoYH4ajSJgP+xN3YpYLMZW0www2HBGRgb/l0CjM4OhjoO8yOTCYMTuGL/YhDODYTPDcx4YM83zU0mLoWw6OXjR62yTSieKKamwgVbHRTg2Bl6RUmoDtgkihtH4/WO0U0YZMEKYtLy1w6M0YbGDg4PDLgp3NYdDInbY1RxlRfmjvKnBDfOlhZ0m9Er5hEDQRLkdsaPWddhZ4a7m2I2hn1T+f/ZDoESxYErJQRkDNmz2I0jnTTx17oA513j8031M2ZQp/m0wQ+9o2ucINMeHr+BIvppjxOrhRtWoN8GbhSZXczS9cGPVqtmeN/BgL07OvqH7yMd9R3CZR9KFH3748t7e44+/HlcYuKs5thgJvzebm2IwYssQrxHYghmI/OKSSzo++ihT3swwCDCsTElkWDBFUPWd73SaPt26KNTJpimV/Nqzzsr75z/5plDhraaADDSMlP1aKBKJPNu163mxGEU+GUpycr6/YQMCeYn63caNl5sbSbBra2s7d+7MdxmpGhoalJwxKyvr9g8++FnnzqT9zQcf3HTQQevXryezbi3xyU8+YWfY2xDbOv/mo90DD3B+9JXl3DIGDvNl0tcLyGWnVmwZhzDc1RwODrsWGn/ttYSy0sL439nz8wtLt+TP2Y1/B6d+Df4IX1ZaVNSqP8cTHCzfiBb/qh7K3LjclqHVm3RoU+QPGblgmT7Yki+hEHwhSwv7jVuwYFw/zRO8/hut0Lxdm/EWFgZUkC389opTiSs2ReMSvAtLFay3Y3KmeKrCIlYW13JyBweH3R/qTwT9iBmzvRup+OfMucO7Pvx0jrUlj5SNudDXdCsYkTflCetaMmW4Lt64vmzMjQXdDujeZ8b1/nSid80W9TgSsXL5670PsTenHHzwwIPtZNVD593T017mccNsn7kquPCj+KLHZ0H4eH1pz7thGnscDluDhJozZQlKaQqCSbw9J0OuhIpXIyTMXgbYVo8hW1DfAca6MIQO5qoEvLrMATHTz80Hl0BmZGTAqNNhL3DAhtGDKhTLVM/mgGSUnoTYUfMRs+np6cRu2LABg0VzcnLQYBO10Vx8gZ4RoLGxaOQFYzMzf5aVdU1ubmE0enVOzuiOHS9r354R8or0dOwrMzIu/fxzr77+Jxzjxo3Yl2zc+P26Ol4jNmy4uLZ2ZEMDB3ZhLHbuunXf+eyz4TU153z88bBPPvn2hx+S/+wPPxy0atWZq1efvmLFqcuWnbJ06clvv022I1955ZjXXz/q1VePePnl3i++2HP27EP/+U/O7IHPPPOVp5/e/+9/7zJt2n5PPdW5pIRXzp/+lP3EE7yyHn88/ZFHIn/8Y8ajj6YVF3sNDYwdH36Ysf2DD2J0eOghDL32+v3vGf2+xgMPYDOyH84SZ57R2v5ZaPrGsIwMi2TGQgkdHBwcdgm0os1RWpjfb4J33ULzbPryqcMWF/TbgvpsxbIFfXuaP4LbB96XTi6Y5vXwrU2B4P7jgw3E0dKf1MOZkx7Dv3lo/SYd2hSlM4v79+LElxXlT+ilr32JV2DeefmTFo7v778hJuWn8HregsW9pkI04y32hhhiZPFMQ5QW9ps2zIgWjl/si1JGJUBLLBzvjZvgyZj2bFlZ0aggUyh5wWLzzh2ybNwCn2hNcgcHh90Y/i0mTZ6oMXREYB7Q3b+NxZhg3hNTljQ2NGZ4Mx6J35HSZ8xjpi0yZ45J4t/sMmfOY2PU7Ej1GNO2w8rlr79+6yndfYx83Fu6cpV38KV/u9u7KkT4OGboaVv8DA+HZorJBDJZo56Falp5GS32avoQBzsCvDYWGbaJ8G2ATKMMNRT8uyzM0zQZITMzM7Ex1F8gg+52wUg3124gID9jJBKBSUtLwwaIM8wHl6DB1p0gjDAYYpAxZVQTJDc3V4sSSBQ25Ebzqa7Sk1/73LBhg5YAWVlZkMpMVKdOnci27777IgMcLBoCGXUIJGeElxdoh4zZ2dl4xbCuNsBaMOTnMBlZ68WXXvrykUfeWLQIniRoOCLEsjF0ZjDsmdeKjDCSMRVjbYBXTBjwyiBotxbhKGtrXZHJSOlKuXQCWsjp4ODgsD2xyTYHdVpx35LSSflBUyFvdCk13GbXZ2XLF5uiNQQoL+h8bAJUvK1UCq3PvEm0YSqHVsC/RkMoWDx+qt/JWrHMXLhhqGJv8fKm1/Ck9PYfNlhfsdRevQ979OpvCP+dGeh5b/stsZZXFOwS1gDET/VGheMak+cPGWk0rUnusEcieBTEphCoHXZRrNVjRht7HMcPGDoj/uCN91YvyTso7pg3d8bQO9TMMHhsjDf75VRP3vDbJhPnqdlxx1Av1CjZUhzS85h4vyIFLir2L90w8O9rmX1D91OWX+nPii8KFHsu2qrAS1lM2qLUroIRZjQVjN8HUTYbvCphy1BjQzJllE15LEYkxTYgCju5ilaJjq2p1VDAw2NHo1HCKe9xZZhPLcEFo56FruDQZ6moxQCJMjc3V0trCWxtBpBKNiHkJ0or2gysyGaYEkg29T4AUYA9IMC1ceNGVonFYhvMR8ySBFJHoRGB9q/Y7OxsLYRMjwVFwM5J+Ll5jqmOC2hj2rwAA0gljfJgkIE8Zl9+UwMgg9Eho4HHCNsaw2cbBlsCgTzyigeQgRXnGWVYV8IUYIsMI5lJRjiJg4ODww5E4y+tlCgrmlA8siThagi/YlN9Vhq6IaTRDt/iEndT3albEMjKivL7jVvgFRcww268AyWcMoDfakjskViE14rfN2Azh9L5RlEg9u+7KSuytu8GydtumiokCJYCJj+8Zg5bi+CinZKR4f7ByBJz9YOPFNfwbI23OWxZFG+Gfsuu84PYf/PYsuQOewBe2xQCncMuC/8KDU93mPjwnxh6/DWPdX9E08b7WPwbVrw7mtyAknDjSiO6FRTd4QUpdRdL4NhiHHzaUO/Wq4Lnjs6+oXv3xmeQHtLzmMfvMbNVD53X3b9pBVw0yL85ZfYs88SOPRptXuD5xWiosFR+RtW3AC+jvFKqBrbTMKSEJxyI0VR5iMW2pBgT6kelmSduYjDFkI2AulohugICUKjbsp+oTPNUTkiAJjs7OycnB1upqqur1QHBhomYm1n4j5a8ugJCIIq0dXV1jECrwyNjIbUk6uvrCdlgPv2EXckLyK/9q/FBbE1NDQKicLEBPe8Dl2IRaEtkxhAJSMgUMTzhAAOenbBzdvW5eUSoeh8CaXUaSYJAJFHYOmPomUqDgYwR2M0DpuRhOcTaJyCEqWxIuZRHPKNCNBqhH8VUXjES2LQWkm0l7CoODg4O2xmbaHOsWLYgRYOhR6/+5l//b9Vxr7XLikYVeMFNACV9g+s+Gr2BkTd66vj+puCblJ/Xs2/8KQxlRRMWjx+b0DRgE6G/8hvEexP+PQF9VTUuHLZ4nH83TThzk3W94mkzh/g3M/i76jfKi9u6uyDVtpukKi3sV7B4WImvWHidZ5YK0k5YPjbYjkMbIX/SwmHTdIp5sxVPsA++iH/h49gar+C/+6Y9q65VaaH/jI3WRDWHkUP8N69/+ZFBY/I4tTXJHRwSwDs2juC9VHbfoEH36e28g8AO3Bu7WRx/TXBthqCLOnTTiZ0awCU9ZYNgODwhndCYNsm1RTj40r8V947fm7L05hcbP0a20XPKrb2L/WdvDBx00eMjfeEs7yLv9eUrA6FDmyChzrQVoy1TVdMKIpOLVYBSwEZmC13VyarMZcMrAwaltULkpba3XpXT9noECnIqdurzNHOnCVNIyn5IBCArK6uj+RQSGLzqZSgV1T4LqUkBQwbSAkgY9oaSDBixWAweva6nICF6JVHrAYMlCCQJAnKyDUjAbuFramo0ra+vZwrq6up0UIjZFS6NJIRHQCAbkBieKWKSs1B1dTUaHTKrk5MpgTrAQfn57UaMGHjqqXgJYec6dgQwgCTkhCEVXgztRMeFgENGIJt18RLCqFgZFpaxvBiFh73Yxp8Ilgis5qEkzWVICbsfBwcHh+0M/8df8/Cr+BS3bPh9h+Bf67W2ufJ/tFcGvOXxWwSstzEESzWhKf2Cq0MmT+t7XeIfuP1NJD6ZI359if+cyuIJ+YVFpWX+uuJDmcPr9h8/1d56M7KkdLRv+7mFlNtuTKXLWhTk5dnrWZTW/Um+7ZE3+rqRxQX5Rf7XtaSvaXL1G9c38cIi/8u2xd4Aaqn4hWKnAo8vcV6rolKBt0VxgZ9npjfSU+cuf1KQyqd8bHFyB4cElN03iHesfiIuvH1JwQ5ubzjsXhh4u38fio+gx3HwpX+TZT3BA0bj89tvx/A5q3TYClBJCtbGUI0KZNgC0hqQdrSQ0mqoe60AG14jFTW8XBIzqjugEZkKfgWipMKHwaYyr6urU2tAXngEGDk5OepxRKNR6nzQuXNnCnhc/CJEjEs5AVGsFTGPL1XjI91ctQGvFom2AYhqaGjAu9E8ZBQBwJBXXRK2xEJ+XtMyIDMbrq+vD7djMBDjYqyqqoJUQhg2QCqlZdShoccFLwEb0BK6AYetImOsqalhhKmtrUVDFEAJqYMlIYeAwUgqHaZOhQTYrEI2rSsS+IcX71xYEmhXEgthG2g/GlsAAiGYp0JCZgcHB4edEy23OVLDfzikf0dB/CGRPsrsZRO6s2MUmDx5WvBMDbxBtyAuaxLs/83bLwrh+gb9iRD8VkLoAQhNkT+pvHzqdb2WTehnbz8JZW7cFUY8R+Mewm2MVNsOpfI3EQ9qBP6RSW0Zhy1F3ujS0F0c/pdWU98ysF2BsDLB2zRJ896QDrOJKNWKgoJsaKIRD5s0CSMIDbixvey7rrnkDg6bi+N6Bz+U8i6fVT7r8uB9v3TyIH6YNV705l9fIYjxr/goLPS5wtJGu1HfeJGI1Sd/PlGCxq4yaPJSzR0cHLYCfnUbgkiKT01lqBb1S9I4D2AYVfFaw0QH1Sn1MKNiVTDDQ6r1wJTiGcMW2xphCIFUOMBWN4GKvb6+PsPceKLeBEqmtrDHyMzMVJtDS0BS2OtOkOzsbGwEykkSXWqhdkNdXR0CMhAIg4GLER6DnWMjI7P6EWi0InkQ2M8wVk+EJGSDxMXe2IDaEERxXPwAQ6mEZKuqqkKgBgQLMcJzFMSq68GoMwBPOCvqihJW0fnEzsnJQanNk0ELwUMCQgB5ABqWxguUE8aOgvZgocwycClzWGNtmwQlI7w1pNEI4AVNtww2WwKa4x0cHBy2BRp/eqZC3uBh/YObOvz/1vrPtDDXNZiWQZPWwbPTPGOXTi5Y7N/6UQomDemrqyJ8r+0WqIFAcOg6EXM5R2mqG1YSlWHoFgN2mT96Uqm9/SSst8utWKbtAbtV3453PFJuO2Hp0Cb89gc5bLiDQ2rYWrDftGHuqh+HNkXe5df2ucFch2R7Dwbzl/S+v9x/QEzwE/G+yxI/AMhqTKctsP0LQvxEZfcNurO3rp5r9vOJkjWsckMf/9KS+3svmW9CHBwc2g4qOzVSK2IkVIwJdawV2BCNQrhyls1IaS2xrZapvWUoRF4BG4aynCgM3eiBTHV+VlYWsenp6fx4wgaq57UERnZ2NrYaCuo+KPDz+DUXjBnmuRWMkIBA8VpUj/+MmgeOIiNDdXW19JnmU13gISsqKiABO0TADjeYZ45uNJ/MQh52yNIYbFipBG2PDOwWQW1trXgMXQxCBt20AuCZYpAEF2A5Rnhd5EIUI9lgxHPUjOyHKEYOUDwZWBqSzWAQwgjPqK+CooC/cPyLq6lsRqCpkfgG2WRIINs4AzBNgE3VMlLKUiYEzfEODg4O2wKNv+pSIn7rQGmZ5+WP9T9LtlO/cZ79CAyJykoLR42L34tiAVsQXBURbm4Et5M0vToir2dfb9qEcck3rBDy7LRU11H46NGr/4Jxk/2t+avFH4cQymyXw2m3ZzeTYAcIbTucqvGRClKYBk+K8D0R/G+D33OtBOIgbI+AvXLDPW3Uoe0Rf3sNmRludhw37Ez/vdaj93FL3vHbwJfPut+7zBfwk80wjRqDwM47c5gJWLF0/nx1T0IBwWUj8ZxJmrLnpnm3myZ13uXXtvQAXoedF8FzbrcZgmUcWgd+XQZWCCJVK9qKMVw6SsAICWwSq4EB6howVXEuUgLV1YwS2BqbOpkK3OZR0Q6w4cmTaaB+BzLIjIwMinmqd5YjPyRTBDU1NeGivaGhQdvAzs7OzjKf/MrPFt1CooRkhiSPv6TZISGAVEwRVFdXq02wYcMGeAQKYRuQQL0MbUaZWZE9EAiPDEFdXR08U0ZkkOhZgoNVV0JgWm+eY4rXNi8wjNNfiHPFHjTlcGpraxmVTT0deATskCnLwQACgWw2RkKdIh2CTqD2zBQDXjYaCcRbUgZj2EAgrx0F8WHYVC0jOdDBwcFhJ0Hjz7hmkD9pYckw/54Q/2ECC/r7GNZTnrHjPf8hA/mTlw8Z1j/oB0D21YMORs3sNTLhSaWNV3WoRdHPfsBKj17eAi/FpRym1ZD4/NH4/+fzRk8tGel3XkC/CV7JQvOnycbMdrnwVRep7VTbbrJJf61AYZbyi9ZwKgcHB4cdBL/dsfD2JXemfDhHaWGnfkuv9bshLX4AUBihDwOyd8IkojUah10H+2wXBIs5NANVlRqTq0fVqGENUDUrcVgAL5dR+Qgr5cWgxg7nhIRRR4MppTijymyFMFXBr2sNVIojyDCPGtX1EXjho9Eo/1/CiBhQ0lPkI8NmpPLXBR2ICUe29957KzAWixFLwY8ehu1B6kIMtUu0DRLigsdApq1iZJlnZJAToCcVU8CiYMOGDaxLSK6B+JycHHaCEhcMUYw6XmxWJzmjDpwMLMSUg0WAixGeEyJDG0Og/TByILqmgykJ7ZeAEBmEsA0EKHVi4bH1pWEJpsqPCwaDUXkYBZEwAkzCmGwwEmKjwuGC1YNkr4ODg8NOjk22OajwzT0hQmlp6dRh02bqgymCRxqUThqdH37OQSCGxvI7D8mPMojHhv/C3cxDLhr/HB5C/KEGefmNO4s/XrQxc6p1m7NTbDucyp/YteJLhVPtyaisrOR3YSuBOAhzcHDYGvh3RMWv4PDKnps2v8+hzfw4she1aZqA+dOe83+gxzP06H1csRom/tM27AJNkKTJO3OYd8Nko21uGQeHnRdbU8KljN2yhPyKtKMFqQR4RpFWI8PyQAxVsXUJxulDBXPYiw1k6IICqnFGVeZydYg/apSpAuVSQ4EpIbm5udjw0WiU0n3Dhg1U70wjkQgCwmtraynUSQJjd0gI5GeffaaEAkW+ynuitLF08/GrKv7RE55tnrKBgQxDbYhYLEYIR1FVVcU20EMCQrQQu0Kg/7eQuaamprq6WnvDhRJbekb2wHGRGQMZDAnJw6KMrMKxSKkDRywNyZWHQC2tHhCptCUYIL3WZTMI8EIyEoiAJMrDiFd7VnK7hLxsCZemAqTEwTz+pRRjDTv1FUkQn5DHwcHBYZdAK9ocCaC4n9TGxX1Z0ahpw1JdyuHg4ODgkBL5k/zHafhXmIF+04bpcrYkNPkAoPlL9dHdYRzXZ6l/T0u/G/qYj/7Ju3xWiZ75EWeSkazJu/z+YDN3LjkuUDk47CrYmhKO2OQScetrQpuTVMqmUtPaclmZrXI12gIYhGUYQEkEtQls2UzdTpktGbxsXPIixoCnAqfqZqpamlH1v+5LjZiPSoHJzs6GJCQjIyMrK0s1PHpigdoomQa6koKEZICvra1VKsKJwt6wYYNaMEwxyBOLxcy+gmNRW4RU2omu49DdJYANEMKidnWSEKuGCwJCpBRwsSI7qTOfOCslPOEolYqcxGLDI2MDHCNTbHui2IDOElHYLKqmhk4Fo3aLmMwAJYsCDAGx9MiYomGKHltLC/Ba0QKvSRm8K4DNhjIsxpXMyBAZdrUSNoODg4PDjsLmtznaGP5fJN3jGR0cHBw2F/7nq8QR3DkClWjFr4izHwDUqBF6j1Ua29Kw19CJSZEzSWN8Zj5r1qzGTA4OewJUBLZtXZdQWDIFLCHIFi/D0MEGMOAxKLDF+8HxepWpDI1+JR2vflXwU1GjoUiGl01JLw2Vtqp9KnxK8fT0dNXeMgjX4y3UtkBTW1tLBsJJoo4DUzLoUgV4GDRMtZ8NGzZIpkszAHxVVRWarKwsSEIYdUTqMkhGoG5XYTOI2TxKbUmCq6+5Bj0GeyM2Gv902wZzdwxiSI4IgXYlQ2cAmz2jxCAzIJDMGOqtAMRAm2cJUrG6bHimjOwcQ+dfnRodNUqdZKAVSa6d67QD9DAIFA4UgkBJGGGsXlPZMmCApoJIX2EQsE15TYWwvUmEMzs4ODjsELQ76aSTZs6cGcyaYvr06YHlsDtixIgR9iHkYfB1b86VEvzma/3vs80SOzjs5Njcb5YWcPrpp2/yMY3HHnvsCy+8EEzaBGX3DbrMu79J18MhgH5SMYah8kNgqjoHUGVR4I256cG7bhyucIdNYs6cOV1vuSWYbHuMDv7dGdHcb0YVlvJKIAZbZFgQ1vP+ZJRB6SuDcpp3rKag/uKL0//4R2XDZbNJQAkNg62qGwHAgH/3tNN6zJ3LVEU7NT+yrKwsXNFodNo++3yvqkrXbuhaCRXn2LqQgcqfop2an6hxb78NE6BjR6r5wBY6dPDifYSWQG2vdgb7Tz6NaWnwXz7wQLsf/CBgWsTVXbrc9dlnYyIRHR3f3fXm43L5Bv/dxo2jjcGBcDhVVVVqVZR07jxs3TqdQI4rFosxcuDTcnJOf+898hCCl+To0cw97LATFy8mLWcAF4La2loEjARycnBJqfHjIUM6T5+Owboa9bXAS04YYpliY/j2j37U/sEHZUOyimwprcGIV2Aqw7oSGNmtxBaE7BK4ZTv+vHJwcNh6bKLNwf/gg4nD7oidq81RVpQ/ypu6LZ93UlrYaUIv8/xYQStO9UZt43UNSgvzl491T3PZvdC2bY7AahFt3OZwaB76ScUYBrWEBVPKDNfm2GLsCW2O5n7ltfL3ppWF9WEyzDDKkA1PfcsbVVWuGIk1bvj+99XmUEcDA6WvMNcXAN7ejEwRWBLlu6eddvi8eWSm1F/4n/+YCO/MQYMyDf6UlXVxXZ29XUWXMJCZqS52wIAkeZcuXfjhia1Wws3vvntbXh5rkaSmpoax8I03Jh11FF7CkRHIN9onn3zSuXPnhoYGBLjIc/WiRfcccwyZr3zttYlHHomhayXUMhhXVsbRfvnAA7+89Va+SdkYSdgSAj2VA5s8sViMwxFZVFt79d57syWY8vLyrKws9oPm91988WNzqw7HxT71tA5C/pybe3FNDWm1Hx0psn906fKtdetgWIWltf+0tLTSgw8+4c03EQC8+oqQDQELKbk+DgYXmo+HDNn7qac4FqZ4FYUXm9Ea8DI+/+EP2z/4IFP7tZZtmTAIESnD5kyJTQp2b7g2h4PDroWW2hwOeyZ22zYH+Sd7wxYv61kav6Z+2zdWGrE913LYXmjDNofDzgb9pGIMgzrBginFBoUNsG2OK4efpHCHlOD75cUXX5TtruZo4ReidWEwJsvESxYeRVqGKTU2b1fLY4isv/jijo8+SmltXcgYCUxPTy+/4AIptx/ie9uJUFMTGEL79l7ocRiNSE/34g8BSYDaHJxk3UoDOnbsOPvQQ7+xaBFnG1utH/VH+DHCqC8iNiNRfKV0NYe+OhKg97ObL5wYoK8d5MZLL9XVHNIImjLq/YBYPAjHyrBTQeIwIyTIUqI1ml0Frs3h4LBrwbU5HBKxg9sc/rUVy/p6xcULvP7jS4ZNKxjnG/4lGPj7MQEjS4K7/0sLOxUUMx8/Pt69CJiQJg48M4eUj12eP9n2ORpXNA2IhGw9ivInL+tbXOynUzZfn3pvieuibBJLLrP3/uPLS3fmS6cdNg+uzbEbQz+pGMOgPLBgSoFhuhxN2hy8JZTBISVcmyMl7C9HGYzYYpJhvZSsCVEieX8yWqVgbbnsTSvt4w8TxVA4KL/ggq889RTvbaLgkVGrYzC+881vHj5vXiTi39bxyquv+hk977xhw6LRKHkej0TGGhdi8uBKNw/aULiq+szMTAr4Tp06xWKx3NxcXelw1fLlEw45RJW/rtS4evHiCYcdRlRGRsaYRYtuO/BADPRqARCLDP1lr746oU8f9kMgK5KZPbMoNsz1y5dz5P+3334oWYW0JIHXQgBxWloaORsaGliLQ5iwbt21++57Zyz2M3M/Dttj5Ju9qK7uUnP2sElFYFVVFXkezci4KBZDhk0GDE4j0EUl6DFYFy8jzIu9ep2ybJn2iQySRQGbIa22hBebVNgfDB7cdeZMdogGPRkYsXFxHmRrig3z+Q9/uNfvf8+6csFYlwygWGB5O5UtQ16LZGaPgmtzODjsWnBtDodE7Pg2h/+pEaWjvaJ8a4SbEUG/YlK+b+geFL/H4KmZEGgaRXHECa1iNE3bHD0nJ2frt+y6YKF47Cb2FpemjLXrOuwucG2O3Rj6ScUYhsoJgSn1BiUKsG0Od9NK6+HaHJsFW3zKxrAMBa2vCPHWK4QZO274/vczHnsMW+EwlOgYKCn7Py0o2PfJJyVmisGIAGPZiScetXBhurkbJRqNMmZmZmZlZZEH70N77XVFRkZ2djbfHZT3OTk5VOzEoiEckuodpYp2Yquqqvbee2+Yny1bdtehh8LEYrEM87jQq958c9JRR6En/CcLF97dqxfhCBBjQNbX1/Pdd92SJROPOAIZLlasqanBQMASLHrt0qUc2+15eRwXPJshMyMuHSwyxOwcg5wkv+399wtzcyfV11+VmclUd6ywpcmx2OXp6evXr+eg1Psgij08npV1cU2N2hYAMdvg/MCQH7A3eC3E8c476qhTli2zTRBOi25RQQlJQs4MJHkgYd4/88x9/v53SJIw1Q8fbEbtXCNT9H7IJZfoag5IMdh2iiHSIplpGeG1NonNEu/kcG0OB4ddC8GvRgeHnQj9hw1WM8AaIG906VRvlP+JlQXF3uLlZZ5XtnxxIMgfMtJoVixbsGCc/zGXjaIAZUUTFo83H1qcN/q6vuMml4oOITkb6N+rh/9Pj17948lS7i3lusmxDg4ODg4OSbDlqDVA2BZULooPh4i3xSSGJcNiRhmqzzEA5bT0QtgF8HY0T+LEoFZHiQEfiUTEYCNIM1dD6ONLYEhCrV5nPmOVmjw7OxsB9TnFPAY1ObYaB2Tef//9ERBCIBngu3TpQnIxKMnMiK1tAALxshlW0R4gY+bzZbFhQGZmJptkDzCAbZAEEIJMyYlCQH7EHIVyMsWltNXV1aRlXXao/gjbQ1xTU6MDAWSGJ5ZdAaZyEUsgedLN40gJZy3y5+bmogfYbACNjgKbKGIBeWDISSAbQ6xjR8AItD288DocbAyl9bPHESaTXQJJAIxGa9hRMB4fhARWKoSVoGWxg4ODw7aDa3M47CIoLezkXx8BSmwXIgVGlvgSg9CVE6WTx9lGhN+JKJ5Q1Madh9TrOjg4ODjsKUgo8BLQgteWguGaULaNYhq25bVgqtJdNqOmlmcUTxJKYitWeUz9jN3Q0IBNFW0zqJxWCBoYDD8s3t3QJ6pgR8xHriqQKh0yGo3uvffeZIMhkGIepqamRl41SshM1Pr16xWIJhaLoYFUhyI9PT3TfASsVmTKltRBUHuCbLiAbn5hk7oIgiRMs7Oz5SUDYqD2AUCpvgM5pcFFWp0KHSYr6mywog5E4EDYIUmwtRw7R8yWIGtraxFgcJjkhMeLTEsrMyNrYbC6TiwjNmuxECEYkIzaj84VDDYk2TRlDBu4ABqR2CLFWFtTOwKrtEzYBWS3BpslBnYhBwcHh7ZF8HvOwWEXwMgh/uUYpTPNMzA8L69n3wXTnvXbFXGqR6/+QQOjrCi/U6G9ZAN/qA1RXr5wvKfAEJKztR7Nrevg4ODgsMeg5QKvOW/LZZ6i0ABsGYItbqWkckYgjRhVxdTJYozWBzxVugRiKLAZVV3bDEwlg1F/AVvVvmp7wpVc5T1iCnt4doIMDVNIFfm5ubnwOTk5SkI2okiLAJdN2LlzZ4yrr7nm+p///MuHHkJZawDJqEstWDHTXH/B6gqsq6uTEoNsGGRmdZbGCziEqqqqmPk4FbUYWJcM2jB2jXnaaNB9iETuJnCvve798sspnlfUrt397dvz8jIzH0hLezgSmdqhwyNZWbwezc5+cr/9OFN/3nff4mj0L126lHTt+vcDD4T8xyGHTPvqV3lhv3DYYXP69mUs7dXr+d69vbS0uUcd9fLRR/Oa3afPwhNOWHDccf/75jcx3hgwYPGppy46+eRl+fkrBg9+75xzeLEf9s/JEdihvlJsGBtwHsTrSHUgQFNgXTLCdngE8DISIL2VJaA5vjVobkUHBweHrYRrczjsIsgfMrK4wL8YY6Y30luwbIVPTSrpay7R8CkfeaNLA6bfuL4l8QdzlBVN8OzEIOWNK0nZWo/U6zaF30YZ1y+/KJg6ODg4OOx5SC4IWyjzrBgNYCpDoI6VId6OQCEqdCmAdUWAeBnqWSAwcj9QthoQkkEyVYMDMMXW1ROvHXHE3B49Zn31q3/fe++/RCJ/ysh4oKHhoS+++K15UNHETz65be3aO9etu3H5coxfv/feLatW/fztt//vnXd+9r//XfXGG4y8YH76n/9c/9Zbl7366jVvvkngla+/zgvSX95gzIIF6K9dvBibkajL580r/O9/f/zvf6O8etGisQsX4srJyakxj+TgEMrLy9PS0urM3SiMJo1/gQn7tz0CNUE4OviN5lEakEwJUWfkZ2lpnJ3Cjh2v3GuvMZ734w0bLudk1tb+sK7uR/X1jDAXrV8/IhZj6jU0XFxR8b1PPuH13XXrvvPhh7zOXrNmyKpVTBkHr1hx7tq1GGeVleUvW+Zt2PDN//3vjKVLGY9bsODE//zna//619Evv9x//vw+s2cfNXcuY985c3rOmnXwzJkHPf00+9H5N4fif/kABhtm1JdJBjzHiK1RMhD+QlvSJpRhpwA7PBWSyeRUDg4ODjsP3CNIHRKxwx5BuuVo28d7uoeFOrQW7hGkuzH0k4oxDKoFC6b6YzJQQeUeQbpZcI8gTUbKX5GUrLzfrEu1pZ0ySqAa3g8wpASM1ivorYtRN3x4+h//qNYAITDwdvrJ+efvP306NgV2enq6OgJM08yTI1BmZWXh2meffXjzY2dmZuIiyR2ffjqua9eGhobs7Gy+KdBA2iXIryVqamqYkopR/YWr33nngX796uvrmV52+eX+YXjevffcAxOJREa/8cbUo4/WzSMcAklqa2sZ2YmAzfcjy5EKDd+VMCh/tngxJ+vOXr3IA8OWkKFHwzYYtRM2z551WcSv16+/NhK5MxYbYzYMQ9SUouCvFJdfdhnJWZ2jJif2HyORi2IxYgE5NZINr5opbAOSqTI8f8ghpyxbhqFtwON9dd48eY884giFY7MKR7Ri8OD9nnySbbAWLrLhJRYDIBOpdeE3jBzZ4aGHRDIlEEMuIMMs5UOMDDHAamSERwksksmEWJG7B9wjSB0cdi24qzkcdl2UFnYS+k0bNnWruxJtm83BwcHBwaG1oCYMrKaAV40q2462kqSIxdCostbWlpTQ4qnVUcIjYKoMgBJaBi6bCoNADHvJA7ZqdTUOEODC5vclhTcjJDU2Nbky4I1EIloROyMjAzEZsrOzWVENBXVGEG8wnz+iVT777DNCKPun3Htv0ZQp7S69lCToWQUv+RlhSIKMKFxkFvDCkE0Ggrq6OoUAcrKoQBReHRFTvIxVVVVMkQEYNIzsXNvTBoRoNMoedOysS5R4cnJEnAG2R0Lyq/WjDTNyTtDrSJliICYJ0HKCXBo5e6wOiY0BidiuCAlYF4aRbIxyAckIgQQ2Kgy8Esi2pB3lCo8JSCYtk1Lv4ODgsN3g/0La1ji9dQjUDrsacnJy/N+TrYPuy20j5E/Sozba5qmfbZvNwcHBwcGhtWiukkzJCME8BBW66jUAyQC1sbwi+V3MKNsWw5Ti1MzSiKRWV/2MF14lOpU/IxW7GhlE1dXVYVPSU/9rIaLUbqBKZ4pLqVAyjcVipFLfgXAyIyOVlMiY4lIqZGnmg0tk4wVsCYEe9uG3JQyPgLGmpoaclZWVhLBVpZWL/TAlG3oWxSYPJCGsRRR71tLosTUqxOQIwP5JzhI6KM4GJCMZdIoYORWMhOu8VVVVEYKe0epZXVGMbMnk9sFypNXO7erIBKYkBNh4tQFSodEo2PDwFAGGZJbx3XFAWoHEQLzxN0FKEjTHOzg4OGxnbI82B3htUwh0Dg4ODg4ODg57AMIFYXM2SHYxqlDHtrWrnfo6YwgSW9sy0liXSnoKfmyV4rhAJP6RKGIwKLDFoMRW40MlPUBGVQ+Tm5trEvutBHjd4oEsGo1Sq+NVUwO7zjxHg0BSMaqPQCA2KC8vV8sDvXiiSEI2tSSYAnhWIRujMrOubR9wFOnmISNsm1g0SgUpoEcGiQbDrtjRdCsYr7ziinaXXnrFmDEo0aizg23PFTJWJCdQCC52yB4Qo+HoCNSRwrAW0MnBOPGEE44/7rijjjwSL1NGkmPgxbbnn43JS2Zs8XbU6tgWTHVoymMRlhFoY0HAGjCVS1NsGSBBadEc7+Dg4LCdsZ3aHJsJc/vAln1eRdl9g7Y0tBmYjO7TM5pHZWUlv9VaCcRBmIODg4ODwx4JlYv8TtQUyLZ8ynoSI2yrfJVt9ZTW8EwxGIEJCh7QQIUMYwNVYDNKjE1xriSMagpAUpPDKxVTqmtly8rKikaj6enpMBh41SOw11moEUBhn5aWVl1dzRSxehOMNTU15KyrqyM5qSDLy8t1xQeMNomRnZ1NODYuNgZw1ZoPVSEz+1EzgtXRsAH/aI3NEuTHACh15SnhehgHXkj2w87JwEgSSMX+v/Jyxgnr1k2qqPhtZeWUmpp7q6thMB7YuPF3DQ1TN2zg9bDnFZslHtlrryezs5/IyOD1eHr6X3NyHktLe3rffad37vzU3nvzemb//ad16vSP/fZ7/sAD0eN6qUePOYcc8urhh/+7V6/XjzrqlcMOm9+376Jjj8VefNxxS44//q1vfOOdAQPePuEE9BwXW1WLBHAG2C3HAq8TpaPmAO0hc4wwjECkHQWjCkiSJDBhWIaEMhI0LYQ4ODg47Cjs4DbHmjVrzjrrrOeeey6Y74QonXzDfP4pvvO+hA8gdXBwcHBwcHDYBGzJl1wuJkCVatgQpLeu8JRRjMBUfNhm1FRtCGxGGdTAIgE2DFN1ItBTS9tCOi0tLSsrKycnp1OnTpTceiRHrXn4hRoE6GvMx7JSjav1AKM2Ct7s7GxskmRkZJSXl9ebu1HgGbH1IGfSItaoPWCzCoHY2h4jDEm0BDzTWCwWjUZZ117sgIzVGbGBruwA2g8jx8XSVVVVn3zyybp16whE1t48DgPj2n33Zbxh//2v3nvvwtzc0ZmZV5pGzGXp6T/p2PFH7dvDjPzyS6aM8IwXNzR8f+PGC+vqGIeVl19QW/vd6urvVFaeu379+VVVvAZ/8MFZH344dN069PnvvXf6u+9+c/nyU8rKTl258oS338Zm7Pe///E66vXXj1iw4LBXXun98su9/v1v9Bwax84h69oZbACvwwGQjBwyZAKkDBv6gtopCAeG+eaQoEkOaU0SBwcHh22KHdnmWLNmzU9+8pMePXqcfPLJAdUiSgv9yyrAoELTctCFG4UBOyipDZGo9yPi4sLSQG1FIS6M0pnF3nEjRx7nzZ/2XAq3g4ODg4ODg0PzsCVfcu2XXJemFEsGg2FtjWESUMFaG8grmzKYqpgpFb5IGEaKf6JQMsVgFK9Rlwx07NgxzTy5E4ZKO91cwaGehUgE6FFiw9fW1urSA2wyMFZWViKoqKioqqpS84IQjAZzAQUaxJBM2SRboqSHUR6m2KzFtmHIQzZV/vDsRL0JoGo/EongDZ8HSBgdJpvUitq/wLp4YRjRK7M2w6i7TgALkTY3NzcWi+kkaBX0LIGYtEouAy85a2pqSAvDlFGpOHzWRYNLSThMnUAAgwAxaZlqXQyWIERnFUZLyIUtWBuNvuJiSCWxcsqGx5ZABqQMMYzW5eDg4LALwf9Jt0Ngexx33nmnfpltAqWFBUuGLSwvLy8ZOb+4seVQ7A25v7x8IeQN/ZrcWJKsLy3sd4OhFt7uFRdcdl+Z3ygpKO5T4qsWlvQR1wRl991Z7I28dtKka0d682+Y7G5ccXBwcHBwcGgj2ALS1pam9vTtMJNgUKaC5OITEg28RisQA6h7qZBhsBmVR4U3I0U7ZbYKcj8sLoNEpmz8h00hyDBwwWCrqaGnjDc0NKgsVytElTlFOzxTavs680GzjFVVVVlZWcjwEkhC3SCj+h9GlX92djY2eVCq6wFJfjJga/VYLIa3traW/Xz22WfaBi4MoPysTlrywNfU1OgZItqSDpAMeFHqwHVOELCKGKYYTO1RAHgW1UlDQB5sdsIIYJQf6BCQkRODWARshhAOARuXbdmwEAKdB2l0JrWibHLKi1hL2J1joJEAJVNGwFSMDCAXo2Bd2AlGMlpwOTg4OOxYtDvppJNmzpwZzLYNTj/99Ntuu23SpEm/+93vDjQ3JSb3OI499tgXXnjByEFpYaeC4pEl5ZPyA8KgrPS+yTOnLSmeP9/zfGeP+wb1u6FPoPJDlty+cNaZz1kyQT/2nZDcoMxP4N+RYpGwphEoJPWWdktMnz59xIgRuoK0NQj/UtwkWhKXFeWP8qZuu485MV9DmfGvZGlh/vKxrVwxYXvbercOuwI295vFYReCflIxhkE5YcFURQugRKHmGXPTg3fdOFzhDpvEnDlzut5ySzDZ9hgd/Ltd0cKvvARXc0r4wGoeaKhmFY6tEKaQvEWZqn4WmEpce9FFWX/+MzUzb2YEGArEptJeNXjwoc8/jxExD+9Ew0i5zv/ZKNEBdlZWFnmI6mgu5WAEN61e/euDD+abAkGDuZOFEKbshMzoa2pq9t1336qqKnim8CwBed3Klff06VNr7i4hKhqN/mzRonuOPlp7vuLNN+/q2ZNvNG0YQCon21i9enWnTp1u/OADc4g7DUyLYafCXvfey3nj7GmKra+gzid2mA8bshmT+a1BW+XZPrhlO/68cnBw2HpspzbH3Llzr7322hUrVvzud7+DSb6OY5NtDtNxoDq9f6w3uZ+cLbY5TFOjib6ZNodH0OWpS9Um29hz+hy7Z5uD5P2WXacvn29PG7awdLS3OSu6voZDElybYzeGflIxhmHKqwBMXZtja7AntDlag73MrSLBJAT9ugz/0sSWYYGLcBmM2NKDL376UyPZiXDH/vuzMR0voxoWfPtg1NfX3/jee7897LDa2lrIrKysysrK/ysru+foo1FWVVX9fNWqXx9wAP9p5ABxqdvC9x3fg4zRaDQWi9366acTDz64wdxpEpyEL7645b33OHG3HnAAPHtIT08n8NNPP+1oru8AOoGgpqZGl2Dc88UXP+3Q4bcbNtxgnj8Cz6Lw/6+i4vouXfhOZ892GwRO/fLLH2s980m37AQe2V+7dSv44AMyoMGlHxcs9/T++w95/30EkORBwCFg45IGEoZU2HiXDxrUq7RUNkCJlykGU5Izhqf1I0a0f/BBNqwpwOV7r7hir3vvxRAJZLOcpkJYgIupxjAje0+Da3M4OOxa2E6dZn7i33nnnT169PiJwWbcqxLHiqXzPa/PkPw8750lAWWgR4OW+Y/Q8Poc2liBJuvzDu2DfKZ/40lpoXmWR96Zw/xnbph7UcqSP6HF5Bw5JGhr5I+9/Tj3INLtgLKi/PzCwnz/cSn5RaVFgeGfdjz+BNgvlP+V9OdFRfkBFzCpPhunf68eMvJGl5aXjs4rKxo1bsGCcf1M9hTJU1A+fBrC32dRGWNhYbCkVSXvysHBwcHBIQkUjdSiCXWmpiomNVpBeIpNYczIFAMYie+V3fHee9OmTGk/eXKHe+5JLyrCZsy8//7o736X/fvfe5WVOQ8+2Onhh3nt8+ijXf74x33/8IcDn3xy/yeeOHjaNK+29qgXXuB17Ny5A157beB//3v6G2+cu3Lld9eu/XEsNqqm5sqNGwu//PLaDh3GZWbekJFxU1bWhK985fq0NK+q6ufp6Tfn5PxfNMr0tn33ndit26/23pv9aJNU7x3MrS72oHRFBgbVOyMuzkm6uXejurq6vLxcSo26zwWDPPX19Rw+2eriH0lbU1MDQ3hwBuK9DBhk5ERAQrzqFOBiCQymaWlpkUiEEVL/QYVnuYyMDBaSmHCtVVFR0aVLl8/NHS6A/NjIOBZiyU8UPIuyB1yAQPha89BWDMBWSUUIh4aSJRghMcTg0n70VQZk48AVzpRRByugJ0rryguIhbGwvLUxlF+Mha9OQkK2BDQX1Rzv4ODgsO0Q/FLcDuDnvjodre1xFBeYWtHHoPvK1GWAumxpn+M8b8k7QbthZJ+ll3Xq1K9gycjbF4YvtEihz5+08PaRS/ysvvr+y/O8vMvvLxmphcxlHeEE5rEc4V2Y+1vmT9uJPxRmt8GCxb2mlpcvHO+Nm+DJmPZsWVnRqGnmYSvlJSPVrfJKCwsWj/epIcvGLfCJsqL8Cb2MprzEK2jSYsgbfV3fcf38L6Sl80ZPHd+///iF6ngkJ/ev+PCpheMXN+YqLRzFnsLvlGJvSEJgwq4cHBz2eFzdOgRqh90LpmbcdNFoZZa0USlrS7yqTil0A8oorViGnzSeRzag6haDRuW0eKpupip9IYGM9PR0Cmz4SCTCCIOBS3kYYWKxGBm83NzfNDTcGov9urb2jo0bb/zss2s++OCm8nIq+2s//PC6jz4Sc+WqVT977z2Mn69bh/HTd9/1IhEEmhauWYPtde7MFP31H3/sRaMYV7///s2VlUTBkOoXFRWQ/7d+Pflv37DBS0+HGffpp+I1sh92qONin2oKZGRkcDj8h6DBPEZk48aNdXV12DoQ6Rk5HMTYafHHr9bX16MnVXZ2dnV1NaROPlFqUjAleW1tLbbywOAlVTQaVScFnoUAeyCbtoSAEPaAWF4thBigZC008NohLqaKZWm8GIzYeJFJj4DR5AggEm8wN1AsBi5G65WRIAYJOTeJ5AwODg4O2xrbr80BMjMz7zXYVI8jf5JfNzbCv6sk7/JZsidNwmi8z2SIP/VpMUbmF6Gp9HmXS2zVXl5+wIRTGsTjE26PxOQAAO1gSURBVDDr8sDvsO3Qf9hgfS2sAfJGl071Rvl9ioJib/Fy/wKM5YsDQf6QkUazYpl/dYavsaJGxN9VQ2b6/iY9kBaTm4s/1NcgeYF3XcJtK8FFIj169W9mVw4ODg6e99qmEOgcdguE60BqvJbLPHmtLLku1YhXtmpRS6pGBSKBDVEZrCnlsUpoK5CLQBXDgHIaqJCmpNfVDQBBVlYWpbUuoKACp4CnJkdMSQ8Dj4Ypgbfm5Py8Y8ffdOly5/77Y9/11a/yYtPYvz3ooF916oRLL+z/d8AByMbvs49XUzO5e/dfd+58S3b2zVlZGN769Xd36/bL3FxGr7p6wn773b7vvvCIb9t7bwymkBjj0tN9fX29Av8vM/OOrl0ZebEfwCFUV1fX1dVxFBkZGerIVFVVsXNsjpcpNvtnRM+haeSQOUsbzQ0jMOqJoFf/glTSkxkDwNfU1JBHGTjb6kfA6OxBAmSQjEqOTTYMbYDdMorBhR6bRc0K/ialJ1YkBhCj/KxlwxHAKI8d8TICeRk1BUzFMFrG8i1DUTsErdyhg4PDnoPt2uZwcNhylBZ28h+uAUpa6h6MLDG9DB/NPEbDb3csHL94grkRJkArk/cfX5IQ6ODg4LAtsPbJMaeeOnFeyllbgIxjnlwbTDxv3sRTGxF2OCQiZTWVTLam3muugLQVpsZwCQqMJIBc0jMK1LqMEgDZyCi5VXXbYpgp5a54MYixJYhEIuIpzim8qdsp8plSWsPDMCUtVXc0GoUnFTYGS8CorUBCyn4lzDSfgaKLHbKzs0mLkrTqMmghvIhJDmDIgJffzdjkQZybm4uMtNTwGJWVldiEY6NhA4CpmhfaD0CMjA2r+GcJRo5CJIYOTSSGArHViTBZA0YdBEgtyhRee2bkwFGq+wDPIaNBydnQqWaEZzlkiFmRQB0+qRCQhBEvBwtPKlyM8Ahg2BJTNDoQuVhOSkFT6YEEgc/sFgSTULdLGo0KDJNMfbWByDDTSmxBSCuhLTk4ODhYbKc2x7GbQqDbLNgLNxz2EOhBKeaZKT7yevZdMO1Zv+cQp3r06l+sLkTwAI1G+M/LsETZs9MW9O3ZtAnSbHITq6eDsIJ/78uolhodybtycHBw2AL07btyrjoba1+ZzcyY2w5D75gjPDZw9vA2bansxNjcokuFXzAJYQtKLJvKVowgbFivpiqPRdoaVS4Z1kYp21bj2Mbvl7uMVsCUGptimKJaYjF+FrOWFoVBIJ7KPByOhlE9BUr6uro6eMpvePRU+PCU9AjgKysrc3JyqN4JqaioUNMBG71KdFwoYfy9xrfN0rLRRCIRAhkJZDl4SFbRVSfKALQrxg3m3hOgqydgPvvsM/UyEOig1KdQKhl2RIMAvc4PDGNtbS2M2iLIpCQz22AVQBR7IwSeEaUysDHtGd5ugEC8jNiQeLHZCaO+LtqVzrkEUjKyN3iUQF6U4aOQFwOwnAwYHYuJ871WJoZYhYsECVOLZCYlFC6jlSEODg4OW4/t0eZ4oXUI1A4OKZE/ZKQelDLTG+ktWLbCpyaV6HkbPuUjb3RpwPQb17ekSQssf5L/iA0/3vdOG2YexOK3JMwjSFMmXzhsWnADjFfSeGWIWbSlRkfSrhwcHBy2BAMHHrzGXFfx3qpDBg40FDBXdhioF8F84sTgYgzLBBdkNLEk2fRFId3O/8HQGX6DxY+eONGP82MSMzTmNteCBGlD7K6AzS262rBIC6cKl5GMMhJqQqaWUZkqWA1eSlmrAaqW5aIGZqpARopkDLyq+RmJFbD9YFMYU2lTpVOc296BLhCgmIeJRCKMpMWgyEdgHw5aXV2dkZEBTwjLqZVAKlyMqtJJoi1BItOKWk75YW5Yvvy6t9++dc0a7JtWrrxmyZL/Kyu7funSX6xaxXjz6tW4fv3++zeuWIEXDVMEMBi/fO+92+IfMXvnp5/e/tFHML+tqoK8a/16psjGf/jhbz7+GC/jhE8+ubu8HBd6jZMqK3kRwvSe6moYdg44NM4SB5WWlqbODtvmWGBwIYjFYjrzyDgWDhYXPLZOr5ScNFwcNcALqa+UDEiS6Dxgi+F0KTNTpWJdbEgM8XZUBgwbxSgXwMtop0LCFFgm2dVKaOmw4eDg4LAdsD3aHA4OrULe6NLS0Xka7bTRiD9bY9IkjKCFEXBjey2Of4yKfa5L0nU+pAlcjfezGHVzyRsDDGH3gxZDU0s2ulPtysHBwWHzcaC36pW1njdv7sqDDwyotU+Onz3wMf+iizvUi/AxwxuQwCQgZVTzOODgvivVYFm88uBxRF1zfHKGbicM9Gb72/P31zcI8K87GXhCNz90l8YWV3SbBbsK5V9yBQiDAMgLKFY1ZUQgW0prMKp8tVMBkvqZEEZVy+KpqJUWg6KdEAzrQslIcY4g03yACGJKemQw69evJ6S2tpacGBTk2ARiIK6urr5h3LhxN954/c9/Lp46HJCtU6dOlOjaDFMKfhXzpCU5TDQaZd0bv/KVWw466BcHHPB/X/0qXuybDzzw13l5N+y33+09e/7qkENgmCLghdjP8NBDehFyfZcuV3XqBAnG7b//rd27Q/68a1deZOB1zd57I7h2n30Kc3J4YUD+NDsbvQJHdez4s9zcMZmZV0QiP2zXbrS5oYZt15sHkbBntSRQ1tTU6OyxeZ1DRnjEGuFzcnLgGWEI5JyQhPNATp0WphiMOu3k7xi/mgOGEVIdE2ydQLwspLXIqSm2JdEAhWuKTDYLMRUpQ1AgEKlUYUFKbFLg4ODgsJ3h2hwOuy6CD241V2dMDVoMOx47564cHBx2PRxwoLfqPW/tGm/gCQcEVLfzp4zzxvvXVFw/wwt6EV7fg427sTuRiJRRrUHfeM8iRYZ4n2Pe3JUDx/3gEN/cXbocTRoEyWirii7lKiS3MAVmYs0pw9p2KpgIH9hyMTJNqGkBdmVBwSfnnFNx/vmfnnvu2sGDV51++rv5+e+ccsrSb34T7yt9+vyrd+/Sgw56tlu3p7t2/UNa2sN77fW7zz//bSx2f0PDXeXl99TU/GbdursrKm778ENev3r/fV4E3vHJJ7esWcMLW/jlWv8dM27FimvffvuGd965avFixptWrbqxrOz/Vq68eskSpggo7D/++GN2W1lZWW4+9pVtU5anh54JggajoqICu76+vqqqSv0CHbIFLqLS4jfgkAolpJoRHH7Hjh0zMzOZQkrAWFNTY+T+Thhzc3MxNpqHgHQwTR+AwXJqT2yI3xSjhRSFlxGvbPQsF4lEGFmabcBjINBOmJJHm4HRxSx42SGr4AUcrI4RPS7tnxESFydEU6VFD48hpYBGqdQKgcGLAcMoAxJDvGVAWCPSjhYJegcHB4cdDtfmcNha5OTk6Bdba6C/Y7QR7JUbzT1tdIdg59yVw86Od1qHQO2wh+D4Ad7cJ1+Z7R1oOwfzJp46fNUPdFVFQLWA91YtNv9uXpQfdkjjkgapMqjPMW/NSsTHDzgEc3fpcmwCtt7bevBrMbDitiknA1heLmuEYUlGClSRilVhzEhl65e85qoBCbBzn3xyn+nTee09bdpX/vEPXt2ff77X3Lk9X3rpqAX+p6EPLCs75Z13Bq9dO/SjjwoqK0d+/vkPPe9H7dr9pH370enphdnZel2Vm/uLbt0Yx+233/+ZSyoYbznwwJsPiPfmPO8mcznGL7t3//Uhh8Cj53VbXh4hjJB3HnYYAnYbjUap2zmW3NxcNtnB3DWjw6msrGRab2704EB01BJA2o6AkJWVpdaApojREKVHgTY0NJCNcYO5cQYx4XLpwhO1LdavX88eIBmZsg31FFiRdWGwddOKzm1GRgYLsT2U2h5pUTKyOhrITPPhL4z6urAQPCFM8YpUz4LM4tErLakwSI6hKKYYaIBcOg/aHjakbZEoj/bGaEM0AgRAjAwxmlpIIG+yS/xmISGJg4ODQ5vAtTkcHBwcdgocsykEOoc9CAcc7M2efciA44OpwVAznTd3hqYpsXjVe4xr16zUFLQmSlj75KMzpG6K5Aymz/Go9sdOV81dtUd0ORKxNUVauCZMWR/a5KZ+9GEZGZYxpa5fJDOl9JWLKRUvha6m6iBYQyG2lgYUxoQofMOGDRThTAF66n+mZAPEKo/aAUTpmRQwTNPT02tqaqjkbxw37o7f/OYXN92EF16rsFxWVhY5mWoPjLoOQhpcpIXB0B7UesjOziY/ydGQRM+/YKvV1dWItefrr7vuZ4WFP7/+erwVFRVkNlmDs6R2A2m1LsAFSX54NqkDgdSKKOvq6nQ4LIGXPGwJgylJWFrrspw+nlZ9Ewydc+UEkIRYHmBAYpABoMHLmdHZgNEFIBhocJkgH8pALPvna4EhmTXwkk0ajfAYgBBsIENpGUXKkFKwAk2t1zLW2Bq0SRIHBweHBPg/DR0ctgb6OLdWAnEQ5uDgsDVY9+K9N4VQ8lbAN3Hc++K6JC6sDeGtEqs2IIS5xoBy2P7odsLBnqdbUoTjBwydcb1/78hcb2jQzEiCeYaoLxq/6hB9PktroiQAw2cPfOyaxC5H6gx+n2Ox9oe5csbKPbHLkaJIS6gVw/CrSeNNqUn2Krl4QBFrGf93qoERBiEq3QVVuVTFJtQH4SqDFcXIVGUzBTOxHc0TMeXVA0QVCJNmHrdJwc+UKhovDEtEo1FV/ky1+vr167Ozs9et839ykDw9Pd1e8oASBpmW1qUN9fX1uluE1Rlra2uRsR8pKyoqJGMtdQqQocfFokrC0irs2RteNMSyMaaQIBaLZWVlsWfSkh9xTk4OGgxyYsCjYVQe7YQpi8IwygUQk4HMOl1SZhhgcLCM7F+HjIb8hLNPTRkBScjAiI1RXV2ts61+ipIgBjoEDlAhmjIqFQtxsCIxAGthazmRYQOvDAkUiC3SJmcMGxY2m4ODg8POj3YnnXTSzJkzg5nDlmKLPynm9NNPD6ydBtOnTx8xYgT/sQjmmwK/CFv/m2+zxA4OOzk295ulBbzzzjubvF7j9ddfP/TQQ4PJuhfv/bP3vStO6eJP3iq56YWuY5nATl50pG8F9OPeRb8qODy12J8EQDDHO/Kjj7teUXC4ZRpD9kToJxVjGCo8BKYUHqp8VNWMuenBu24crvAEXH311a+99lowaQbHHnvsXXfdFUz2AMyZM6frLbcEk22P0cG/OwvCvw0TfjOqvEzwWo0MlamW8XUhA2/DFVd0vPdeGGzerlTpiFWrU0Vjq+JFQKEuW7U6DEX1f7/xjQGLFzMlBGRlZRFFntzcXN72sklFLF70tt6e+OWXN0UiuMgJyYiA0v039fW35OZi852CPhaLEatF2SHKX65b93/77KPjIjkaav5M8yEv4I6Kipu6dMGLHnF1dbUOjQy1tbXIIO/esOFaoycDXpJg/LZDB6+y8qfxT5wFhDBWVlZyUNjsByX7ZOTQyH/PF19c9vnn97dr9yOTSseiu05IghGNRhl1olj3oQ4dfmQyqAeEwR7+8Mc/ths79svJk79bUMBRazNEscTT++//rbVrOXxzZP5VIVoCAVMOh9OrLons144//uiXX8ZFEjasfgepiMJmA/DsTTuEqR4+PPrYY3jhUZIHYG8cPXov85bQGQAypLEkwLaBlg8Hhu09B7dsx59XDg4OW4+g3euw9eB/qK0Hv7dWv/tuEOng4OCwVTj8iKM++vgTz3trzvPeGd+zrYnDCy6CT74YY78j+zTtXhC33xGn9DnyozcTLvRYF7+a460SXQjy4ov3+heDwJeUiEp9cYiDg0ProIpRVaXGcDEZngqQKu/tVJCtUUU1QKkamBFQKlNOq05mShKm1MMIgPoRGMrDf1QQMKpKh4ek/Iak/IZExkh4VVVVRkZGdnZ2bm4uGvLr0ok08+AJZLocgyR6vgaVubyU+rouQyvCsBwJEcBjALsf9gaqq6sVIgFrEYIeQxqmGERR9sNjCxUVFcSyfzYPz9IkIYr96MoONCykR4RqRZKQkF1xlgDHyLGrpcIUF6nUj4DUOdG6bAxSIJzkrCWBtkd+SJJwotiJogCGViEDGvThncAzMmVkD+TUiowwGEB6RsCUJYiyZ1guGCABjKYyjCSAeD+RiQ17ZcsFRFpjk9iCEAcHB4fNhWtz7AAsWrRo2fLlvXr2DOYODg4OW4W33nxjv677eus+/iihg3F4Qfx6jI+en6yuxE2Po03ocrz5xlFHHO516XPkRy+kvEXlrZLHPzpj7K9+9asjPn7+o4B7wzsC4lcXHfVGYm/EISWCJnfzCHQOuykSKjpbNKasHi2JLWDbotR4mhgSyLZT2SrgKXQZycCUEV5MAknJTc1suxKU6DJUe9uiWv0FKm1I1vJ7AOZ6BxXh4z/++MaVK8eVlf36ww9v++ijX77//s3mU1cwJnz22S3vvQfPCHnr2rW/+eSTX7z7LgYCDAIJRwY/sbz8Vx98QBQ2XkZcxN7x6ae47qmtvXP9el6I766s/G11NZpJsRje//f//t9dFRX3b9x4X+iRH9FolKNgt9iMbB7UmJtEKisrOXCdNB2C+hQcFGcAm0PTUUPGYjEyIEtPTyeEEwJZV1eHBoHCycYosAoywnUTDTJIMsOj1waYsjdOO4w0kUhE51+7Ij8ZMJhyzrUKUToWRrxAYsBXBxkGIzu0vAwYbVtfPuPxAakoIAMvhiUBjELkwrDesKxlhEOUzcHBwaHN4W5aaRu88MIL4f+kdu/enXH16tWahmF7HEceeeRrr73mblppRFlRfr9xfUvKJ+Unz3yUFnaa0Gth48eXGIX/OHgf/ceHPEKivjUg5yhvamtiWq902H2xg29amWxbDt5+ZwS3rNgbTfwbVt7wXUdd9KuCfVu6aSUh6s0jfuXfuCL2e96f7WgUgaAxYTh6t4J+UjGGQTlhwZRagrIEULFQh7Rw04pDMnbjm1ZS/qYLky38KsTFmKAUKdhpQlFqNaaG3WvDmDG6aQUX9TBM2AvJSGGMC42KfIpqAEONPb9fv/wVK1SuU88DXOg1QvK211M5KM6R1dbW8u1A7N3t2t1onlJBQqpx9Nrbr2Kxq82lCnynMJKkuro6NzeXPASivKOy8ppolFS40BBITjZJTjJMqKy8KhIhEIZAdQTUKUDAyA7v3rCh0DRi7rrrrquuuopwAqdmZXmVlaPNFRMAGTwhagQADHbLd/QDnTtj7FQ4bs4cDm3hCSf0nTOHzesnD9BPHjaPjQEQcw51ULGLLor88Y8w2Lg4+cj8L8fll7efMgXS5A7eM3YqiAmTMIwJspRIzpaATQp2cribVhwcdi24qznaHupxhA2LcI8joBzC6N9/8cxSY5U9O42ZMYWyogne+GHTJssdoP/4hfrs1pK+40YVlQWsQUp9GyJvdKnrcTjsWOxnLrD41UVHxe9C6dJ1v48WLdHlGIcXBL4kxO9wCfDWnOc/spd6PP6G90bqCzocHBxai5S1nCVtsacCMmyAsEyGBS4g3ibRaEmKYQzKWkZsvCqPpQRoVNh3MHc6YOMF8sKrBYARi8XqzeeSpKenZ8afeVFrnhZBEsKRaRu2HwHQ6DNHxISvcdCKpMLLighqzJNHN5iPU8GAz8jI0KL8YlfRrkBGQEh1dTUkOevM3SLo2QM5tbRcnAkl0YGAooaGe+vrJ9fW3llejvHbmhrGKRs2wE/94gteD0i3fr3/qq72x6qqYLrJV3l56hc7TGA26+V587/+9YXmT2iLTzpp0QknML41YMDSU05557TTVg0atPrMM9ecddYH3/72umHDeJV/97tVF14Yu+gi9JwTzgMnmZOgcyjAAwyRmoYF2GGXGOMJYPlkJCiTsUmBg4ODQxuiLdsc+Z3y44VmWVG+tZuieU+zIKRTCIXN1K1bkNlHaeGmojYrcUJrIzx1PY5WYNiwXsvNuV6xrO+wYYYSSieP6ztk9OBh8TZIAnr0CrdEQAo9X8jCwsKm76LGN1foffVsYeNb2b8mxHc1CgNX8LZI4h0ctjcOLxh75KLJ5gkZh596hvf8nxvbFG+9aS7oaIrgFpUA/uwivyMSYOwZXrxTYtHYPkmZ0MHBYfNgC0hrGDqA5RmtrakFvCCXAK9xr3izQwYjNkYH8yBSk8BvdugiDiphvHIlRKUbNDQ01NTUWFmduUFDLRI1F8hjYxl1w0VVVRXeNPMADkh5kRGIQRJ4MpSXl7OQ+h25ubkYEzp0+M1ee03Jzf1tNHpXevod7duPx7f33ndnZPz6iy/+X2bmpEgEzeSsLIyJaWka72SVnBxC4JEXdepEht937eqlp3tdurTq1aFDYOTm+mPnzsG0S5cLY7GLa2sZRzY0FJSXD6+puai6+rxPPz1//XqYSxoaflBXxzgc8pNPLorFeF1onvFxQWXld8vLecFjf6+iYti6ded+/PHZH3449P33v/3BB2etWXPORx8xPe2dd05fsYJx4PLlA956i5Hw/v/5zzfe8H/mHr1gwZGvvHLYSy/1/fe/e86ezSvv+ecPnjWr+3PPfeXpp/f/+9/3+etf937yydw//znyxz9mP/GE/dIAzrm+OmGbr7um5r0QvMESIG8wiSMcHobeMw4ODg47D9r2p9KCcZv82/mW/Q3c/tG+vGRk8YS2LCfLli8OrGZQVjTK3hjRCqw2SLZdj6OV6Okte5avb+nMxb3Czy4pnVk8cki+lzd42OKUX/8Vy5p+kZrRF3tDgneR6X7wxZ02zLy14ozB4LHjveCtXFY0wSTyuyYlvtC/biT0Lm+Od3DYnuhyyulHvfG4/6zQLqdc8avTP44/hSP4nBWjCT2bw7so/nEq3roXXwjNfJBrv+fnJDxt4/CCi/Yz8W96KS4PcXBw2DRsZegXmvFaUUYyLJ+gwVYrASihHXFJiUCasIsqFGOjudMBQzUwBvUw6GAeMsqUcdGwYQvOOsvr2vXfp5/+j2OPfbJPn7/27fvn3r3/mJdXfNBBD3brNmWffX63//5T99vvns6d/1929p2ZmXekp98Vjd6dlcXoRaO/SUvjhetX7dr9eq+9GJl6RikxU4zb2refkJHx29xcpn5gly6/2LgRr99uaPr6BeNnnxXW1PC6tqGB189qa8fGYldWVel1dX39FZWVXmUl44/NB9miHF1ePurTT736esYffvTRTz75hJeMn1ZX/+jjj3ldvn79xe++O3z16gtXrvQ2bgyMiooRa9d669df+uGH/tTcoQPSzdNDOVeZmZnRaFQjZ0/3zoC6ujrOMwYkJxMxUD+IKWee05tmPpdXXwLEkLW1teoiMUWAGLLePMJDX0cAA1gamwyE6wuqzJoqkDyaYmNASqk8cmmKwYhMvLXDEBPWaArsVLBbdXBwcNhJ0KZtjv7jx3uJNaj9Y/em/wZeGvyhvdnrNXzkDxm5YNkK30rM7GPZZHHKEKwVthLWNT2MBeP65Rf5qhTw6+C+IxMuFNhsuB5H69Gjp8fXt2y5N2xwj4DyvwwTFo8f6z+kI2/0deF2Al87fTkLFo+f2tg+a1bfv5dJ2qNX/8X+RSN5o0uneqNMfLFnGCFv8LD+pu3h3zpjEhFRXOALC71JoceFNMs7OGxrdDnlitADMfxbVOJT3a4iBB0Mv/vRiFBbA0eTJocP4uGU364SJD2160f+s05DqzdaDg4OFglFIFCtaIEggbHAFfaG7XDJqsLSesUn2AAZU0a5BE1BR/NpsrrgwmY+ZuZM7+OPT3nxxTPnzTtrwYILli276J13hq9YMfLddy9ft270J59c8dlnjGPLy0d99NHPqqowbm7X7urq6sLKSq+6Gu9VsRg84w0NDZDX1tZ6VVUImPIat3HjlevX3/j559fX12P8tKICsbdu3XV1ddfU1HgbN/74gw8wWIIM7EfXelCxbzT3vzDqNhmzWb8HUV9fr3tY0KgZgYyjyzBPCYFU8a8D5NgrKioY4avNB9N2ME/0wAUyzeNXycmoO18wlGfDhg2xWIzMrE6gBKzCVFempJlPltFmFIhNfjQsRzhTwlkCMaRCzL58jbokmqqjgUEUhrKht6M2jI1GxyKGkVQAErAxRmnwAj+7gRiU2IxyaVQSO2UEViNoagETWA4ODg47B9q0zeH/GbzpwxD8NoL+2N302QnJfwMvK8qf0EuXbJR4Bc03OkpnFptSNWXmBcXedTALxy9uJkPiunmjp47vbx5eGQiawvyxf+rYXsF0y+B6HJuH/CHezKJnp3k9G6/54cvmN6P8boJpSDRe0NN4mU/4GqHm9QkoLezUb5n/likvGRlQQt7o6/zLO/wux7DBfuK80aWoFo5XU6Px3dUc7+CwWyH4ONmbbpq86MjGz6t1cHCwSCjzEorAZIQFNlaGdcmwY9hASS2qclQkNqRxBuEA2y924w0RkRgwkjEyVVmOoX4HtTcjDDU2aSnO4fFSnxOIGB4NFTuk8qgToeKcMT09nXBia82jSdWDQLnRPDeUQBISwhQlvMp4xKyFkZubS2byqKRHzwhQwgCtTjhMUVHRPffc88ADv//ynnuLiu675557Ud577xTsSZN+++XEiQ888ABpAWIdCFCSDPMJMkyVn82of6H9aLcYkIjJgEDnGVINC04IpHaos8qUtGqUaAlCMBRFEpZGhgAGg8MkkBEN27M7REysdsIJFI9NINDGdMLhWYIkjDotkOiZYitKI9AmAV7x2NYAMuxognxga2pUwXvMCiwDLOng4OCwA9HGbQ6/PAxf0LFi2QL/in/QeBWGj+S/gaOMF6ZN/7BuYGtW+1f71JlF+X+LT8wgbNbf3tXk2KKnTNrbVVyPY/PRo5c3bVpffXEN/BtQ1JwSFo73pvk3tjSHzdLrLUOIpha8rYonjJrW9zrzBvCvAir022KlpiNi310rmuEdHLYAr28KgW4HoPECEXflhoNDSoTLvM2FjcWwlSQjthiRgBrV8rKB6lUYiTUVKJIBDC5GuaRRf4FiGAEFtsRU4BjwjNKoYoenrq6trWVUOAyg/MbLyGaAqn28yLQ9MmeaZ45aHoOQWCzGFB4GQ+W6NRBoISVU64HNwOBSR4DVmZLh8ssv/7GPH7W78opLL73kyiuvQHzFFWNkt7vmmjFjxpA5EomQk60qCg12ZWWlEjIFHCDHi6GuDYcAg8GZwWDRevPJsmQAbICNweDVsWtLJLS9BngdI+EwOs8YHAtiDKCE6sKoCQIDjxIGJQaB5BTPDkmrhXBpUQyOER4NhhjC2Rs2gISxSJgCxDbKThk1FSNoKiRMhZTkVkJ7c3BwcGg9En/MbT3y/Qs6ng0mzSHl38BDpWni4zuCP9pTSPbXH9c3E/EnN2zO397Lnp2mzku/4L6Wza5gE3oc3Q3kcmgeeYN7eZ5uLvHhf2JKSZOWVMKNKAnYHL3fyzBtr5neSC/UhvORP3a8tyDebeGNU+IZZWOnzUePZngHh83Foa1DoHZwcNhdEK7fVFgGk1DBySiZRqpZRirVsNjmgRRPAQywwy5iFU7ZrOJZdTIuElIk41IzggpZXYyOHTsik0ZgShLE2dnZusoAGTU/NoG4SEVainYyqD6HR2PbEwTiRYYYprKyEgFQf4EQxMh0C4lq8k8++aS2thYXIK1qfmz2oysm0OTm5qonoq4BXmuzBAvBKAqS/OryaEsocRU/8siXU6aUPPkkU/amLgMGGVgUMRp9lEw0GiUJXhCLxUiiw1c2QrAR42JKIJuUBpsNQOJFxobl5YggORCdGcJZZe6//sV+Fv7nP1lZWUSRQUkIJIpRIYz+PuJgigzeCrQfbICBl+TAyBvfPMDa1gtEppRtB7BWeDPNYXtuycHBYedH27c5/KLSGxc8tdO/ekJPdozfbGKQ4m/gvlKXgQR/OE+F/EkLh03rZ5ypM4vyGxR9dc+DStf4c0ab+5t8Sqgloq6Iua9l8ypYdx3HZoMzbs5y6N9J+cHYFPnmWpy4rilao7cWDoNJkzD8sEaNfSxHgLg03oSLKxN5BwcHBweHJLSmBmu57ATYArYVY8CE60AVyWou4FLFS/EMo5JYenhKZQlUolN4M8qmqp89Z870p57669/+pgwSUPkDsqlyxqDgx6YOr6iogNFaKEnOKky1N5X3TBGzRJp5GCcyNqBugtorABmuWCymJXQgaFBGIhGS19TUMELCkAGxH+Z5lZWVErPhcBtCbQWywTPq2OFrzTM+kGlpXW1hgYxAGTocYhlZgimxaq9UV1dz7LgEbUmHjME2OFg07JlVYOCRKQ+GWjnsAQaDFdV+wtYmBTKg5CRoM8TKSwZiGbHJgJcNaGRvjPAoZQC5wkAWdimVwJQxLJABrC1Nc2jZ20qE120BrZQ5ODjsIdgGbQ4Kv7Hjg4d2+s++WGz+2F3glTRWgSn+Bk7RWNLX3JrSb1zfpn+MD8M8M6Egv6gsZeb+I70JoQwSQ4xa1tdsyF8kcd2efc2lGia+zeB6HLs2/Kfh8i7SDSsODg4ODns6kqu1za3fmisLU9ZmIqW0AqpNSlCRjDJsUYpMsCQ2IQAlNiPFswTYlMRASRipwG1yAW9gGUhDwVxXV2fv6QDI4MlM2Z+dnQ0vRvU8tpbGtsU5UbpbROHEStzRXOmAIeh4MUSSnHAdlI4CngpfJCMMo2l5+BetVFRU2LaFtkEgqxOCkZmZqYYCS2Oo14AhvZBunjBiba2CHoORVBwmAtbSfjAg0QC1ishfXV1ttwfJ0sqGmKku8VC4uhXapMIxGC1YFA1iNNoYBktgY8CLtF9TezjKbw1WCX+hIcXbQDsKVgDCvBCOTYYNdHBwcNjOaMs2R+Of1vNGl8b/tO2bBkHnooW/gVsqockRDxF8lZmmyjxpkrh4hiClzwcpktY1RDOPIBWarr9pJPc4wrerhO3dAzk5Ofx6ayUQB2E7M/QuSXgfOjg4ODjsqUiu1ra4fksZyO/HwIoDBiXlq3Vpam2AofqWwlUkUzFG5Re01MbKQKWNi5Fi2A82z4ywFa+tlrE1EsgoqG7PzMxUEhgq8JqaGgpposgAiUFJj0tdA5SMrFJbW6urLaQhEL3Ke9Xt6AGCyspKphhTf/e73z/4ICOxSsjIr2XysGc07JaRPOyKJfCqI4AXFwb/2cDQoQko7ZZYl5wcO/kxkKlxww6HnXtuuzFjzj3nHKZ4lY1AZIxsADHAhicDIdoMhyaNdqKzJ4ZRZ4nzQwgC9Onmihg2oxEBIRiAEA5E637j+OPZT/9jj1UGtT901CwNFA5pz62m2Hi1GSCSEaAUKTGwhngZkBotDxJchvMR1jg4ODjsDPD72YHp0BZIeR2HHkdqkTB1cHBwcHBw2HMQrg8FqkTIBJ6prR4xrB2WmaDgvgPxqnWNM+gsUFoTq5GS22Tyl1NNziiGgtlmYIT51llnDR0yhJofm5q/qqqK8psMlOj871GLEqWF0Ci8pqbG1tjoI5GImgUIYrEYIyQjVT17I1VGRoaqd3aIGMNCO9ESqu3RsAp8NBolW2VlJVNIgIZF6+rqLrvssvLycsRqr7AQGrbNuuqbqKFAWnKyB1w6FptH/zcmSktLTzjrkoG0rAuvVoXywzPi4nAwIBHoVGAQzsh5YApYjoU4WGScfwWyGR0jwECvL5Y1tBAuMmif4iHZm12F5DB2FMMIxCCTUiOkNXxRHEblAz7ZZUeQ4E3GJgUODg4ObY7gB59Dm6CFe1Vsa2P363Hwy978HmwV9D8DBwcHBweHPRb8Nkwu/PRbMpgYNMcAhVPrUvHKMH4f4b/VM+KSwQjU2kCDTdmMQYWMgYz6WX0BVcVMqeGRUUtXV1czZmVlqVCneq+oqIhGo9ho2A9JyKBim3AMAqn8qflJnm4evYFBYY9XCzEFpGJU94HNfPrppxgWZGZUOEqmOlKM9evXcyzKzx60cxbVwzsUKLGOl3VREqI2ATvkiOAhyS8lXl1zCskIdCoUKyUaRtaVgEBtT4w2Rn52wpQzBpOZmcmUQJ12Qtghq2sDTNHbp3tI4Kc2OZVHPAbZEIshoQBpG0kKl54pBiPQgciGxLYJBU0tYGQoT7IgDCsWkpUJAgcHB4ftANfmaDNs8nkcqw2CiYODg4ODg8MeCZWOwaQZWAEGoEy11aPCGYGtw0Viq4iVYW1gBYjhKdqpjf3UpkgG8BTbCCRTOY1NKY4XfV1dnZH7DLU9CRFIyRReF0GQBwFiKnAqedaKxWJSVlRUMCUbsbm5uYRoM5T9eDt27KiWwaWXXPKTH/945IgR2j95/GADQshMWtsCAERpaVzqIBCo3UISXm0++RWbo6itrYVhh5FIROdkg4H1YuBlBNoAB8g+gTLXxB9NAs9ILC4YGeyEJFpa4ayOkqMjXBrA0izHVOe50jw8VVGsrv0Qrp2wVe2BKC2qzLIx0GMQrhElLsSEYyPQufIXjr9VpMQWrEZTgam2FDZaQELILg2dNwcHh10X7nu4zXDkkUe6Z446ODg4ODg4AJV8KdFcHWhKy8aC04JpOARbjOUZAYWZnTKqQlYZDCBVFftS06pgykj5LRelsq2uFUJ+bF2MkJ6ejlfNEWko5lmR4lzdATSKgiRnvbmbg8zY6kGgzM3NRaZmASHkBLjQMLIHIINAW/arraBWC+HqyKDBhsHIyMjQzgkBJAd4RbKQ0tpYNkCg9oANcCFgz1JqXTRAUzQ6vYw6IaQiAzwaeKBrVViUUQk5vfDkRFlZWcmIS0CgQ5AyGo3KAMg4CgzCdewsAUMU2SDlJVxfPmxthqmSaCEMgIwoGPH+RuNvFYkxjDAwpMRlecFurwUkhOzS0HlwcHDYdeHaHG2G1157jV+QjK1HEOng4ODg4OCwe6Hlks8WjWGDEEVptC5NBZFhBtuS4lXiUqfBq6KWQIaKYapfSnRV2jYDUwUy4pVRV1eHQZ6MjIx0c9UGoNKmnmdU1Q1Pva1wAtUBUf3PqEeT8n+kiooKpgjgEZOBMp6p7vgA+qwWFe1owleXaAMkwdAhqAVgDUAUNgLbiYBkb+gxiGVFNPB4tT1s0hKCgKkMDpkRjaYYAC+p2C02h0w28STHpcMhuV1OQMZCMAhYSy5kyoOXrbIKU8J1HpQZg0BtABfhRMGzNMuRRyQaBNo5SWQzClISZUkZ0lvbeBoBw1rBpHlokw4ODg47J/yfng5bj9O3FEG8Aygryu/UqbA05cxHaWGn/KKyYAKMIo4mnqauhDRtBJZoumYKplmUFkq5GSEODg4ODrsPqCSpEm0VLcbajDJk24rUAtLqra0po6aMclGyUg9rqgJbAgpgTW0RTgltwzuaTz+FlwBGd4tgEIULAUpV3ZTcjABvNBqlXFcrQZm1KzTajxJiq/7XKghIpaJdqzBWVVWJZ0TDuoqqN0/fgCdWXRjb6dCumEoGU1FRQSzApRB2QojWwmDUDoEOQcdLiHaCXn0TDG0SGQeIgIMlg5IjxlVbW0u40lZXV2dlZaWnp7OolkCDC5twHQIjXgk4FkYr1snB0MnERsxacsEwwmgtbQlbLmTY1quEjDBABqOAy3rFADFyAVyBFUcyYxEOdHBwcNghaHfGGWc8+eSTwczBwfOmT58+YsQI/lsQzDcFfpm18KsuAS2JqflHTfP6Xlfqf5Jrk0ngnewNW7ysZ5gZ5U3Vh/2WFnaa0Guh/eDfsCvR10ZossRmYmtiHXYmbO43i8MuBP2kYgyDgsGCKYUEVQ2g+KE+GXPTg3fdOFzhDpvEnDlzut5ySzDZ9mjpc+O3Apv1G9DCRqUMT/CGp8bvw7o0tTajjI1XXpk2ZYqm8qpgVuUMeA9TFavsZ1R3gIJ8yfnnH/uPf7x27LF+3i1ANEpxH9hhZGZ65rEXzcIeXefO3vr1gQ26dPHWrQvsltG+vWdaAE0QiXjxDsgmkJ3tma6Kx4kyrYFhH37I9/jfjzhi6BtvMOXUcZY4bw0NDRicUgy+97Ozs0uOOsoP3JkQuf12Nq8vPSPMhssuaz9lCgZTvQGMsBGSybBvGzHAei1s5m2N7bZQy7hlO/68cnBw2Hq4NodDInZom8MbNswbPJr6v7SwcHmvUFOjtLDTzCHlY5fnT7ZUuFmQ0DhoOlWsH4VVUOxTI0vM3Cj7jVsQoizRf7xpjfiplvX1iosXwJQMm1aA03cNftbyQagWneqNmrysb3Gxv0x8laaL9AhmZEFs9uklL5qUxGEnRBu2OVp5bdcLL7wQWA7bGPpJxRiG396Ig+lmtjnWlowePmWJbw29Y841xxviNu/GG73bGIsKuhlRI+RtPW+xScHOgd2jzdEyWvn7MSxLCNGUUYZ1iZEN5LU24+djx3a8915IClqjDUB9zvuWih3Iq1s20tPTeSdnZma+VVBw7D/+AYONuIMBCXUvRlpaGrU9hX1VVRVTEkYiEZhoNEpILBZ7eO+9va5dzUZ2EMzDPnYq5M+cyahGEj86OFEY/NCQV+DkczL1pdG1KvNOOeXEf/0L+/VvfOPYefPQo9GXSRewYOjaELUz9OOIVNix66+P3H47XqYklGDj6NEdioowgFnTf6sQLgNSI1NrJ/DJaMFl0RrNLgHX5nBw2LXgblpx2LnQ01v2bJnnlc5c3KtnQPkonVk8cki+lzd42OIJqe7yWLHMdBFSgtj+vXqYZsOEXgvLfZR4BeZGltLCftOGGWrh+MU+VVY0alzfEiPpO25UsNKCxb2m+gpv3ARPxjR/j96CYu+6xtBGFHtDTIaRxTN9mpzBImLyRk8d3z/oZxikXDQhicMegOCZPc0j0DnskvB7HLMHPkZtP2fOHd71o0vWBg6vW0HRZrUkNqnf3IQOrQClWmBtDlqu7mzOsMzaeCUIy0QCTcWr6YYBTwktgxFSUwxArYvNiFdTP5GxkancxWakisbApSo6IyMDMcAF08F8fkqaeZYnVbeSUI1XV1erIQLGvPvuZStXMl6xZg3GqLIy78MPR69e/eN33hmxZAnTS5cuFf/DZcvgNf3R8uUX/ve/XkUF00vefvsHixf/ZMUKr7oa+6L//Y9AGMaC1167eNEilNgYuC74z3/OX7DAW7Pmu6+/zuoXzZ8/pLR02IsvnjN7NqRXX/+duXO/98orQ59//vx//QsSg9dZzz133ksvYeD91qxZ3vvvnztnjh+yfPnZ//wn/OBnn+XlffwxSvhvv/ACaWHyZ85EAAlDQmyvqgqbEAQYvAb94x9eWRlT9sO5UlOJE8WUU8pU5wpGXQ9OMrxIdZektF9QkmDwpdlobpnRlw8GIMZGzCgDUtmYokQffieYIB/Y7CSYxO/fkSBhJA9GMiSwsLKwkaBxcHBw2D5wbQ6HnQs9enrLVnhly71hg3sElN8HmLB4/Fj/koa80df1HTfZ1v0LxvXT0zcKFo+fGu8aCNZlfSuWLYiTBcXe4uVlLLO4/7DBJixvdKl/0QQav50C8oeMXMBOfMQ1jUYASfMGD+vvZ7MwTRUOpZdoUk/1RoWWTUTqRZsmcXBIRmmheTv7aJvnz5TdN2jQfS293RAEC/pIrU1M4sdsi8fj7GJY+/Jsb8yNQfPh+AsfG3GisXysLRmtpgfGqcLEeXIZ+HSYkJ5x4sSJKeQhAQqTcXTJPKVudp15yjSxhKziAiYp+Z6KLS7VmqsPkxGuDGWzqF1Xhp1aMcAWT5mKoYJWYGoZCloMiTGE9PR0ymD7qAsVvbq+Y4N5IiY5Y7GYqm6UCOClx8tI1U0Fzgioz/1VTTUOMFBCarckAYSTU9vAhiEQBiVjJBJBiReQX9cjsC5LkFBLR6NRQti5MgAEbBglDGNtbW1OTo5dF5AH2I9l5SjUStDx4so0nwVDOPkxtBMEGOIZyaZViIVRflaHAaRiCs/qbI+FRDJCwhBLcgyg84OhA0fDHjhGMhCoD6D1k5qrPBhhampqEDNFiUE2DO0EgxGGcG1YgGSEB+IRABm+wmiEMAmM0J8SK8YiLEuA8qQ0HBwcHLYzEn94OTjsYOQP8WYWPTvN69nYUCidPM42KPxWQbG9oKP/eF2dUV5uL42II3CVjAw3J0aaayYMkgK2GahF+y3zL/vwN+PgsNlYs2bNWWed9dxzzwVzoey+QQVe8IZeePuSgpb7E61D3uWzZl2+iW+M426Pf9OVb1Lr0Ij3Vi/JO8heYdGt2/HdEi+3mDcxfrXHY2PKrg81IG7zbjS3uCRhhjfAXBsydMbc1K2IJWXdb/TTeVMeIYdvzH557dqS24J1bOC8ideXjfGpAat1U83aktGPdLdXnrhGx9aAMs+WheH6sIVaUbCB4UKRmlNTeRllwDDKsIUuYpG2xKV4pk6m9rbVPlW61VAtK1BlM0U+FTtTdSJUXRMIIFWKp6enqwFBBkpuVewAniimmZmZtmivqKhAmZOTY3L4n0uSkZGhD0ZBTB6m6guwEDYaTUmOOGI+rjUrK4udkJ/kAAMgYMMoETBqaW2JKcAgCi85GcmPAJ5RJ0dTwLoy2CpKZWBp8hNLZgTwZFOTAgOg4VyxIiQaeO1ED0ZlyoGQQYcDotEoZ0YkYBU0HCMMa+ElCTKtiMExosHWVJvEttsgCaMMuwrhGuHF2BPlr2oMGEGkZazAxlqId3BwcNjJ4docDjsbevTypk3rq6sbDPwbVhrbE6GbRlqD/EkLh03rZ/6W3KNX/6BBUlaUb/68nNez74J4qlLzOS6+RjeJxG91aQnBTSnPTlvQN9SVSQFdrEFKTROweYs67FlYs2bNT37ykx49epx88skBZXFc7+DNknf5rHjPofF6C/OuD19a0Wjby0ASrrKQgrGwMFC04jIMu2JCoyXgB01eGhBJ6/rLFRb6KuY2TTMXiez2WPtuWZ+BJ5reR7eCoqCvsWTK8Ou9Ec3dgNKn+wH+Pwd071P2rr0FJox4wkYDkP1G7zb/Oo3rZ3gmsHHp4wcMNZr3Vi9haXMxR1y0Z0FVX1vBloXh+tAvIpuWi3aawAsiGbU3jIT600aZKrWx32GLXuphaaiNIfGqDLY5KbB1bYJc8Iy4KPjT0tLs9Q5U16Si0sauqKigkkejit1uybYAYrEYPFNIW6vvtddeSuhv1HRYIBnr6+tZCyXbINC2HohCTxICcZFWjRUWhWTKZtg8SnUBAC6trilAr04E+9FOyIbBFDE8GrLpDMzo3v3vBx7Ia+bBBzP921e+InvaV786vVs3vM/26PGPQw7BeCYvjxea5w49FM2snj1xYZf26gX5fO/ejGLQ433hsMN4oYSZ3afPnL59//W1r8G/eMQRc486Cj02BiSBC447jhcGm2TDMtTd4HQJHIL2r0NDg5cRWB6IsYDh8Bn1pVGgZLJTIjnPNsV2Xs7BwWE3g2tzOOxsyBvM/w0aa/2yogleSZNncCbcuLIpIB9ZXJBfVJY3urSkr7kopN+4vkqpJogprQq8ktLRef5zMxYXNM6Vohn0H+lNQGmzNYP8Iazvp5zpjfTMPSl+e2VcP/tRspu1qMOeBNvjuPPOO1VjNCLv8mv73GDevKFWRNl9lzV5EIyXd+Ywb9pz5p1W9tw0b9iZeX4/4c7euiIj/pCaJLTwaJj5WjTejWDFG/royTJ9brissUFh+ft7L5kfMCnWnb+k9/0Qk/JLJwdp/Dyt//beddB8L6Il9Blzx5iyRxof49EWmDfx1OGrR5gLNdTTSI2hd5iLOXzsgQ/6aKHS20awFV3YCG9DvGVUo2pkaqMAGslEfm6uX8AOA4H9I7+8MJTHCqSQxqAAVkuCahmytrZWTQQYSmvGuro6/VwiXFGQGEBRJIEkjzJoRdtJqaysrDfXXCBgioFYCVWfU9grM8CFGCgJPMkxNCWVOhpMGUkI0GhdoAYHSjbGBqrNZ8GggU8zt4qoicDIBoa9//6333136OrVvIasWgU/eMWK8z744Mx33sEQf1ZZGS5eGIOWL0eTv2wZ0y+nTNELJeTpb7/NOHDJkjOWLkXAlJE8ejHFdcqbb/I67a23GE/6739PXrToxP/854SFCwk84sUX+8+ff/TLL3OwnG1GwLbV5kAAYBjtVxPYkyYXo/266AyIFBBbfRhhEhulte3YHFr2th52UQcHB4ctQFu2OfL9v4bLLCvKt3ZboK3zOeyMyBtdamr80L+T8oOxKfIn+c/RiOtSoKkLeXCPim8Z2JQom1KWaJwrNsHwx0mTpJW0kdfS1oqvOmkShtEaJiTm30CSsGjIctjt8dxzz5111llr1qzRtKUeh0H8jTVkpt91MH2DvMtn3e9d5k8Lir0l7/BD0++GmD5H2XPT+lzrX/GxYun8eKsiLkpCcJ1Ij97HJfntTSu6fIRsjU+Wmb9UT5aBfm6ad7uep3P5tbpZK+W6x/mNFx8spW5goWe+vXc7dDtxoDfltqBh4T/3IvQMUoNuB+Utmf2y9cfdBxSMyLNxbYWhA/xrRebNnaFp49Jx6oDufWaou+I/x2OPvWmlraq1lqFVbEWnylPThA0wFWP5hDowgQ8Xt5TByqxiGBuIpGxmhLRtDoBrg7mfBS826NixY21tLRr1L0iOFw0JbdVtV0QAIpEIPIHiCVSjRMkhMSARiKGSZwkpiUVQH39uBYG6lYO06ebTRjAY2QM/HoE9LunF2DYHS+CCYSHGtLQ0pngJZ8WamhpWR4YLHg0jqzNqwyRkJ+hhWFRiXNoGSZhqVxhh4GXUZoDaNCJJgsFU4SLJKaVIplpLUy3HNoBW1yZJIo1keCUWg0Y2pFbBlhEehbBMsGKAIZtRypSQxsHBwWHHoi3bHP5TH3fHP8I5ODg4bAecfPLJPXr0+MlPfrLGoOUeRwh+u2Ph7UvuvK/MPAhm6bV+E6LxQTD5Q/zLI/yrJeytYKG7wLbr8zVaWNe/78Y/DDU7Ul9jsmujW0HRHXnxG0HKxjyWdInE8dc8NnB24PfuaHQffw1xbdjoOH7A0BnX+6vM9YZ6S1a/51P+Ev7SPuWjcbPDp+TdkfLBILsZUtZsW1CttVD7JbvEJKwCmXLdMIltp5TEmipQhlyqqFUzU+vazIzUvSqVVRKjrDOPokDMVF5+8qiKptJWIa1bPPSsDa2CEqSZT5klA4xASEfzqA51RhTOCKMlCFdJbzeDQQikSeBVVVXB22NhSiz7iZjPr2Un2gM2SwAdiJKT6rHHH//btGnTn3rKRPtgkwAZI5ljsRhR8BkGZMYmnFXsEdkug22awIjXcsgIZNvYkDpMQQk1csbwsqtoNEq4liAhI7EwCpQLQ2thAJbQkWohDPKwK8QwZMCLGBIQqJFAxNjow9kULgOItLCx1pVsANnK4+Dg4LDTok3bHP3Hj/cSP+3TfwqCQXA1hn9dRmGhzxWWNtp4SyWUzEal/t9uOEmymHnyjeXBPeGFRTjFNXd3usNmIicnh995rQTiIMzBwaEp+J/0nXfeqU7Hpnsc/k8w+8Or7Llp8/scahoHyQ+CyR8ycsnMmUuCiy7MdRN+S4SoNvgMFD+bfbKMfViI1+PMYV5w70l8Ky2uG1Cm2VEysplrTHZ5HH+NbgKxt4Hok181ahr4TWPB8sQ1dj2Sohp1cSQIEo34Nq65BiNoYQTchd3Lggd+NG52T2hytF3N1kKe1izBb0krw5ANaUfBMhSljJS71kuIKlUQLlmlxFDhrVhKZfTYlMEAl0Jkw1dWVmLvs88+TBHjUqcAQ4U6GlyU8eIhcYGHHn646L77GO0lGOKxGbUTrYuhOh+N7VaQBy9T1f+2H4EmFouREwMgi5iHg7IHvGgEBIEVgm5UUdsCfa4B21YTx/JsgJ+69fX1bJX82g9gPxwvUzQY6PFqD3rOKCP8oPz8wWeeOeRb34JXFCOpOEZsdWoAZMeOHbVndUnIjAAlwFbPCBd5pNcGWFfHq6+doiBxKQmkFuWgIPVVk9cCjR0lDtuaigkbxuNDthWDsC0kM2G07HVwcHBoE7Rpm8PzBo8dNi18QUdZ0ahxfXXbdt9xo4IOyILFvabCmMuSZS8c742b4MmY9mwZUU1vL08BmySlOPHG8tLCgsXmgzeGLBu3wCfKivIn9Eq8S9xhi1BRUWF+D7YKiIMwBweHJNhOxyZ6HCB/kv/5KkGzth8/Bf0fqU0eBGNvIckf0qe42F7LkXf5rBI91aPfDX1afKxMa5B3+f3BNgq8ktAlGo38nUv8J+htYl3f6QVHU7Dk9vu35zUmDuYmGoPhswfGP/TWwaC5eqxN6jR+JwZWHGKU3I7ml2fAi7RTFcAUsTDqCFgSWAOXbFXm2KqHYWwsgVTLKrlVSyNOMxc1VFZWSgnDFIMMCIC/oXbtkFHAS4AyDBX2ajFgsJAqeUII1J6JYj+EU/brERso+emnzQDE2g8aQmprazHYSXZ2Npm1B10HgcGo2j4MUrEoSViIDIyQyEilO2uysrJgMHCRStetIGCEZ2kZJGEJaZiqESMXYP+4OHtmR/5OOBBG0nI4OgqmCHQsTHWqIWHUviEnUSwESRJkjKzCZjDIjwYDjcIRaFcYQMsxopRMeRiB1rIGPAaQIcb4UyPslV4I20IyE0bLXgcHB4c2QfArsM2QN/q68AUdK5YtaLxt2zx8EYQ+37PRDpN5o0uneqPMf3eLvcXLU/5Vz+pTioNPq+jRq79hypYvDvRsw3f4G4t/Qmnzazg4ODhsb/C/4XsNWupxGOg+DyHeYEh+EEycDfcV4qrEh2CQkUQaG+fGJSQRwG4jSBbXxPlZs2bFXQnrNs1mndv3RhoHkHSZyW6Klku4lGiuHtvKOi28E+yEjZEcRiNT61Udq6UZNcX24+NXRoj31QaqcoF4pcJQ2WxrZpXEgGIbAaPKb0AJjZhpR3MTChrCicUmqrq6Gpd6DUztcmEgFq/WQE1NDQxLqN3AEmSGYcSl8h5XLBZTr8FPYUAIU1ZnZDlyVlZW5ubmSqOdV1VVMUYikfOGDRs6ZMg5Z5/tR5pF+Ymqo2bKumxbi2KQSheMwNTV1bEEYMoqSo7BxrDZVVZWFlMFQgrKSRR5MjIy2IxIu5zOofavoyYJYvJgwLAuhwOvfWo/nDGmCsdFTsLJyYitVeBRAvIwciwAAw0wHt+WDA3A1h4sqTE8FaxLkCAB8IHl4ODgsDOhrdsc/FfVv6Dj2WCyZfBvL192nf+/3cbby5vFZonDCN0l7p7x6ODg4ODgsHsjZZHWVtisYi+8E+zkjYmxLlWYfqFpAEMpK8baqmnFKCpMCipuIQmhGsf49De/+fi2296/9da1t9zy7k03rbrxRu/AA5dde+2isWNf/eEPX7n00ue/9705w4eXfve7f//2t5/9znf+dtZZTw0d+uSZZ2I8cdpp2CWDBmH/4eSTHzrhhEe++U3vsMO8vfdu98ADesE8OmAASq9PHww0KB8+8UT7Kj7pJDSykeFlw+yT+p8iPy0tTQdCPQ8JOAo2rw4FRq25z2VD/DoUdYchcaFU7wNEIpFqc2dNNBqFR6/GAWCq9g0yRl1zQX7S6uoMeKaksg0RZOwHJVNlQENCNGyAKWAKqdtn0LAE0P7ZDCRiK1PDAoNRD0mRhoPia1RTU0MgSXDpPBDIFJsRmZLIRm9J8mAA6TEYZSCDNE4fIsOMIF6GtUFrYjeJLQhxcHBwaD3avs1hLugYp1tD/MspGm/bDi6xaBWSby9vAZsU+5/fOe1Z/4oNe5c4G9NVJ/6TPdxNKw4ODjscx24Kgc7BwWHnQ7gI3FxQ74VLPmsn8MCugmFdlKyMqmnDNaeKcAyAhrpXSkgMgWnn667b94Ybut1yy4G//OVBv/qVt2ZN74kTD7/77mOnTuU18PHHT//Tn/L/8pez/va3c2fOHPrUU+c988z5zz333dJSxu+/9NIP5s69+MUXL3jhheFz5nzv+ee9t9/2PvsMfsS//sV46SuvjPz3v9F4S5ZgQ/7w1VcZfzx/Pi9cxMJc8vLLymM267c5GNmn+hQYajRgU/ljsPNa8wG3ahakp6f7YaFHb6jItzxTAuvq6ixPLEnqzT016n0gY11IvIykwqtF4dEDkrAT9gN0PglUhwUNQI/A7lb34Ah4iUpLS2MbNgQZozYDyYokhFQ4elLpcJiyJWJxSYOXKCklZsooBg1RTHVoYSQwaALLAK8EVhYWyJsQApKZTWILQhwcHBxaj23Q5vAv6BjfX1be6KnjF8dv2271NRNNbi+P3+rSHFolzp9U0tfco+KLfOSNLg2YfuP6bvXd6Q4ODg5bhxdah0Dt4OCw6yNcRqYs+USm9FpGXiphy4SrUOpeGQANoypzCmBAgQ1Djc1IOU0JrS3hwqBazs7ORk91jY1MVxPIVVVVxSo1NTXV1dUU50piQQaWo24nFr0ussCwGwNoGLVzbC1hXZrqag4MtocBSUJIgSlLaBvKpvaBqv3wOUGJgBBGtkESHQjA0AEiY8rIWgSSiqlOIFMdCGcgIyODQ9adKbjUqsDQBtBgEKVAHRGjTj5QcjSMCkSJV3tTX0ZfFxnSo8TWrjRlBISI13KMbEBrwbMuLhhg8jX2woAYGRLIJokMRvE2HEDKm4CwJozmeAcHB4dtjXZnnHHGk08+Gcx2f5QV5Y/yprqbVFrC9OnTR4wY4Z4V6uCwSbhvlt0Y+q+8/k9vQQFgwZQag3oDUAJR/4y56cG7bhyu8CTMmzj63Qu3/NEXa0tGD189IvyxJ8nMLoY5c+Z0veWWYLLtMTr4d6cGNSHvq2CShBYqSaLkxVAp+/nYse0nTxZpi1sMRgpgeLmqJ03qdO212BTYqrTX/vCHPZ94Ag0VdcR8jgkuAkFOTo4txZnyttdtHXw7UI0ryWP77+917XrJ229XVlZmZ2ejJw/fI4/us88l5eVoiGIhvl/UkkDAqFjWevAb3/BWrvz+mjVo6s2zPP6Ylzdi9WoErKJ+CiGMrAgyMzP5Cdy5c2cSluy3H3rv0EO9d97xDYHddu3qrVkTTFtAJOKZz0xJRE6OZx7C2hJY+qOPAttCrY28PK9six4Al5HhhT6jd/PQpYu3bl1gh9B+yhROIycTm7PNqBPLqKlDC7hlO/68cnBw2HrsIW2O0kL/SaM++o9f6JocLcNVbg4OrYT7ZtmNof/0M4ZBPWDBlHKrtW2OtSWjb/NudG2OEFybY5NQ8WmLUhnWBrwP94q3MBixMUD79u03Xnml0W4Kffp4S5YEtpCd7ZkHeW4h2E/Xrt6HHwbTEC788EN2yPdLVlaWmiDYHcz9Gjo0xodOOMFbufLid99FKfKR7t0L3noLpZ5zof4Ix5hmPgsWHiVJMADGX0488Ttz5/K9yUloaGj4e8+e7Ofsf/9b+XW6gE4dMlIxkvOp3r2HLF6MhihIkusilGeOPvrM11+HBwpUCPthM9rnMyeeOOTVVwlkD7hg2J6eBjL7nHNO/tvf2Iz2Q6x2i6FYksCwnKZoNF14xhlHl5bW1taShEVr4i0Y7Y1VIAF6RkhckIwkb/jFLzrceqvdMAYCgM0qEgN465VYhp1aWD6Y75FwbQ4Hh10L7c4666wnnngimDk4uMrNwaHVcN8suzH0H3rGMCgJLJhSVPilVSvaHCWjT51CLdlnzGNFBUyG+xPNmvQ9/NaFcXlD71ADI2D6DB3qzfBMUyOZsUgMZ/7E6rwZM2ZYZmeCa3OEYWvI5GIy7BIDYMSHvQJvTkaKatXbgMpWIZAKkR677p57Ol17rW0cQK794Q8PfvRRlNnZ2YyU3LiysrJ4n6enp6OEJKFqdaZEqbqGp7B/6tBDva5dh7/xhl2FKHgyMBKYmZmJ0blz58rKSkp0NBkZGbpwA/HjAwd6ubnYOxUGP/QQBxuJRGxPAXAskBicilkDBpzx4oucDQ4EASdETRBOzqxvfeu0v/+dQwPwCDgh5NE556RVVVUx8jOEUbE6t//Jzz/86aeJgkdPNlwsqoaI9Iw6h+iJhSEnzMabb+5w663wIhnJw4jXHFDw1QcyGCExrEuj0QaM7D0Zrs3h4LBrod0JJ5zwzDPPBDMHB1e5OTi0Gu6bZTeG/lvPGAZ1ggVTqg6qC7DJNoffcdDVHH4rQhdhzJt46iPdw40Oq/FdcwegsWLfmJJ3x5xrDkhibO+ihXDLBNKdAq7NAVooIBNctvjElmGngLqX9ySGZaxADDbFMxqU4ql+YSrvuiv7qqsoueFhwPs/+tEhf/iD7kZBgKHRRklJAU9aXKq6AQzfC3858ED/ao6PPza72Hwcdpjf5pg3L5iCaNSrrg7s1oANJNyi0rXr+QsWsGcOn93qQNi5vn85dlBdXT2zb18v/gG0Ow96XXopW21oaNB59lsYpqPBIWAgqDcf4MJBqd/BQTFuuOmm9F//GgEygBdS7xCgaQKQWYFCWh6l3KPg2hwODrsW2p14wgn/cG0OhxBc5ebg0Eq4b5bdGPp/PGMYlAEWTLekzRFqOKToPZjmhbkew7/U48SXG+90kfjCdxOZFsL960YCdWMLZOeBa3OAVlaMCeUlhrUFbNW6lheDYRmKZGzeuozY0tf89rc5V1+NrSsFsrKy3rv00oOKi9PMp6Uy4srIyMjNzUWsiloNjkgkQogeqEEdrosUsIl64utf/878+ZmZmQRSe/OtEY1G9ZTQ7OxsVewspAsfVMMTxfcR9mOnnurl5v5gxgw2WVtbyyrFBx10yZo1VVVVrIueET3bICH52YnCWR1Nx44d/3Liief/618sgbe6upqcT5144tC5c3UeEJCEEAxGSAwd+1O9e3tnn33uxInE6kRBMj5zySXfKi5GA8lyGByaVtcJYefPn3LKGS++qFPBiIxRIS98+9unTp/OFCVekmvDEmCI1BcIw7Yt/jtoEPs57Ec/wtatK3jZD8CQmCim5EEjaNENN93U8Ze/1DaAdo7SGpBkwIYhRAYkRoLtYOHaHA4Ouxb24odZYDo4ODg4ODjsKMybeKp/8QW4Y2hAbQ62MtxhR6C5YlLlqJBQf2oKZIunZFWxGlZKJkiAQQmtKNW6GIwwCKi3qcBNdNA78Bdo147Cu7y8HAYB047mbgtlo9pnqk9dQQC0DZQY1dXValUwIoNUayMjIwOvGFbBoIbv3LkztlZHRqw6GkxJjpJANo8Go66uLj09nTpf20AvpYCNDBBFCAwj2WCwMzMzo9EoU9blcDDIgGFCPbaqQ2AVsNFcMYEAGz02OTlqpQqPSoIdi8XYDwzbs+FAjR7yoBHDrmDg0WCwbbw6RrsfZGSTEi8jYA+IlQRShqDkCpSh7SGzOYG1LS8xYBq25XVwcHDY5cBP0sBycHBwcHBw2LY4oHufGXPNFfnz5s7o0/0AQ1oMHWAu85jrP03D87qdONCb8kRcnJppgqbhDrsWbD2JYetMgJ1QakpAgQrsNEEDIMWr0JVAUdiWBxhU+xiU0IxEoaG6pkqHSU9PV5fB8sTq4gsMqnpidWEF1Tgam4E6Hw16BORBDK+c6koQJbLWQE0BITs7O7BMv4DMeAGB2gz6SCSi+h+GJFoCfWZmJnxdXR0C7Ufh8B07dlRrhpy4OPDq6mpyEmuW8jhY2aQiSq0N7Gg0yoroEcMDprhIokXZEiBWB6VUMgB8p06diCWDtoSMLTFl83iJ1RQXAmwT5weqHaNYgBcbl2y7hMDGxGhEQ2ZsDEb0TGUbuS+TLQNoe2gYsYF4X908WqNxcHBw2J7Yq53nfio5ODg4ODhsS3Q7KG/JlOGjS9Z2K7hxTNn1p4LrvTua3kVy/IChM4xnrjfUW7L6PaKs+JGyPkaTzFgkhzvsUlB5Sa0ow8IyllfliWFrUcYEGVOBqRgBmyiRqucx6g2wlRA+zVz7oLodF3lU2wOFw1dWVorBW11drR6EMmjdaDRKBttZgPE3FL9LAnFVVZVC8EJmmk82UXhtbS2Z1XwhMCsrKyMjQ1NdyqE2gcQKZ8QlATnRVFRUEAvDKmqOsE/tBxIBI6uQChc2II+m8By4eBYiJzxrkVmXacgFgxJDo6Y6mUoiF7xCMJSWneiEaOdomAJkLKHkADsciBhDXumZogG4INmbifOBTIG4MCQGsoEMaYIYcwiMkJoCNIxhjRBmTL7Gt5mDg4PDDsdersvh4ODg4OCwjXH8NXPmzDFtjW4FRf6dJXOSnwhqNL7jGgx54+KioqJmmTiSwpEGjZRGy2F7IrkybA5WGa4VRSZXj+KpbK1LDCNMQpSmqoFF2rLWlrIYZGsw90EwxUtpDYiCwVtbW6t7MVRmg/T09Gg0CqMpfIcOHSjXSUIGinZsvKRV6wEeEkQikQzzzA4yk0RLINAGMAAyrauiPS0traKiAlvXU+DFlZWVRWZCSIjBbhWFPjMzE4NdoYGEYUUYYmGUH1vnhEC5sIFsVlS4EsJo/4hJJYbDZ11Oi/KoVaEWBoGMxDLFRRTZ2DyjriLRQvCSkYfYhf/5z4LXXntj0SKitG2AXhpWhGQtpvAigfavPUCyBFNrS8ZUvLXtaCFX2ABhTZi3SJmqObRS5uDg4NAmaPfNb540Y8bMYObg4J6q6ODQamzBNwshgeWwcyP8n37ZMigbLrzwwvLycmxKC2oMQClCodLSI0gdkjBn138EKWUbb4NgEkdKMoxNCkBYo+IwHAJjBYwSaEwGPBWyxNaQuEOHDjW//W3Wz34mninl/UejRh3w0EO8z6nbYdQyoLanxqawJwoDXiHp6ek1NTUR80mrxPKNgP7J/v0v+t//qNWRAUIQICMn0H60AVLZbSv2oRNO8HJzv//004/+4Q/i2/3iF8NXrMDg2w2Qisx8uxGoddmn2h8kZ7m/nHjieS+9hJ4p20M8/YQTzps3Dxc7ZBswugNFO+H7V9uY3quXd/bZg375S2RPm09hBt8666xnLrnkzAcfRABwEciiBCqKcBaafdppp82ezZQQRgT2hM8599wBf/2rpiiJYgQci/QcC4eAPX/BAqbg61/7WiwWW/Gd77Cf3j/8oToj5GQtJZehDEwZlRMDpS/+xS/0gbLY4q1LJ0oLWcDLQGanCjF0amxSsJvBPYLUwWHXQrsB3/ym/Wnu4ABcm8PBoZXYsjYHIcHEYSeG/vvOaGHqiACuzbH12A3aHG0OWzc2V0AmCGzJisEIA281QDajnaJUICMld+3kyZGf/rSDebaF6vb1V17Z5b77sHULCcp08xEqGRkZ0WgUHrHaDZCADWCjpN6mXMf19De/edH//scUJeF8dzDq2gf0CHRtBTzL7bfffp988omKf2SPDhjg5eZeNH36Y48/brbstzkuLivT3oglEKPafMQseWKxGCMLEY6LRf928skF//43O6k3F1Zg/OWYY8595RU0gO9WVqmpqSEJYMph6k6Wpw8/3Dv77LNuuw3BjJnB3//OOfvsv1988ZBHHiFbWvxDXtiGMkNyciBfOPXUAbNmkYpjxMWW0BDO+NJ5551UUkJO9VxYVBtTIHvWsWPMmz9fix55xBEEvvXtb7OfvB/8AK9CSEIIBhoMNDCMxALxAHvjzTe3v+UWvMosXmDKHlKS1kgYpWkltiBkV4Frczg47FoILtJzcHBwcNgOOPfccyscdk1UhhB8OR0c2gKqMIGtD62BS9AUYFO+ylAhylS2BBhhW7EYihLEqxSnXKfaFy8No4p5tQNUnFMwU1qjrK6uZrrB3E6i5LJ1p4au+MCgjMcgj5ogumYBPjs7mygtwRiLxbS3DvGPYgWKtRCPRhsmPM08OoT9kBybXWHjUiB6lsMGrAhDcqKQwbOuwpFJYGWATSKWDXRoOj8sQRKdLoWzHxIaYdBzwcjMzNQZw1YqkjOFJASDWFYkGwZTSMBCR3/960ceccTXjjoKvQ4H4FK4ejRM2T8jLhuLIY1CBJHBxOQBGIqyYsuHDWmMvwlslDWSkTLQwcHBYfvDXc3hkAh3NYeDQyvhvll2Y9j/8YdB2WDBlCKHwgNQolDtuKs5Ngvuao6WkVCOAqaMMIB3ILaKbeNsAkUpXLZIAAkolbFJ0lBUlHHllUwRkI0a/rMrrthv6lRV4Glpaeo+IAC6biIajfLOp5hHQNRzzz5r0u9E+N4FF7BbvjHr6+s5oif79z9v3jwYNgzJQal5obPnnwRz4YluWjnnzjvxqqeQbh4d8vT3v5//wAPoCSQhebDRRCIRvIQzvnDqqQP/+U9CdB0HmVGShBX/efbZp0ybpoS4WJGRcDZGHkidRkIqKyvVcEFAuG5a6T58OCFMlRNbsKngGckgnmyMDb/4RftbbtFUbxWtAiNbroQojVaAEUYCmVKzk2Ab7c1dzeHgsGuh3YAB33z6adfmcGiEq9wcHFoJ982yG0P/S2YMg4LBginVBVUKcG2OLYBrc1i0pqoEMIyQctlR3rAt2KmUMgCFMbb0G6ZMybjySgzV5LjKx47tct99eKnqKekZeYdTfmdlZfE+Z0TGFDLT4O9PPXXWt75FuOp2QkqOPfa7r7+uVQhRQ4RvFtXw1Ook4fuFJXRlRIZ5qGd1dTVG8Uknebm5P5o1K2Y+p5aox3r0uGTNGgKxASGq+cnJWhi65YQpqchZ8pe/XPz979fU1OCFJ/BPRx89YskSVmwwDxBBA+Bh0GBrG0/17q02h67aACzEcT1zySVn/O53aFiLDeDFJgqbbTMSO3fQoEFz55Kt0nz6DAcCyRKE/PPss0/8y1/IxqnABckITwYYMsAApmTWfrTEm9/6Fvs5+OKLSUU4C7Fh9AqEUSxeDAGXRt20go1Aa4lXlGzL2BHGTq3GwcK1ORwcdi00XsHo4ODg4ODgsJ2wtmT06JK1GgNq22HexC1Ypdm9bVE2h+ZhC8swEopM1Z9hpWyREmi0kIaRWpcp5S4jjKYAF5BBtUwhjUskMng/tXk0KYU3NTYZMNBQZmNTitfW1iKmOGckA2Ix9fX1TBmzs7MJj5mPIyEhjFokhOfk5Gg5QkjF1FbsyBDjVStBgdon20gzHyurXkCN+WhYwNLw0uAiP9kQ2yXYJNvGpRF9NBplb6yrvZk0QSyp1LhROGJIZCQhJ1PtjSkajggNAlaRUhqtgovkiFFGIhECIeXFxgVYS0qlZdRpBEwZEeukKRaDKEi8GAgIYcSlnGIsySiYaB/BPA4xBFoXhvKEkcxYtOBycHBw2CFwbQ4HBwcHB4cdhO3zSa9r3y0LrM1Bc3vbsmwOLSK58hRs9RiuP2U0V1iGU6FR3asKGZvKXIHYUoYzy6UCnioaUG8zalpvPh6VVAjURLCNCSXZsGGDan7ygGg0ShSaNPMsDFLZbaCprq4mofaDgUyXdQACs8yHuVL/M8WrjgNTXOQhJGI+coXMGMqAnWkemwpIy5TNsEmmbEOLkkc9Ark4EEZIBCbO3znbiMU/PVfHpYPCZpN6tgj5NSVQsRwOJAbr4iItRlVVFQzbZlESooHUCbRJtDFIZPBMlUfQGYZESQZGAINSMqakkoYRGxcGCREwlV4aC0XJa11SWsNOLZKZ5FgHBweHnQSuzeHg4ODg4LDNsbZk9KnCxHkBBewVE/MmyldSMtr3w0+cKCrQ+8qJE02O0SXzlCy4qCKIDSmbxK4tuW3KkiVThocvwQhls/uBM/N4Wl9jrjdpJpsJcti2SKgeVVVC2vJSBqOUcjEKMJS7jLYGxhBsBmDreY222EYDINURUH1OVQ9JTU7RrgofsWp7BMrAFKUeyalLP5QcJQalOzYalkCmkVSMeAGBytbR3AiTEf/gEsIhI5FIeno6Gu0EXi0SNllvGjG47P7VOmEtxmg0ihKSaU1NTWZmJl6URNn+yMy+fZ/Myys9+uhnjjzyua99bdbXvw75jyOOgGfK69mjjtJrznHHvXDMMbP793/x+OPRzD3hBKYvf/ObhGC/MmAArtdOOw0XAvjXTz993imnYPDCmH/qqQsGDkTwn/x8xv8OGvTG4MFvn3320nPOYfQfzGHAUei8sXNsDhnbng1GDgdD5wElkA0kAMqgr4KmisK2YoywHWY0pgSpAsvBwcFhJ4Nrczg4ODg4OGxjrC25bfbAx+aAO4bOmBv0FRoxb+L1ZWN894DVU5YE3AxvQIJ+SVn3G+fMeWyMN+URT8bsl/02xCPdTeY5d3jXBy2LJrHdCm4c06fPmMcSLs1QNrKUmSi/fZF3h4nKm3Jbk5tSmskWeB22GqongZ3KCEMCW1ViyLajogztM5oK2NS08BpFYtgQDEGlL/UwxoYNG3BhU1QzYsPU1taq3kagHgH6Dh061NTUKEr5pcnKylIsgCR/1Dy+FD228mdmZsobBgwyCcREIhHIjuYDayVgdZZIN7fAYMBjSJ+Tk0N+7AbzMA4YUtm91ZsrR+AhAYEK//Zbb+H91ptvnrN06bDly89atGjI4sVn/u9/kIP++19eZyxcyHjaa6/BD1ywgOmp8+ef/vrrjGhOmTcPFyPTAa+8ctK//33yq68y4sI4Ye7c4198sf/s2TD9nn/+xH/968hnnuH19VmzGI8uLWU8/Omnez/11CElJb2mTz/oT3/q8de/Esu21dpgk0w5cH2ZOBZBjAwBW4GMuBhliJGNRi6JxciwpMawIUjj4ODgsJPDPYLUIRHuqYoODq1E236zvPDCC4HlsBNA/7M/7bTTMCyoEyyYqrICFEt1m3wE6dqS0cPVw1CToGT0bd6NN3q32dG0IeZNPHXugDnXHGC8PkOYsaSHiROBMWL18Osbf4n7qU98udnYQGU2E2cC86AnzML+36Wb7KFxb81n2yLMcY8gbQa25kyGXAkClZ0i5bUksEoxVMsYvIHFNBQVZY4dq1IfJWP11VdH77pLt2kA9RF05QVjRwO1GEhCUf3Kyy/nDxoEWW+euwEzY8CA8+bNIzmByCKRiK7UiEajkLW1tYQzVXiHDh2I0v0seB8+8UQvN9f773+1uo8OHbzQUzY3DX1HhUHCVv6U/ta3vH/8I7Atvv71/Ace4EDYM7vlWBixNeUYYeYOGpT/0kv8HJCMM8nhMGX81/nnn/iXv8BoqtMCOHwOHJ7zxoklCbZcMlj53ccf/0pBAVPEanYoOQbAICEMSmyN5Gf8/JZb9rr5ZrzIYOzoH475ultSjMItxCeQDu4RpA4OuxZcm8MhEa7N4eDQSrR5m+PYY48NJg47GvwX/7XXXmuzNse8iade793hdxGwHunetm2OeHsigBW00Jho1MRN1+ZoC1Af8sYIJpuPzQpPqFEVa0lB0wSS6teGNBQVpV9xhSUZa665xqhajVtv9W6+ObCFaNSrrg7szcWBB/pdiTffDKYGFy5fnpmZqf4C327qMrB5VfhM6+vr+ZZMMx8K88Tjj19w4YU6HDTwfzr66Av/+191GQjpaJ7EgTc9PR1BrXnYJ3z79u2nX3PNOXfeadb0L/ogIeEzfvCD06dOxUbMWnynQyJgar77/btgXsrPP7m0lCTICMSblZVVXV0N8+oFFxz/xBPIIFlR4RwOMvYAlA0lNiQafUwM/Mo//GH/888nFhtIA9i/BEDHSAaOTgYCtTlkI2AMe2FEyrakDEZ5MYSwa0+Ga3M4OOxacDetODg4ODg4bHsMHWBaCHNT/GGh20F5S2a/bB7RkcrdIg7o3mfGI+Yek7Ulo+1zNlqBYMW1L89ekndQN5NHd8ewhz7dD/Ath9ajTUpBG65sgrVlhEdg61JGSlnD+RAjL/WtDI1Uy3glEIkAiIlMnMgrZ9IkXnvfe+++RUX7TZ26/+9+1+3BBw/5wx96PPbY4SUlfZ588piZM49/7rkTn3/ez/DLX+p15rx5Q15/HWbowoXfWbz4e0uXYgxbtOiCZcsK3nrrkjVrznvzzR9/8MH3V67EdeHy5Ze+997FZWUjVq++7OOPL3rnneErVvgb8jxIxD9YtQoBejamtkW9+YRXKvy0tLRYLIYBSc2PVz0OHSAMx8gR1ZlHisDAI0ZGKnjEmZmZeoQHro7muaRmZf/2lpqaGkZ4EiocA0YkGTAIwVAs2dAwtffREFVdXa0942LPaHSPj9KyMSWHUX54NS/YlZZQ/0WACRs6EE0JJAqDbNjACH3IZkSvhYACrSxsJJNCwrQFKHlzaNnr4ODg0LZwbQ4HBwcHB4dtjOMHDJ1xvf8Uz7neUG/J6vcCOo7jr7kjb8rwwL156FZQFMQOn5J3R/iqjkb4bZSmjyAFffJW3xaK8p+5UWa2eL13R4uXasSzBVMHg9aXgimRUAEqm61Iw6WpXQgD2EAM6wKy5VW9bZUqelXAC2GZVaqJIKUMam97LYPCbfEsUM+LIQPZampqkGFQsXc0nz4biUQqKirQkBwZJT0jGgxkaPws5kkcZBCIIi2G9oCXPVRXV+fm5uq6CT3dA83GjRuxYdLT08nfYB5QCmBQZmRkEEUSliMnK+bk5FRVVbEox0U4MoEkahyQUCummc+XVU7EamQAXAggMciDniUIVLhNiwaXWhvaqsLZDBqAAXR9B4HoZRBLCPlhAFOi5IW3YgTYAIFGAa+SKMSSMsJKYHlrhIE4JZ+AhJwJaNnr4ODg0LZwbQ4HBwcHB4dtjeOv8Z/iOWfONddgqK3gf1yr/dDWwH9h9zJzJUXjh7nGLcskG/Hcwa0rybFSBKRF9wuLQlFGbeZxQtHNZ/M5h61DczWnIDKhvNRUZSewgdawJBU1BlCFrNFOkVleMlXOQBmoumFkq7pGTDGvqlv1OUtAWlDk2+Qq/jMyMghJT09XKW69vtpA7QlGvLosAuhzWFXhQ6JnM4zt27evra0lCYa2hEY7YWm7SUaAhljSwrDPurq6Ll26YCBjP9pSVlYWPLZaDyjZLRrCGeG1JcbwGcBgXWxG8msJ9qBUpGWrJMTWkSIjHBsDsDFCxGRmZmIrMyHEaicyINkGeuXUDjEIUWaAV1uSC711+TuLv08sD2NHIBKIYWpdCWiOd3BwcNg54docDg4ODg4OOxbz4h8JO3z2wBsTuhEOuzGaKx1t8ZkAy6scBRiWVDaR1gCUuNYrBpvCGANGLjEiKcUxqJ9xYUtGjY2GehubUSHV5hkcA775zZNOPPH0006jsCcQRlBJT/2Pnj3UmStB1ChhCp+VlcVIfmTkR6BA8jCNRCKZmZl4gdKqYxKNRvXBK+qAsAouGFy15kaPDuYmES2ko5CY/KQlnJ3rGFmdqW3oSEkUsdIwhYTR4UtDTmzGjIwMMiCGRIChJgVe1iJcl6uQRHqNOnz2wwZYmigMXAAxUWpw6GzggiHK7hCZEgosB2CAvDpXYYhkJIMfEz8QgWlgNbXDsPpwoIODg8PODNfmcHBwcNiVMfuG7nHcMDtOnffQKpmbxKqHzksSp+K2Hs3titWC/dsDSIV4+LbZ3I6GvR4j6ZKLbYTGazQcdkYkVJ4tFJ8J3mSlBCiBLY9lB4p470OGeKpiimfVxpTiMFTaKrmZoqFW1xUWuFAy4lJHA7u6upoqnQJeXQwYgQKeJFT4iDMzM9GkmyspSEX+QGSujGCsra3FYAOMeMnGusSynO46wSA5AlKREEObhyekpqZGy8EwMtXRYWstpgh0NtCTREqgY2dF9U2AVtep0IHDkDMjI0OHjEGU7r4xEX4q5dT+kRFCIDKgJBjI0LB/vBgw2LhsHnYIKTG2tocXGyWHgAtbUEgY4tHIZpSdzFiEBYJkYWMnQcLOHRwcHCwaf8k5ODg4OOxioOYf6RWvNnjx5qUjTQNg1cqlgXuLsOqhq5Zf+bdLDw6mbYaBt1+5/KrEBgUHcMqMoS/qCIq9kc12OuxBHXzp37bB5hwcwtg5ayd2ZYtSGYzhrcoOV6TWVi2tEYSVdgQIqMmZYgC5qKipq+E1JZYpkEZi6m3KeAkAIWoxEKVA9BkZGbrGgQpfevUO7CEoG4hGo3hxoQQY7eMf1FpbW4ue8OzsbAxlRoCe/Onmc3DxPvGnP02bPp1RvQPxiNPMJ6GwJeVnRabkQWZXBzB4MZAx4tV1JWTGJg8giWyOFA2Hxia1kFLpGBXOaA6lnt0iw6U9E06gZHiZIsDLKBKbdTEEf2EDLUESBNaFMnwUOgSF4zWcj7AtWCYsTpZtJcIH0lZo8006ODjsNnBtDgcHB4ddGcf0PEQG9f/qv1168KqHrrr19ddvPUUdD3ulhG0fpKB8+LQhZk+dMXTUwIC64YbgWpG4NjGaOSLDnffQbDmDiy3sZSZ2nYGjhs6YGl7UW/XPGd7Nd8e7FgNvL77o8Vm+IJTWhIcOync1ObRgOeaJu7WSuMbBoXVQ7bQtqrKtga3oMNhbeHvWJVICO7UGPKUvwLAa8VaPlxpbtlyaUpyrhKYap8JHRh0uDQZT8RTtMBT2qs8ZyUAsLvKQQQU8DBrI6upqRkLS40+yADXmE1XJiQaSkUBSAZuhtrY2zdyZkp2dzaLqoejiC/UdBG2eKD2Gg82wEFHEqo+gg2IbmiLAy0Ik0QYgdfEI4ZFIBCWxJNG2ge7cUR40c//1r1defZUXMjJAsgelIqfOA0fHQgCvjgvDni7E2ACSKXpG8muEVFoL5UGP17okFimvZMnQQkJYE+ZTYpOCBDS3AQcHB4dtgR3f5njzzTd//etff+973xs8eDAjNkzgc3BwcHBoAQdfemXvW0/xC3nbSzj40rtvPuaYm19UxyO4UiLePvBm3xC/eMK/+MMGzb7hKu/u1bcPxJr1eO9D7MUSj3uDwuEpEnre60t73u2n8269hxy+MeOffjPinp66SKPYs+scfNrQpfEwg5XLXw+t5nmH9Dxm6Up1JJQ22GbooIzT9D16m8tYinvfGr9GJGG3s6cGEl/TtL3i4NAK7KiqzFaP4TLS2tqV3ZsMvJbHtlMxsiE1pWxW6asWgCUx4IGUmqr4p/xWsc1IIa0uA3Z5eTleeJRU9Ywmzg+EVEdASSjv6+KXLZBB2URS/NfU1CCm+Fd4pnkwpwSMZLDdAfbGmJOTw5bkXb9+fUdz/wgy7dzuH6jxIYPNIMMmkDE9Pb3efAILuyKhVmdv5NEOY7GY2hzsB0bHEolESEIGVpFMgXY/2ALJEWBA6jAZsdXU0ELYhLMKe8BFThKK17nCVgagbJrqBALLhJUiATY5LQI2LgszshM0gZUKKFsWgHC2XR2707E4OOwh2JFtDn5GT548+eGHHz799NMfffTRl156iREbBl6/BhwcHBwcWsDA200hv3rQrCbNDoODL/3b3d5VPj/ycc+0D1atXHrM0NNMq8C/+MPva3je67eeMtK78v+39zbQVVXZvudGQMBPtMaz3220SILAeISqrhu+Wq98pKhELOgqsRPLAq9G6woSlM4oQW5QC6lW0nzZKRQQfWVFb0uNa7iCLVQh52Gi3NYLSOxWkvcAOUBh+o4ejNKAfCPS/7Xm2uvss/c+Jyff5yT/32As5pxrzrnWOeGErJm11pYCgnJwt4cAI7vVh2BC5WMSxgRw+KDafKE8va4Kr5wMky3rx9Ns5cMD8s8o1LPPL5yx9+BhbfTNFn9vKFEzKHcqzEslJJPwLkSDS0pr8frYlTCA6rVAtq0g63NZr9okIshiW5xhgQwLFt742Uy6YEdv//79xRldAGPZ7Q/w6devn1jgCeCAVioLGPqCvoJUqgwDBgyAMwTEAnRBhdBHg0Gvvvpq2RyByUi5BCqSoAv5kRNu6IURUej95X333feLX/zi3nuvuuoqsdiiBsLlNWKSiIKKQLR4FTBCRk4AFdkgwCjlCfiDEydO2KlKL5KglfkgHLIAu9RTMBzCT548CQfIyAy7vIcAqeQtxfQgwAfDSZS04okWIA9ktPJWSCsO4u8VgMhobaC1iGpbwToIXhl4VW9UIlLxyRS602shpIfQlWWOyspK/H/z6quvTpky5aabbsJ/VGghw4L/8H73u98ZPyG6rrBwXdQobaC1eULjImUD44xwGmjxuUfK2mX+hBASgip3fLB4/4ve0xk15YMnHnxcFUGqZhhTGKMWV/kCE5FiQmGGuTMEJLxMw7N7Q+Pf3dEmVCFHvSlS7IivABGSLvhWksC37DRSYsTHLlxtCCzA2+trZWGPRbJ1A7Lkll60WEjL6lqigCzmsSaHRRbkp06dgg+W7kDW/wAO33zzjdQFEN5PHxVBoNQ1ZGV+5swZMUogZIkFyAkj5oA8GNG2srD/Vh/ukLGk/IGEEOyTaPu4d4siDyzwPHnyJPLDgpx6pupaUHliCxxgBxAQhXA7E7ihlfxXX301BIwCT7gBdIkMAdkA1DGjR//d7bePHjVK3kB0yetFL2Qkx1uBPGJELKYKQVT0AkQhFs4ARrR6NAW6JMoriyewdlEhSK8k8VpEFkS1disArwxPr0oIIWlOl5U59u3b19jYuGDBAnzfjEQi995772233YYWMizz589HbxqdXomue3T/gu1zcowqRNetcCqmb1odMbpmbEVdk6Z6RPmj3rpGQeWC/XEGQghpI+r+C7t+P/L+lkCRQLY81GzfIGpW9vC9W96XugJi3SsrstXZF330QzmYvRHh+BImQu2kkMqJuiDDTtFfxsj68TTHnjnBjEo2mD0ajmPmGfaigMpvjuFs3+DdfxLDDKyLHVUzUt5FkmbsWjmptLrRKKCxutQ8ehbE9Sjsc2knTVq5S1vgH/AiaUWrl452gQqQBHgtAKpd39q1sagAvdYfdlnJQxC7CGix3kYL0AsfGLEOF1nW5AjHAl6Ec+fOSV0AKkIgIBzOQPsaI1Ss6uEJC2KlJAHVru2l/IGxIF911VVwlsMmkg3tlXrXhlQcZESAPFJKQHv+/HnxxDxhQTYY4Qy7JJHiAlQkx+iYieQ5q8+2QJZeGQgg/NSpU6IiD1TJj1iEwIgWUZIKwCJvFwR4wo4RZT54LRgUMoAnRkGvpLUtuuADQVJJBrQ2J4BFsCq6ANzE4sV6io+ogjg0i3giVlQfieyEENJVdFmZ45133ikqKoKwY8eO8vLyaDSKb+hoIUciqm6A3s2bN2vfhNjNE7F9ErH9FGVSfQgYWkNk9abp8wqM4hJZXT5i6pw7pzdsDU08ZPhYI7kUzPPXRAghpC3kV6i7K9TBDKBu3VBnM1SpQt/WmV84Q05tbHdmOFK9QMC0LeYwiVMV22WRX2HuuEBM4oJASMIEZD38NhKqgSYuGV7lnhg5cni/LWMI8LMTUjOKHS4ZNfygOh7jhtsXJb3qsg554XEvw4uagmPem5L9sYtOM4nG6tedufk1f5SShWHE3Dfl2bPLctY87ylhNFaXLnSWSdebc6MLdXmDD45NJ1JcCnqXsiA0CkbvAhWqWMQoApa7MIqD5BTV+ugeFYteqNILVLDGrq5FlWW5rMChyjocwIKlu5z7QCpYpEghhQPZvgEG6Me+wk3qAv30o2QRAhXOV7oXdgKpVkjZ4ptvvoH9qquughsySOkBSTArZLOv8fTp001NTVKGkKliRPQiCSyiShlCzr8gFipayMiJJOiSoUVAK2+LhAN4ihFREJBcYmXa4imTkeSQ0StGgAywA0RhMrBIiFRMAIySFp4wwkFixaJSuCUMCOIpRi+S0/qILMAigti1u7FYghYfvpyWRHZCCOkquqzM8emnn44bNw7C+vXrxWJ59dVX0Y4ePfqzzz4TSzjRdY+Wj6iO2zgRKcvbNF3vpqiraCguiygfY6guqQovR6RAZGvViFvjd3JoY8nUAifnzukNK8I2aRzav9tIFuXb6kkQQkgQOZkhuMt9fV+HUtyLOyoqIJgCQixAG6BKGHy1EHsciu2Kc5JQN6HtCQqub6xyEXuIixcEGMeYp2LobLEbo/ui3Pw2zPTbcT2SnULiYzNpza4/rskZX3x7fnRnXJ3D5ebBI4zkMmLwzSIMKl5bq8sbZjeHZ5uH3QRibWbjBwmn2YVf6gSXgqHJsXz1eoYuIK1RMkAFkIGsukXWLkoWB8jWTRbMQPxlzQxBWiC1BvGHgJW2+KCVlbks+NGF9TkEdAEpbZw9exaBffXNmqdPn+6jL86AEUK/fv0Qrtf7qlhw5swZdMGC/DJDIAUIdKGVUZAZPufOnUO4XFaK5HCQEAhXX301BHlRCIG/CPCEAGBBCEaR5PK6bOUCDjCKG4AbjPCX/FKVgPG8BhaklRoN7DIEWrhhJlKdgXzq1Cn0Sk4ZAgJ65Q3EcDJbDCEvENkEsaALiIpwtPBBiyi0okq4IDI8rR0tZItYrBGC9dFmRdCShBTdfLQuihBCWkqXlTm+/vrrG2+8EcKxY8fEYhHLwIEDT548KZZwDu3freoMoGBqye79hxwn+kXD2Ol36npEzpztTZUF6q+XnUfVXo7iKqfhi9YdGVFphw8xiiG6bkVDhd7gkTNnwYjy2CaN3eV5ajgM2FDxsu+Ui6K1kyCEkE4h6+EXhr7YAU9grSl/cWhGbqnoMnbt3DJt/Dhn0O350dfDDp58ebTBSJpBxQ/mrJkZXrcYN192edQumzZi7lPFg1T54/XBsitkmbOQhY4k2MVhS0llOdei5N6EkH35fb1Gih8CK2R0wQJk4S1GqLDLqlta9HoF4HWQJToW/GKRnQun9TNZgVjO6ltI4YmFPX6cg0XGxeIfS3dZ50t+yAjv27fvOX3TB7hKI0MPGDAAGZANw9kaAWQMhxA4o+3fvz/sAKPAomsF5toRsUBALIxoZfJX6htDMRlMuF+/fjAiCTwhYJJwQ6BMFUbMBCrc0IWpAkwAs4UzHJANPrumTfv0nnv+n6KiT37+8z0/+9l/mzmz/r77PisuRhfaz++9t+GXvzzw938P+8EHHjjyq18dmzVL/jQ++ujxefP+v8ceOzF//te//nXTE0988+STp//xH/EHsReeeUb+XPzNb6S99Oyz+PPdkiVW8P4RCwKBfr9jWKNtBch4RUbReHuTkKKbj9ZFEUJIS+k1fvwd7767xWidSFFR0T//8z/feOON9957bzQat/LPycl56623jh8/fv/990Mw1ui6wkedl73XY0TKBm6dqmoZVhwS5lPsVCsnSCuG122f4wR8miU4tM5bZWTN2ArkzgnxjKO5/rRg8+bNDz744IkTJ4xOCElA+35YduzYMXr0aKOQrgY/i3/yySc//vGPIViwnrFAxQoH6xyAJRDWPHOf+f2qp2aa+DbTWF36vPOUnDjZtXLSzvG188dp68w1bnVjxNw3Q0+kwH3hFmfaMkR4s3jSGBeXRIk6lNra2puefdYoHU+p+bvrwZIS/3iMElAT0ayb18GuWn1Gkb3Cd+vXXzF7NlSs+WHBP2wYsarHv220kGEUAcANsgXOiPr6q6/+49/8Dbr6auAWnT0bUa3kxhud6693Dh82ait48knHd4d96uA78CefGNny3//3zv/7/xq5VQxbu1beOqm5oMX7hu8bF/Wzac7rYy/yZuJth1G+veCdPBuJ9Js8GSqiYAHiJipk+KgBNLDI10haWKwgrWCNglf1dREfz3bi9ytCSNvpsjLHc889N3ny5ClTpvyX//Jf/lFXrC1Lly4tLCzctm0bfuh/+umnjTVYIYAlb/8Cbwkjxwq6EAFxwf48KYWoukSDKkW0osyhgt2CiuA3uJNrLnkgUTrCMgchKcIyRzcGP+53aZkjvg4BpBQRV7ZIhnG8/SPXPz7SU/HoKnpsmcNLigtLcUML2esfag9VxRNAEFmMUubAMlt6sYQWwboB9IozBLFDECM4eeLEf/cf/yNUePbRF2EgiRwh6du3r1j69+8PB9jxSblSc80110CGHQ5QX3/jDZULo7z6qnP99TPfeQf++GQhBC1kOKO96qqrTp06BQFzgLPsHIEsOzLwqcRHcvOmTVOnTcPQUNGe1/duwA0ZBgwYgM8pVOmFM0Y/c+YMJiCjvPfMMwVLlshYAD7oeu9Xv7pj9WpJgkD0Ikq2cmBQKVIgFcBspXIh2cQIEIhW0kIWFYHIgyHknAsEvIHyWiBDQHvh/fdtmQNAkFmJKv5oIYu/fLG8FusggV5/EURGa1WSCJY5CMksuuzQyt13371x40Z8z/3JT36ydOnS7OxsfJdHKzUO2NELH+Mt2PMgoCzi5Mx5uaKhWCnFTrWUFgoq66ZvEiexFUwtqdIuW50SRx9saQ3I4j1rop6wUh1Xq/AdXElE9IsGc8yGEEIISYg6sGKuE9W8Odep+Sj5E1N2rfQcV2n8qKYh5/uxYsiulTOPPuipjtw8eMQWOQnTWF3K2znaE1k0pkiza0vvEhStCGK0A1k7gNHKWNlCFTf8WCVGUaUVICMEDvCXNTkEtDCqYO0pMnwkOQSs5MWOFjLW8JAh4Gc5WLB0x3IdiAOALHeIwgH5ZW0PYAyeUIZbX70xRDJgVhjxmmuukdsugBQvQG+9A+Lqq69Ga4eDEYJMEoJUH5Dw3Llz8p7Ydwa9aOEpeRALi0wMRoB5wggfeU+g4pVKHnjKwRwEykAAKuaG4eQNkSHgIF0AXXCGRTLAcuWVV4oDnNGFFsCOKWFECDIBOMj0rOBT4SM5RUUgLJAB7DaPWMStddgkhBCSznTZbg7w4osv9u/f/4knnvB9x8Q331WrVuF/kccff9yYupzousLVt25v4zaMSFnhF/Nato+kK+BuDkJSpN13cxiJpAGyDOiq3RzVpSu/vzZ+r4Xsv/jlX5Ls5mj0nGgx51BkD8eDR2cGj6jY/SL6dIvu6VRqO303B37YwFfN6N0F74uSn6agWqP35yuxG8Xl8iuv9Jo1S+oCUPEPGz5AnIG4ySJfVtFoxV/kU998M/CGG8RZahN9+vRBC/+rrroKnljGwwJPfFKuu+462GHE5wU/AUKFHbxVXa2GwYT1bo5f/Mu/yEYJ2T2BDDIWMiAzYmGHMwTYpRwALup9EH/aunXKXXdBhT+cJQQyeuGpBrviCgRiSrCghQOckfD06dM7KyoKlixBEviglerDB3Pnjn/xRfVq9UdeJoDJy8cfngi3RQ0JgQXh0gIZQgT0whmvDq04Sy+ACpAQLVRku/D++30mTYIsOWERGalEFkSFHbHi6fO3AlofSbqSIMMZpcfA3RyEZBZdWebAd/a1a9cePXq0qKho1KhRAwcObGpq2rt378aNGwcPHlxaWor/foxrGtDmazUypMjBMgchKcMPSzdGfohH60UtWVygYjWC/8hAu5c5egKdX+bIOBItJpMvMu3CVQS0+Odq7T4uv/KK3M1hna0s6+3e7kNVxA4gA3GG8M3Jk9cPHAhP/MzWt29f6UIUeq+55hp8OgYMGAAjFvYwQr3yyiv760fMwgh/yNdeey3scIbx/5g40bn++vvefhu958+fx6AIRELkxzRkFHzWYISMcBilXgAZ4Rh0y7vv/nTqVIQAWNCiC/kRiAnILhI5MIIWo6iX1KvXVfqBte//9rf5zzwDN+REF8BYH5WVjVu1Cq8CRmTDlCAgBL12aOSHAKNkhqrHN5UXhKAX/rDABzlhgQwjeoHI4gZZetF+W1vbNz8fgljEiAyiWkHsVoDdCtZTd8bcvLE+knT1cFjmICSzUN9zuwr8TzBv3ryHHnpox44d999//4QJE9BChgV29Bq/9CBnzva21SgKKjOhxkEIIYSQdCDRatNrx6IUiCCttxcykC7BugWNQPzFguU3WrF4HWRxLrLUEbCq7623VMiqXowIOXv2LNb2ZzTffPMNlvfogvPp06fFGS18mpqa4Hzq1Ck4wAKkTDBgwAAZGq3k76s3d6CFjPDzGvy4iEExK299QSYsgZIE/oiFCmfxRH4pK0BGF1JBRi9mCwtUCLY2gTmjC8gQCEQvWswZLZLLQMiMVJJHjEBUuCEWrxd2yY8WRoBAAB8ZTlR5CRZR7etCawOB8tDYqGA43GwSb4iPJF0WX3JCCElDurLMIYwcOfLpp59+6623tm3bhhYyLKaPEEIIIaQH0Lqlo1rjurWA4PJVcopR+WmsrDw0Voa/JMESWlTIWKhjBQ4VsjhAhSxGsUOW9b+0WOrDAs6cOQN/GMUBabHIB5JKnJEfi39BpdNJ4HDu3Lmrr776tEaqJCdOnEAedEFFZuSBM3JKdQCq1BRkOCD7LOAvAixwho9+Eb2kigHLAH01qSSRMkoffcoGdpnhlfrpswg/794Jgij4QICzvBzpRTi6oCIKFpkkBKiwoxddiIIqiKf4SFoAi/WR+YsMIAPpxQwhWE8rWH8RYPdZbIYgiew+bEJCCElbuvLQCklPuA+fkBThh6UbY9cDXrAUsUDFggSLEIDVC5ZJc5/5/eMz/07CSSj4vHzwwQci9+RDK96VZ3JS97TIStUb5V27ih0rZBHkbg4I8MG/alnqo0scJFDmIC3s0oUW/qpCcebMVVdfjV4s+2WJLjUCdKGFCgEWMcJN9lDA2K9fP+S55pprkOdK/awTyFt+/nPn+uunvfFG//79z58/D/vFixchw+fUqVNyIwZyokU2gCj4wIIPIJJDjWzfXnjnneiCD/L31QdbkMpWOq699tqzZ89KHvtC4ID5fPD882N//WsYZT6wI+fu+fP/tqIC4fiYy4h4LfDBxNArlQt44hXZucFiW/jAiChxFgf4A8hAwiGghQ9amTzkb2tr+0yaBAdxk1Qi21bw9gpBf6g+gbQIHlohJLNgmYP44cqNkBThh6UbI8sAtF7U0sQFKpYiWL0Ab5kD/yQkAwmFZY7kpL4E9Xn61rTAt6z1OsRkXeawKrAh0lpnr4x1OASxnD93bsBVV4kK0AuuvPJKyPiYSLGjX79+UKXegVZktFD76ltLxQFRkXvvda6/vuDVV9ElAwEI6MVHDA7IiU+clCFkqlI1kKIJPonv79jxk4IC+F+8eBFdV111FTyRBCqcRYZdShVQMRNkRjjsHy5d+rePP44pDRgw4Lx+YAp86v7xH0cvX44QyEiLVgocyHbmzBkEyvcBJIQAMBn0igxPpIUqs0WX2GGBjAzSSjbY0cINiPHb2treEydCFQcg/gKM1lMGFbvX3zqIUdQkpOLTY2GZg5DMouvLHPv27cNS4fPPP8dS4frrr//BD35w991389xKF8KVGyEpwg9LN0Z+1kfrBWsJC1QsS7B6AbbMwStIUycTyxxdtQj0LVNDp+HzEQvaoNGressc1i4hVhW8Flm6i3rh/Pl+/fuLRSoIcOitL6ro378/Ph1X6hMfoI++RANusMNHSiFSnoBlwIABMP6XX/xCyhziILUJiYLDN99807dvX/gjrdQpMCJ60UIWIbJ9+51TpuDzCE/5nEKGM0JkMwhySkkCvRAQAgtUDLFr1aq/W7gQnhgUgbCgq+4f//GHzz0HB3lR8IeDFWAH8IcMy3l9ral0AWSwDjJDACNkGEW2XRAEhKNXGT/8sPfEiWKEKoFALKL6ZLRWFsHrBnwqSR2WOQjJLFSNvKvAN/HVq1f/4Q9/mDx58htvvPHhhx+ihQwL7PjvwfgRQgghhHQ1nb8+xKIUrYxrR7eC9ApeHxslqlgEa7RdFrsCxzIbqvgDyLDYKOkVWQT42N7eevsGfsCDET/IISdkcPHixbNnz8IBlnP62k60UsWA8Yy+o7SpqUnnU7sk0HXq1CkJRB60J06cQE45byJpYZf7NdArZQK53eO8vkwURrFbB4TIDC/oCzhgP336tBQjpBdRmBWSoIVd5imprtRHY+RFwQiLbPeADJAWMhykgIJAWGyXvCEAoyAcQBC7CGglOZDhREWLXgABiFtQ9YIotLBbQZBsQHxEJoSQbkxX7uZYtWrVtddeO3/+fN83XHwLRtfJkyefeOIJYzJE1xXmle8WeWxFnX5ySaIHvabyANgWPiTW7+6dTmxC7UsXPIaWv6AmJEV6woelsrLSSD0PWSTMmzcPgoB1hQUq1i2yaOFujlbAQyvN4lupJkLcvK3piAddAP90RRbj5VdeEaH1/MM/OP/5Pxu5Xbj++rErV+JVXHHFFVdddZV81rDy79evH2R86GRjCD5xsJzXd4LKvo/++gqP93fsGD9hAtLAExn69u0LHzicPn0agXAWu7wPMgoEfIQHDBjw0fLlP3rsMbghOYwQ4LbvN7/5T4sXIxCeUkCRdxgqBoUMkBMONgpuMgSMyIwWdlHhaYeGKjIEqFaGIOHfffjhFRMmSK/4WwGeghiNorEOIkivtSiPjiQ4n24Dd3MQkll0WZlj3759r7322u9//3ujB/jVr3718MMPe06vqKLCpuluKSFSNrDYqW6qLEhUqkilhJGKjwXOq2/dXllgVNCi8FbT6YUOljkISZEeUuZYvHixUXoS8pP6kiVLWOboIFjm6CBSX9BiLS1uCAH4V43WWtArq3ftq0CXhKA1Jsf59uLFPnpnhErhOvdxz6fAua9+/itUrP8ho4UqFYQrNRfdJ6T069cP6v+9aNH/8Pzz6L3uuuvQIjM+YsgDxBmtfO6k8CHFDvRiULT/17/+6/94222wY/T+/fvjgwmjjHj27FnxwTTwmZVXAU90IRv861avHqGP8CAnBpIKxX/77W9vXbRInGGUFwUgwyIZkBAD4e2CgC4IApzRwse28s6ICk+kRQs3GCHDLqr0SpnDa0ELrCpdYvcK0ouWtCMscxCSWcT+o+pk3nnnnaKiIqOEgV4sIYwCIqvLnYqX7Wq/oLK6pOGLqNFAdF3hQE3hOmvdv1psZRHRrY+1pE5k9abp8zw1jlAwQGFZmRpEDeAfLtaLSUak08w2UqYUEJxYwbzpm1a3eLqEEEII6Un4Vr9ixOJZZGuBILJ3JYxltgjWzSaxFqsCPUhsFAAZSdBiRKkawAEyjEDqC7Bf0FzU+yDQnj17Fp5ooZ4/f15OncCOwHP6/AiAHT6XLl06ffo0WskAAaBLsPllMlKnkGxSQ0EvBBgRK7UPRCEtWhitM3LCDQ5IhTlILARE4VVAkGkDKY5ICJLAjl7Y4Qa7CEDeBwBBnNGLWDiLii7bwl/sUNEKMigEyQCgCqLCDkT1CoJ2ieG1+HqDzoQQkrl0WZnj008/HTdunFHCGD169GeffWYUx4l+0TB2+p3eLQ0FlZ4tDtF1j5aPqG4C1SPKHzWFjt1VzgJY6ioaiqXq8Oim6XXap6RqawsLB5GtVSNuDe6o2F2eJ+UJW1zZ3TD8ZQyhtpmEDCe9dRVO+QpHhE3vRaPrClcM155N1Y6eahw5d05vaOl0CSGEENKjsOteYNe6WDlDhuDttYjROnsFQXplASwtwIJcBCQXAcAIB1hEkBZLenGWqoH4Q5CqAbqkytBHH0KBjB+E4HDmzJlTp06dPHkSRljQnj59Gm6YCVqkkikhSW99LSjCz549K3d5yFhIJYUPjIIQINUNW1+ARQaCRYoU/fr1gwVRUJEHFoQAccZwsCMDQC/SQkWXOIuDvFixQ0UGAKO8Usiwo8WIolqLCABRcIZqSxvA2+sV0FqL+HhVi1h8iCd6bQhI5EwIIZlIl5U5vv766xtvvNEoYQwcOBD/wxklnpCtD4f27y6ZqvdaFEwt2b3/kDY6Ysq5c/pYtfEjZ872l51HVVxxlRO3E6R5VJVl+BCjeBhbIeWJJltyscWY0OFsr7dmg8m75ZJEM2vhdAkhhBDSc7HrWFEFGL1228JoPb1d4g+8RgEy7EZxu7BEB1iiY20P9YI+GAI3qQtIZQGtLPLRe17XF87pXRuSsLe78wI+8JQdFhDgA/9Tp06hRXJw5swZGNGKAIv1l/ynT5+GM7qkEgEB+SFjJghBK26IwqAADhKrXsN33yGVzAFG5IEg9RGZJ1QAB3l1ABNAFwKlRYjYoQLEiowMOr2pPdmE0gXECAcRBOtp3axsBZsEgvhbwYv4SOsVCCGkm9FlZY4bbrjhq6++MkoYTU1N1113nVEcJ+fWEbs3vSdr/YJKVVioLtFK6kTKBubtV9s7Wh7aGlo0XIneiaLpzGs4CCGEENLNCC5ugdcosloEayDL9gGRrQBkTQ7BWqQXWDeJFaBiwW/dEIvlvQgwYvHfW58cER/IEgJgPHPmDJwhH12x4sjy5fgDIfq//W+HKiq+WLp0///6v0L4b7/97WdPP/35M89AaHj22frFi6Hiz//z1FOiIvzT8vI9CxZAhhGe+AMH9O77zW9ghHrgueegyp//umQJ7HBAQsSiPfj88/hj5wAj5o/pnT17VuodUjeBEa9Cyhl4FZAhoJWXLFFAvX26qAGLCGh97xhaeIqAXhGkqiKytMC6oRVZjeF+aSCIm6hWtg6CqF6jz4EQQroBXXYF6XPPPTd58uQpU6YYPcC2bdt27Njx9NNPG13dbOG5glRVEfQdpEP0PaAvO4+qmkJlgbKvGA4vRz0GZYS5pFT3OWUDt041LsUN6rko8En1DlHESLAHJPaFey02IjicdRNBTV5emTvV+DtAwsbuQHgFKSEpwitIuzGyPOgGV5D+9a9/NVIL+d73vmekjoFXkLYLsrL1CoJPDSIO3laMvl6vjFYEADtktFjT9+7TR3qhyuIcLT4jaMVuyxnSqxOYzGLs27fvRX3uA0AFIki9QC4ulYQQ8IkbMGAAuuRjCPr06QMj3OBwYP/+nCFDEA4jYpEWIbDD7bx+5IpY0CVR4iP+h15/HWpagR/TRcD8MUmRLbDALrIIXgtpX3gFKSGZRZft5rj77rs3btyI/6KMHg/s6IWP0RU5c7Y3LdhvrsIYaJ6zYvrQ+XJFQ7Gxu4WHsSXOClhUtUN5FkwtqdIuW50Sxx5sSREEt/DgSOrD4ZVVj9CnVtypxhH9osEcyCGEdFuiawvU9wtDwdo2nlMz6crWri0IzYX+OLvyD96ATLoHo1tCv379jv7lLyay5xFcSaY5vlWuJfW1Ll6yICoCRUYLWbD2K9yDG+IgqpQbIAARpCQB2SJdl9xTHqIKUOXACKJU1dDlwoUL6IURDpAFOd4ip1cuaiQb0iIJVJvn/PnzcBMZUaCPvsJDEsLzzJkzkgRTlTz/sajo5vvu+5viYgj/3f/8P3/v5z9He+PPfvYfpk+/4X/6nwZOm4Y/1/30p2ivvesu/LlmyhT86f+Tn1xVWNhv8mQI+HPlj3+Mtm9+PgT8gYA/fSZNEkvviRMhQ7hiwgSRIdg/sPQaPx6Cc8cdIuDF4hXJCxQBqHfNfUutBQ5eHy+h9kTOhBDSPeiy3RzgxRdf7N+//xNPPOH7Votv1qtWrcJ/V48//rgxpQPRwANlOwc+UJaQdKU9PyzRtQWznfWR0vb5qDebze8APe/AkyG7xriboxvs5hg9erRRmuPzzz8/cPDgsKFDsUTkbo4MAj9H4R+kUZLi9RTZ/gxmVZ+DyEA8xUe6rrjiim8vXryid2/pEqT2YR3EH63soRAHfHZERSufJhhle4V1k5ywwwEyBNvCX0JEFkE49pe/fH/wYAlEwpMnT/br1w+y/tSa0zeSECAWLXrx+YUzZgUZc7A58dFGCPwxK6mhQIARXZABPEWQmcsQ0koqtNZHRoQgDmIRo9ghy9wgiwWtqN4uQRy8oFf8g11tp4PSZhDczUFIZtFluznAnDlzzp49+8gjj2zbtu348eP4/wMtZFhgR6/xSxNy5rw8fIXnabWdQ6RsxfDYY3QJIT2H6NqCgrIytSlDb7OIBO5eDloMkbK8RXv2LMpDh0qid20kcEa/MhasPmAMJH1prC4trW608iRh5S6xpMhgjVHisTWOH/zgB8ZEOgzverWlBGO9689gr9ciy2AIaG2UCGgFMQLIcLOICruowK7nfVEAXdJaAa04QJZahtjFCFnKB/hp8Ft9zwW6YAFSTzx//jxkaSUbPAFiRdC+qioBf6jnzp07ceJEnz59rB3JISAVeiUcedAiJ3phhxEt3ESVrR+QpcYBWfxhgYBR4C/zlFgxooUMH8hoLeJgWzFCFqyKFr3WweLtEvC2S5dMGMBoW8F2tR1vWkIISX+6ssyB/3vmzZv30EMP7dix4/77758wYQJayLDAjl7jlzbkzNnembsqNHGPzSWEdGdUYUJjj5PsqR+2vkk/oHptwfJhcY+dDlpiFFTWLR0zZmmd3ZyRyDm6dvaiXHUB8vph9XuMjaQpjdXPr2mIyTX5b9aCN+dGF6Ze6LAFjmClgzWOTqYti8ZEsbKm9a1ygc/f52BV2b/gMwJfOMCSWxb50gVVBLEAsUgeaZFcoiRQBJ3MlAMk5Fu9/UFUILEQ4CNzgwNktEB8zmusAxAVXfhJEq1ssjh79uxFfSsHWgwhDkiC/ABGtIiVOgi6oKKVsWCUmQAIthetjAjEbt9DkWUgGyJdaEUAUu6Bm03l7QVeGVjVK3inIdheb1oRCCGkh9CVZQ5h5MiRTz/99FtvvbVt2za0kGExfYQQ0nNQhQmNPUsyZvoUkQ4d0LszFMVVTv3BaIglCQmcD23b5Cydp0ohOaVPdsYDqEirUYWNnGkjjBbHiME3Gyk5vtKGV2WNo6to9eIzGBi63PUCBxvldRY7VCzIoUIAsEiXdjFGCN6VPLBuQQGtJASIFVnW80gCGS2MOrEBRgR+qwsZkCFICDxhv+g+idZ2XXCfcgIZwjn90FnIsJw/fx4+sCBKChxIIiUMJJRAaYFkQ4iEA1gQAgGpEAgZFpk2/OVVyGuEAIv1BBCgwgch6IKbOAvokhZYZwgwihtaMQKvbJFw24UWFkH3K6QraCGEkJ5D15c5CCGENI/nsdOmDBK0JKFFziTN0Ls3nvqlrUsMKl77lPO8OrLyvPPU2uJBxpyco5qgzBpHF9LqxWcwMDQVjNbuk9HKMjgoWze7DldraO2AFkbdqdzECKwdgg0XWZKIw0W9k0LsYpQSg/iglZKBBb0X3CMqCEQvkM0aAA7okl4RJAohklmM6LX+aKX6YKsYkGVukh+CbeEJByCBKpfOZu0wovW+HDW8Jy1kpJVAyBJuo8RBWlikFUGwPl6jyGK3vYLqdo1ALFYlhJAeBcschBCS9gwZNqZquT7Koi7TUKdOgpYkJHAeMmW6s2i11iJbq7SJpCFS5PAWM3atVPUNdWhFVTtaeDtHHKxxdDTtvshMMSHcrKcvRFQsv9HatbFdEgtiFB+g1tDawbbiZlWvYO0QpJVFvpUFJIcbBNix8rd1AWm/1eUPyDIHuIlzb/e6U/hDhRsQAa1sx4DneX3dBiwX9R4Q9CJK+8a2aUC2GWCUzR2wiD98ECIZ4CwzsRNGC1nsIsAIIIiDTFsyiKC6XdArdusvMpCEYrFREATbpX0VtlfsQIwW6yMqIYT0EFjmIISQtCenNFKdq4+d5C3K1Y+dDlqSkMg5p3T90nr94Ovl9WOMjaQbjR/VNDSsmTlp0sw16u/S6sbGv0RH5N+uyx6Dih+ctmVnK+scrHF0Ar41Z9tJntCuZuFmPSEEl8GyUBe7z8ECH7GjBeIGYIHsjRJZjMD6SNu7d2+0kg2tgK5L7o4MOGDlL+q37vEQ6UKg1Bek9IAWstQjpFfssACoIqO9qA+qWPvZs2fhKeHSKy16pTjSt29f+IsPVMkMS58+fTABkWGU1r5AhEMQ7LsBxActkJIHBImFDEF7qRCxiGxbMaIVrEXwDgSsTxKadSCEkG4GyxyEEJIG5JRGfIdJfJaCSnPmxFYpghaLjbWCz9m1429tjUQiIWlIOjCoeK3at6GuGx0xYu6ba4sHDfp+TkPNR/LMlV07t6R6OYfGHldhjaPT8C1KOxRZzTY7IhzEx65+RbCtCPCRlblgu2RLhfTC+N2lS2oF77ayHcL759uLF9HCfvHCBWs8f+6c2URx/vy5s2ehiqAepnLuHP6cPXNG2jOnT3vt4iy9Yj996pTI8JRJYm4QVIXDs0nElhtkg4a8NOmFjPRogbwu6QKYPpLYWCtIlMhAQqACRIldZHHTyeLsALIYpUVya4HglaX1qiInJ5FPKrGEEJLRsMxBCCGEZBTj5i/LUfs7wEJnWaqXc3jw1TgGa6SLtDuyKO1MgiP6LFB9Fqx77dJXZK+PdNlFuCzpASy99J8reveWP165T9++vfv0gSCtCCL3vfJK9IqDCFf264c/sMsfWND2698fRmlFxR8IYuw/YIDY0Q646irpQitzs8WFS3rrBywQYPEKaNElvWjlZaJXfMQIi3qZukssaGGBA4xitwK6gFcQf2vxekovVJEhiLM4SCuCRTwF65kEr7+XRHZCCOk2sMxBCCGEZACDitfaisa4+bLDo7Z2/jixpA73cfRYfKtir4p1r3fpK7JaWGtE9bYAS32pAsBBLMDKcLO9kMUOASAQLVRxkPaSRuxoxR9dQMXED21VuNlwyJIZiGo9oaKF57cadMEuKlrxRCxagC5YBJHhA2xOsYgMByAzB7DI2yKyNYosCUUFYoEgdkRZ2esZFJpF0hJCSE+GZQ5CCCGkp8AaR09G1s9G8SybYbR2MYoFsvXxIgtybxdk6w8BlmDVADJaqFIUQCtVCRhtXcArSwvEIsjQQCoXaHv37g1ButDqTqWiSyxoZSA7JS+wi48Ai8wBAlrvhG39AkiXTqDc0CWeUKUVFS3QXrGXYy0WdEmvdFlPL9boDQ/1BInshBDSc2CZgxBCCOkRBGsc3uMqXpl0V7zLaS/ehTFkqwYX3laGYHuBlAYs0nvJ3QEhVQlgQ6RqIDKM1q6cPFUMqSxARusFFgn3OkAWFdmUkzsr2bWB1rrZzFIBAd6ECJdeaWVuAM4ybfFXYZ6xAIzSKzJa+7rEzTrYcKiQ0SsOAENYCwQAo8hoIYsxCTawvWj3hIQQ0tGwzEEIIYR0f0L3cch1pBafSjKOZpej4iBLZZEThcjSGq0VYPSGSBeALCtzQYwS0tt9xoqvS2QRgDjAYmsE6JJeue5ULOJjZamhWLutF0gXpiSe4gYZdviIA7CeYoSDhEAViwAZRiC1EtslRhGQR1oAi7QiCNrXuNkuEQTrABlDqBhPTiCy9dG2hHgDk9NsKiH1hIQQkiawzEEIIYR0c5KcVbGlDdY4ugHNLke962TI3gW2D+kySgD0AhFsBiuI0Vq0r7HYrQpBf5Gtesm9UAOt9ALdbzZE2KqEtQvShXBrV8O763lvQhGsMZgWyGRsBshoBdtldI212IHQqmCPsxil9QogkY9gu0SQti348hNCSLeBZQ5CCCGkO9PsfRxHNUYhGUgqy12vT6LFrV08W0GbY+tqK4gsAhD5CveKClFFgFEW/GKBLD5ogYRIrwjWghZuEGyIFCBgsS1Al5QkxNMidmDtECSzFFAkHIIABxlFEE8AwY4rSK/2ik3DJ6CFD4BgEdXrYz1tC2D02r2I3QpWTU4wT9vpiJyEENKO9Bo//o53391iNEIcZ/PmzQ8++OCJEyeMTghJQE/4sFRWVhqp5yFLiHnz5kEQZLEkQMVi6VvNhQsXzp07N/eZ3696aqbEpg9//etfR48e/fnnn7foztFPPvnke9/7nlE6htra2puefdYoHU+p+bt7gjUn/kEapTmCzqHhYvR1QUULixQvRLWIUXp9sUlktFABosQoMlpRxUeifEYMJ57AhkPAZxMO6JULSoNTteEQgM9BEkKAEYK3leFkXPEUi42Cm9ffCmjFBy3w+gTV5HjdWhRI2sKznfj9ihDSdljmIH5Y5iAkRfhh6cbImgGtF6xtLFAzpcxhpBbCMgexYBWNFv/mRfWBXrvMRmuX/TDik2JVQTxtC4uEwNOq4iYt7CIA6fI6iGplINlEEIsEApXC9RQjBGlFBTJbAKOVbRSQLmsRB/G0OX1IlxW8nj7BqqEk7yUdDcschGQWPLRCCCGEdFu+11pMPEl7sPo1UhtAkiR57Ora5yNRQJboghQmgK1ciB2IHYJvSS+eUMWiXF0VAiwQZIOGRccZT5EBZKmYSCBktN4kQKaHbJAhiLP0WhX+NlBKGOgSixUE5ed6okWvYI1Gd/EZgyFGCSM0YUaQodMmhGQ0LHMQQgghhGQqydfGPhItOJHE5kmyKA0dSwoHaEVAOICnFQT0WhVu0lq8KmRJJbIIdm+F5IHFm00s3l7psoOiRQaALhhtNgjiIIIgXTZJqCD+Mk8rAOsmrU8QrIxAaX0OiUjFJw3J0GkTQjIaljkIIYQQQnoEzS447cJbWhFAaCCMwOssbraOAEG7KNArqgSq+EBaSWIF9CKPqGjFGbLUFCSb7RLZqtJCFRnA324JsUaRvfMUo/VBC9kK8rpEFYvI1mIdQpG0aH2BoiYieS8hhJAgLHMQQgghHc7hw4f/6Z/+6be//e3ChQvRQobF9HU8XTs66UKaXSGrBbfHB0tuwcpiD0UCQ51FFgebX42kZSleAJ+bzqHW/CLA+J1nOwZQMa6ntBaoUq0QHyB2ESTWhuh+hchyUykQBwjBVjJA9iURwZvfJgkidrQ+B5/qJUk2QgghiWjmCtIdO3YYiXQ7Jk+ebKR4eKsiISnCD0s3RtYVai3iAYsoC9QUryCFM/6pnD59uqioKC8v74Ybbvj666/r6uo2btx49dVX//znP7dLrI6ga0dPAq8g9ZE+q1nvTJLLPou0+Cdn7dZNu/jxdUGVrRDecNvlSyUOQCxoZaeGtcBBsgGxYGLevRj4ly8fZPQCEWTyksTK6JK6jMQK4i+tqGL3hosFWB8bIv5BIUjrukJpqT/xwitICcksmi9zjB492iikG/HJJ5+wzEFIG+GHpRsjiwG0XrBusUBNsczx1ltvZWVlzZ8/H2sMY9Igw6pVqw4fPnzvvfcak6Jx49yZL9Vrcdqy2vnjtKRAx1Jn0ZqiQUZPjRaObvCOFZtQ/HzaCMsc6Umzi2r5hySCeHoF5ed+fEAwROyQbcVBkF6xWLdQbKz1t4hFWtC7d2+0sEtr/dHKENYiqtitBR9zUaVXHNB6ayVef+tgZRtu7T4haEQL2fYCrzPpQljmICSz4KEVQgghpKM4cuTIuXPnFixYIKsXL7DMnz8fvfAxJlVTWPpS9rJaxZuPHV64cpex6w4pfrQA7+iRSOTee++97bbb0EIOHd3gHQtyTf6bwfmQbkqSFbV0obWCNscJgqjB9bm3V2qFIlsQIlEiwKIjlJtVIXhboCLjk4Mr3EeuQPa2wBsiKgTBGyJuagDXX2T4iArE2QriANnagZW9RriJ4O2VWFEtQQshhJBmYZmDEEII6Sj+9V//taioyChhoHfnzp1GcZxBRWvcHRODbsvPPXysUcuq2JA9LVfLLcCOvmPHjvLy8mg0evHiRbSQI5EI7L7RNUnGys262Uikp2GX5YJPBbBYRLV2tLKGF3x2u4wXGaDLlhKsv3RZi8jWCIKeAuQr9FNRjO5B3LS7QnzQWhkCWjsZ7ZVwXC8wit0KXrzhXsQY2tUKguMSQkjPgWUOQgghpKM4ePDguHHJDnqMHj06wW2gu/74UvYD5tjI0pr8Rb/MEnsLsKOvX79eLJZXX30VbXB0/1iDitYscpZOAq04MUO6D761t6h2IS2Cb5UOwbvStr0iAG+vNxUcvAlt1xXu42B1DpMEeN1s63OwqnTZnEBUrwWyjlB220qXrZh4/YENsbLYrdHizSCCyCI0S9AzUaxv3FRodhqpz5MQQroWljkIIYSQjuLUqVM33nijUcIYOHDg6dOnjRJj18pJb2S9qfd1SOGhVQUGO/qxY8fEYhGLf/TgWJjIUmeROrSiqh08tNJDSHE1axfSei2vZLTeWGsU1Ye1S5QAVdrv3KsxvFgH6RIBSK9EWRl2tIJYrCAbNCRWmxXo8qrAWqzdmxktEIu0gkSh9RoBjGhlhmIJCs0S9Gw2VsZNhWZTpT5PQgjpWljmIIQQQjqKa6655quvvjJKGE1NTVdffbVRhMaNc1WNw2ydaPy4pr7+pZmTJs18Sf09d6McY0kJO/ott9wiFotYfKMHx2o8djg3/zY9kUFFD0zbspN1jm6LWrLHL+ZTRKJ8sb4M0itG6wlBgIwuGxIUgLj5BCkZWIsAVSxSyxCuiL83VASfKoLIaKHaqFDQBWyUIBa0Rtd4fXyjBPEl9JKkKwmJBupoWjdbQghpF1jmIIQQQjqKW2+9dffu3UYJY+/evdnZ2UYB6rkmRx6ojR0PUbd1aN58LDf3Mbf4kRp29FmzZonF8g//8A9ofaMHxxp0S3Z9zcdSWdm1cwsv58gIWr0Ybt16WKLQyri+0cXu7bWjQBBsCGQrwGjtgvY1GJPGqiJYFeFW/s7dGyInX4AvuddZuqDaQontgiCI6sMGigqsxeYPxoqPJVFykKQrDcms2RJCuhkscxBCCCEdxR133LFx40bvb5W9wI5e+BhdX8hR72xZqO7CULRo70YQO/pPfvKTpUuXZmdn9+nTBy3kwsLC4OghjJu/LFvt7wALnWW8nCMj6NDlpXdNDtm3RAfe0aVXLN7WK4Aksje/lSGgS3pFkOKFOEgrdq8A0IV/9la1eH1EBjablb3AaKQE2GmIKkIwD2g2lSU0vKtIq8kQQogPljkIIYSQjiI7O/uaa6554YUXgisZWGBHr3c/xbj5sp3C4C0rDCpa09Iqg3f0wsLC6urqf/u3f0MLOXR0i3es2JTMI2BId6bZtav9lwxPr4zWqhafRdx8Q0C1Fq8ssT5V8HUBqSSK3TeoF3RJFNpQN+tgSZJNPMXByjY8UX4jJcY3AS+phHcaaTUZQgjxkVlljiM15ffcM1hzT/lr+kn/R16DobxGd4eh+0ESl+aRJG1KQQjpuUTKBg4cWLA2atQA0bUFSXo7lARDRyNrywowaU1BWaSZycF9rXo6qU/G6y5zzT2Zn/3sZ8eOHXvkkUe2bdt2/PjxixcvooUMC+zoNX4dQ9eOTjKOZteusghHK57eNohvxZ7IzdohiGxHkfqFYN1gFwcvthdAFgevpzVaGa0Ai3SJUbsYxC5uNhz4PEUWo9ctCHqTOKDLphILIYSQVpBJZY4jNetLNuwdvviDo0ePVg3fsGTiPa8dcbJ+PG2Us+FFqXkEOfL+lr1a2LCdRQpCSFcQXbu8qqSkZM+BQ8bgJ7pt057coTlG61TCh46unV28adiTdU2Kuurp9cV5ScsVkdXFm5whQbmgsqmyQMQeTe/eve+55x45P3LfffeNHz8erZwWgR29xq9j6NrRSaYTXGzLIty7wg9FAr1rfiuELuN9Cb2q19Om9fl78Y4obhAEb6AVBFGtUZytBao2x/CFC95wCQkNDMZaN9sV9Ekfgi+KEELSjUwqc2TlVxw9erTiYfU0//zCGY6z9+BhWFWdY++W90PrHLrKMWrGjFGOs/9wgkoIIYR0IJHVi/aUTJ03bEz9wQR7Ig4d2DNmmKkMdDKhQ6vaR8mTpQVS/cgpKF2/dEzV1sR1jujBesetlXhlEkd2dvbf//3f/+Y3v1m2bBlayKGnRTqIrh2dZC7exXaLFrfBVTos3pW/dz1vM3sdgPhI64sCkIE31usjvbpH4VOBOEtrsUY4oxVVEKNRND4Hix5KIbIYffgCE7mlJ5k1W0JIzyRT7+ao2b7BSE5W9nAnQZ1DqhzTZs/2VUJqyuXYS7kcaLkndhzliGsD7rkYD/GnV3QarcTCYrmO1LzmP2FDCOlpqK0cY5bOK8gZmhu3nSMaMYdCCsrWSmUg7oQHerVi3fTREbcPjlE5VGKNflepqEQjawvcYezBk+DQpsMlZ8r0MVXL18ZOquRMWV83T2/LCCaMri3IW7THqSrWk4rJZp7KJXzC7jQwCySNvThJr+0JykKEkI4m0erdSEkJLuBVMUAbJYPN4/OE6nXw9VqjtYtgswGvLL1oYbR2GwvEKK3XWfW5WNVnF2C0dptB1CC+LgQGnZOEE0IIaRGZWeaoKS9RVY5RQ/XvorKHjjI7O3zIiZXh2VmhOz727ndmv330aNUMZ6976KWmfOKSDcOr1KkY2PduWPJrX3lCJ3IPwOhSi5rDkdd+vWTD3hlVRz9YPGrvhhJd6ECqkiXONJXrA3vChhDSw9BbOZ4szXGcIcM8OyIiZXnF9dPVoZC6J51Fi/SOCji4+z2ia5fXT59XoA+PONqtqa46t6pY1wLUfon6rduGzovAOr1+uS4GqAJDseMeM5leXzwbZjXKpuna6JrCh/aTU7q+OndTcd7AAlXMQFQOgD0sIXyXjnFKqpuaKgu8spqn5A6dsEol810/9UDxIkdmESkrrs9FuAywKK9MGQkhnY5dvbeCYKwqBiQoE1gBK3xp7VLf9opFumC0dq+DdIkqiIoWXWIBYrQWKySKFVXwqT68IcH8IBieioUQQkjryMAyx5HX7tFFDmfG4/r8imznCDmUIlWOGYX54Ts+Rk37sQr3FknUqZgPCp33y8vvkTECxRNPnUOqHJJEseHFe9Znv/DB0aMVGNDtzEdvVv7sxYnP1RBCui3uVg4l5wzNdUwZQ8zrVfHDySmYWuLoHRVwMPs9Iqs35erSSE5ppKmy1IkC56DjSNVAnTOZPk+OlEDWmzF0NaW60j1mgrBIqWNG0cac0if15SDhQwfJKaiMNNXVPZlbvzwvz9ye6sbGJQSYRMlUcwWHR3bnFjZhlcqdr56GmQXEPVXL1f6OqHoRTZXKSAhpJ7yr7s7BO2Ii2QvW+b6lPjzFEuwSJFWwyw6RelSoZxIkiR0oOGJLE3Yb7FtBCCFdRaaVOY68ds/EJfpS0RlVqpyQBE+Vw73Lo7lKQ035PYMnlrx4cGjhCy9UISAEW+c4cni/W+XIevhxdfvH3r0bSiZO1AdUdKezd8lEObSipxy234QQ0n2Jrp29aI+zZ1GeHMIornJidYEx06fodb0Qt6MiarZyQJITHLPB6tWbqqQWED1YL9tDlIPZMKH2S9hKgwtGiQ2uhxdjkqF95KhiR6SpbqmzSG3cCE3oOJGtVTaJR/Zu5ghMWE3DO7BVCiqbmtY/OezA8jzP8RZCSPvQQatu75oWsleVEcXiHT2VmXijdNbwlTMcgtm8zla2QjAkUXIfPjdJglbsoqaYSmiRcwbhe3sJIaTzyawyhzodomscoxZ/0EyRw1Q5nA0lUmmQzRnJ6xw12zfsdWZUvV3xcH6W7NEwx2K8qJqG4+zfvl5f+2H2cuRXvH30gw+qFs8Y5ezdsGR9jWwwwSzV8ReX5mZMCOlOyA4LfQBDqC5xt3N491BEtpr6hTm1YrdyIIGcLomAyqm5UguIbttkDniAQ2bDRHzVIFLmPrw2bnh9kgSEDe0h+IRZtQ/FEJJQlVjcJF7ZnVvohEFsYExDK+68cwpKKyNN1bnJbj3NRA4fPvxP//RPv/3tbxcuXIgWMiymr+Pp2tFJ98a7pm3R+ta7yPcFoiv1tJIHrQgA/jYkKAjWGXi7vHYfidy8dt8oyWmRc1tI8qIIIaRbklFljpr17kaOt+W4iiBbJ4Zne0xulcNTaPhgsdpw0fzJEbl448hrL4YeWlGonSF7N2yIVTn0xaT3vO/kP6zuOtW1EXf3SI0aLv7iUkJID0BOeMh5FYM6kaG3c6hrOsyVGpGy4ip3L4M6tbJp9nLnycBDWMVN1wI8hYLYhgmVedM2fSWodtW7J2KjwLhW3bIBKcHQHtQsFs2O3T8KP7wStQMkNGFcicUjqz0cen9J6IR907DGPYtWm4tNVQmm2/Ddd9+9/fbb//qv/1pUVPTHP/5x586daCHDAvulS5eMX8fQtaOTHkhw6R60yKob9kTLbxsCB+ssFsEbKF1ofT4+vCEgkXOSJHouJonXzZcZWEuwq0tI/s70QNLk60II6Tgyqcxhn67i7tAYLNd6Hj6oChrx+y5MlSN2c4Y5bZK0zpFfUTVjlGSfuGW42poR/hhaXcPwZM96+IXFMxx1QmXiEmfG4hdUDSa/4oMq2ErUsRVlrWp2+wkhpBthrx71gHW83s6hbup09OmP2VuHlYyxGxvUOt+R8yqKgnlLczfpMyLiprCFAiVv2+SYAygFlXJl6MCBecud6jpdJ5F7RHV83vIDT653jaFDeyiorEPcch2o/JY7T9ZF1CsJTSjFiTzZABKT7R6O8AmraUiq2VsddxYqf0m9fhWel9Ed2Lhx48033/zqq69OmTLlpptu6tu3L1rIsNxyyy3/8i//Yvzi2LVy0spdRtaaxmNSNG6cO3djo1ES0MLRkVKG8gwWHD3BfAhJEbvqTrT89lYTQHBRmiiwWVJZ34qP9fRNxmsRgpOxllD/UFLxIe1F8EtGCOlm9Bo//o53391itAA7duwYPXq0UdIUfV2Hs/iDuB0eHUtNuToEM6Mqg8+hfPLJJ5MnTzZKPJs3b37wwQdPnDhhdEJIAvhhaTuRsoFbp5rzNGmF/BCM1st3HqBeunTpW82FCxfOnTs395nfr3pqpoRbjhw58uGHH/7+9783eoBf/epXEyZMyDJHJYVdKyct3OJMW1Y7f5xR38h6c02Rs3HuzCMPGKOuSMx8yXkMHYPEEKSlo6uUZgQrBkdPMJ8WUltbe9Ozzxql4yk1f5M2gaU4/uUbJTVSD2lF8kS0Y6qOI9EkM2LyPZBnO/H7FSGk7WTgk1b8qM0c3m0bHY9sKzGXmxJCCGkR6hYOOfKiDqcELk/tXshpEaOEgd6dO3caRdG4ce7O8bXLphkVhmOHc/NvG+Q4g27Lzz18zOzeaNy4tCZ7mr03JZyWjj6oaI1btXAHC44ePh/SI7DLbyzFRfASakxxxZ762l5GCR0LiD35PFMBgb7YVqdKRKLXm+L7QAghJAmZX+ZQNQf30bKdQE25vs50VLMPeiGEEBKKOo5TX+weTuk2Z1PCOXjw4LhxybY7jB49Ov420EFFa+L3R3x5pD77Fr1hY9At2fVHvlSSKnLkL/plc//1tXx0y64/vpT9QNGgkNHD5kN6GqFL8basz1OPFc9E/j47VG/BIvVSBQKDqYyk8aVKPXMS2pKkXSZACCHdhm5waIW0Bh5aIaTtJPmwoMtIJDOxSxq92FGyCHJc5b777sPXPZVDK0888QS+3xoljIsXL44fP37ZsmVGN+xaOWnneNlZERRv3jh3qbNInxrRf+uaQxhtGF0fS0Hi4OhO6NRaTEYfWsGSEv8MjEI6DO/7LMt4rwrZ94XohK9LJwxB0hMeWiEks2CZo4fCMgchbSd5mQNdRiEZiKxk0FrkSg5LimWOxYsXv/322zfeeKPRAxw/fvy+++77zW9+Y3SDp4DQaIsZRrrt47kzX6oXP5Cb+HqO1oyuLuWoybcpA6N7iiuxvlbAuzlIKKH1Cy+hXS2qPiRyblES0tNgmYOQzKIb3M1BCCFpx913341lMOlOnIzHfKWb49Zbb929e7dRwti7d292dtyjwvyooyE1H6tLMT6u0cdF1A0amjcfy01S4wAtHl3VOI48UOtJGRg9xEJIa+nlOWohshQakpQbpMsbCEKNQbxDeEkxkBBCSKbAMgchhBDSUdxxxx0bN2787rvvjB4P7OiFj9HDGTd/WfZLMydNmvlS9rKWHRBp6ei7/vhSvbNloTwtdtIk/bTa4Oitnw8hPrwVhySljSA+50T1Cx+JHMQemlOEZjOzDkIIIWkFyxyEEEJIR5GdnX3NNde88MILwWUSLLCjN2w3x7j53isvoGl8RYVBRWuSnxhp6ejuOAaTPDh6gvmQbkOKi3Zxa9EKv73KAb48zZYhQEvnaXOmkjwVHy/t9T4QQggJhWUOQgghpAP52c9+duzYsUceeWTbtm3Hjx+/ePEiWsiwwI5e49cxdO3oJENJcdEubi1a4cO5XVb4LS0rgJbO00gBfPNv3cuR/Cx2EEJIB8EyByGEENKB9O7d+5577pHzI/fdd9/48ePRymkR2NFr/DqGrh2dkCDJyw2tXvm3vfqQYohv/i2qnvhoSywhhJAkNP+kFSORbgeftEJIG+GHpRsjyw+0Xr7zADWVJ62QRNTySSukhfQK3JERtLSRdk9Iug180gohmUUzZQ7SA+HKjZAU4YelGyNLHbReTIVDA5VljrbAMgfJUFIshbBi0s1gmYOQzIKHVgghhBBCCEmJFIsXqdc4evGGjq6GXwJCuh8scxBCCCGEdHN64EKu1S+5k98rbvrocvglIKT7wTIHIYQQQkg3pwcu5Fr9krnoJYSQTIdlDkIIIYQQ0rHwXED6w68RIaTbwDIHIYQQQghpE82ukLlFIv0Jfo1Y+CCEZCgscxBCCCGEtDM9bX3IKka3hF9WQkiGwjIHIYQQQkg7w/VhptPGQhX3QRBCSBfCMgchhBBCCOnmtLTu0MZCFetchBDShTRf5oiuLRgYR0FZxHSFYwIK1kaNoQuJlOkpe2hm8oQQQgghpNvRoroD92IQQkhG02yZI7pt054xS+uaLNW5VcXJagWR1Ysc5R8pzTGWriN6sD5u7qCywPQRQgghhBAShHsxCCEko2m2zHHowJ4x06d4KhYFU0uc+oMJd2pED9Y7uUO7vsKhweTTZi6EEEIIIaQn0V67Qri7hBBCWkRzZY5g1SJmiUbWFsiBloKyiKp7qOMqeYv2OFXFcjYk4AAiZeiLlMEMl4QO0bXKw3s+JqpjNNY3LNyL2swxbIhRPPjm4E0cc1hr7Cq1mY5nPs0NTQghhBBCejbttSuEu0sIIaRFNFfmUJs5vJWC6NrZi/aUTC1QpYC84k3Tn1RHQuqm1xfPXht1ckojdUvH6GMilQVhDrry4FQtPzgvAhcnkUP91m1DlQesy8W4tiCv2NGeMd/Q/HFg8nsW5elihEGXKbxzGLJ2drEzXSeus8dxtMOmrVPXw6qMebMdV96q6xzND00IIYQQQgghhJBOp5kyh1rwx1UKZm/Kra6rLHCia5dXjVm6vrRAbevIKX2yZM+BQyrAHhNJ4KDKJrDCmMRh+jyxuskiqxftKamu1DblG2mKlDoJJuAhsrWqpFoVMGLomzlic5BklaVOFDgHHUdKOuLgjueUVEf0MOrNUCR67YQQQgghJJ4uOXDBUx6EENKTaabMoRf8somiqW7pGKfkyYis/tHhrX8UV4m/qiyorR6JHFT/k1JgCHeIHqx3HZSsyw6qvGCyxkgwAQ9uuB/PHNwTK7PB6tWbquQ0jgp0ryPxJsGQehrND00IIT2Uffv2Pffcc7/4xS+mTJmCFjIspo8Q0mPwVhm65MAFT3kQQkhPJnmZI7LVrPwVat+C9yErvp0SaqNEfGUh6OCrPIQ4bNvkWIdDZjMH/vZERcrcZ9WGTMCLG+7DO4fI6uJ6dWIlAiqn5trNHI6tcmA+YRWPZoYmhJAex6VLl1avXv2HP/xh8uTJb7zxxocffogWMiywf/vtt8aPENIDYJWBEEJIF5K0zIGFfdw2ioJ5S8dUyW0ZQ4a5ktzGKdUPT2Uh1MFbeWjWwZYVCqaW7Nm0TV/0GY2UFctejPAJePCVVCzh1Q+dWEo6ka1V1sHrbOVmhyaEkJ5HZWVl//79X3311SlTptx00019+/ZFCxmWAQMG/O53vzN+MaLrCs2uOLk4ycXYtc3I0tED2bVyUml1o1HC2bWyOQ/Bn6qxunSSJbUUhATg2RBCCCFpSNIyBxb28ZWCnCnTx+zZtA0r/JzS9dW5m/TBjbzlB55cr/czeCsLYQ5xlYfmHDwbKQoq4VmsXPOWO/pqkAQT8BJezoifQ8G8pSbH7K3DSsZoW9wcQuVmhyaEkB7Gvn37GhsbFyxYEFzzwDJ//nz0xp9eia4rzNskF0A3NVU75gFduue9TU4FOvT/CkY2XT2NxurXnbn5NX/cZfQwGv+iq+7NEZpqxNw3azXLctY8X22MhLSE4K4NFj4IIYR0Ob3Gj7/j3Xe3GI0Qx9m8efODDz544sQJoxNCEtCOH5brr+/wDQsnTnRgseD555/Pz8+/6667jB7gz3/+8/vvv//0008bPbqu8FHn5e1z3GJ0pGzg1qmqsgFBbjwqqW6autWVm5oq1d+diCze0Hr5zgPUS5cufau5cOHCuXPn5j7z+1VPzZTwdmHXykk7x9f+8i+lf/z+2vnjtKmxuvR556m1xYOM9JTz/Mw1DbpgsbbYqS7VimiDdIAhaSojr0WGTqS2tvamZ581SsdTav4mpKPo1asXvi0YpUtJn5l0J57txO9XhJC208wVpIQQQkizfPrpp+PGyeo5nNGjR3/22WdGAYf27x5xq2fD3ZDhYxu+UNsSCirrKsaOrahTJY+YLE49jF07t0wbP84ZdHt+9PVEZ0oGFT81d4RUNRqrn1+Ts8zuzYgLaC7Vl0dVdYQQ0gbSp7LAGgchhLDMQQghpK18/fXXN954o1HCGDhw4MmTJ41CUqCx+vXo3F+q0tGg4gdz1iQ9uKL58miDKmWAceOnNRz9Uhs1CVM1rJkpV3MsjM59qlO3cpCeSeaeZ+FJHEIIySySHVrZvHmzkUh3JNFmex5aISRF2vPQykcDe/3UyOB/P+iU3WpkwxfO7Q84b3zk+MwhJPDs0EMrRUVF//zP/5yk0nH8+PH777//rbfeMnrCQyvxXX63zkN+HYrWizmvooHakYdWdq2ctDDu/2Z3y4Z70gQOrw+WkypikXMp+kSKRxQteaqugYdWCCEZBA+tEJJZNFPmwE/wRiHdEZY5CGkL7Vzm2OxcXq+VL5zbhzrPXHYSXnSRnK4oczz33HOTJ0+eMmWK0QNs27Ztx44dsbs53CtIpYKhLuRwqs3DuVnmAPGFithFGur6jaMPogOGmTX53jKHsuguWwGRAkaSVCxzEEJIarDMQUhmkezQyt13340f30k3xnylCSFpxa3OM7OczX/WBYvbndm3O716OX/W8heOM7uXUuXP7frOiqDF8GfXPtsYOg78f7Fx40Ys/o0eD+zohY/RFTlzttdNl2dWDfTUOIim+nVnWawwAdzTJvh72paFkyZNev5ozgjp+X5Ow5qZpdWN6pqOqOqatNBZZqsX6gkr4akI6Xh41oMQQkiXwCetED/czUFIinTUbg7H+aLSecBxPpqmtnXcKwdYAns0Zt/uLIjfsmEs4vmG84Dr/+fZzua7neW3d+xjWV988cX+/fs/8cQTvoXN5cuXV61ade7cuccff9yYMgFMW1ovehuHAWpHP2mle8PdHISQDIK7OQjJLHgFKSGEpDG3OdN8h080s3s5d/tqHD7LQefjj52hejfHT19xPt9vzB3HnDlzzp49+8gjj2zbtu348eMXL15ECxkW2NFr/AghhBBCCOlIWOYghJC04+B/dX4w3MhBKm93/tPBuJs7ghbFLOfyZfPnozJj6zj69Okzb968VatW3XbbbVdeeeWZM2fQQoYFdvQaP0IIIYQQQjoSHlohfnhohZAU6fArSL0HVVz5oD6Bst5T0pAzKTGLPbTiHnipvN35r890+KGVbsblVh1aeXzm30k4CQWflw8++EBkHlohpMfSq1cvfAs1SobAQyuEZBYscxA/LHMQkiLtXOYIPlA2WOZ4xhnqcbvtf3c+Gu54A5Vlmhv1Z7drliqgdOiTViz79u3D2/L555/jbbn++ut/8IMf3H333SNHjjTdmYP8CK5qGx5MhUMDNbTMgX8SkoGEwjIHISQTYZmDkMyCZQ7ih2UOQlKkPcsc1w80UofR0WUOrPnXrFlz9OjRoqKivLy8G2644euvv66rq9u4cePgwYNLS0sz69zK5VaVOXgFaeqwzEEIySBY5iAks+DdHIQQQtqBysrK/v37v/rqq1OmTLnpppv69u2LFjIsAwYM+N3vfmf84oiUDSyLGDkGrC5xvdF1hQML10WNpt1CogkhJMPgk3cJIaR9ac8yx+TUMN6EEEK6C/v27WtsbFywYEHwh3VY5s+fj174GJMhUjawuMrIXqJfNIytqGvSVBYYoyJnzvbqEeWPSqEjUlbsVMf3E0JI5pGJF1UQQkia0867OT5pDuNHCCHEw4kTTR39x4zUMbzzzjtFRUVGCQO9mzdvNooiuq5w69Sm6hKjeoi+t2n3iFtzjOajoLJ6RPnqCMJXONWscRBCMh/WOAghpN3p0kMrnn3JA70bkZsFPx773IOWICHboCNlqQ+baAi1i9pDsh3UxpWbrAkh3YxPP/103LhxRglj9OjRn332mVEUOXO2J6hSHNq/e2zDCv0NNezbZUFltVM8MG//AhY5upi/thYTT7oLGX3ggqdFCCGkW9LVd3OUVMu+5Ka66ZvyOnL5H11XqPY3y1gVDcW6YhH9osF0tw27vbqpuqRqRcLCSfS9TY7y5M/mhJBuxtdff33jjTcaJYyBAweePHnSKMkpqGx6+eWX9bfUuuErgv8x4Dt3SUlJ1VYWjLue0S2hX79+R//yFxNJuhEZvRmhyyfPOgshhHQEaXMFac6cBe5PrXZ7hNk8EdtGEZMcZ/9q8fL9CGy3bAR/NB47fIgIOXO2N22fkxNd92j57t3leVLxsHsybGCISaHMweSGgqklu/cf0qJ/JpGyPD2c6L5e9crKytR4CXrLyozJZAubXpLXTgghHckNN9zw1VdfGSWMpqam6667zijNkpNjz6w0fBFfOcZ37k3T51XOq2go5re6DOLzzz8/cPDgsKFDjU4I0fDECiGEdARpU+ZwnCHDx6ofZ1XxYYTedhG7aS6E3VXOAvWrvrifdLHyXzFcNlZUO/E/AefMWTCiPC+uBpAz5+WKsWMr6qTisWm6Dqx2iy2RsjxjihsjUvao83Li/RiRrVW6mhIyk4LKOj0cgkPnubthuPr1ZYLeKmeqNiScXpLXTgghHcyPfvSj3bt3GyWMvXv3/vCHPzRKciJxT1+Jv6VDf7N+eU6O/gaevoWOxurSSZNW7gpokEqrG8Uaina12AwxEmUIse9amXwsP7tWegaE4hIyi1AGa4wSj61x/OAHPzAmQlpIRux6uOKKNPq5mhBCejLp9+340P7dJVN1FcGzMyIEccq5c7oujgiIVdslFMVV/t8BFlTqGkDT1K1xxQ5NzpztLzuPeuPUTf/T79Q/XavNH1LXQPJiZwF+wPbhDorwhgr1A3jymYT3usMl6JWtKKYWFDK95CMSQkhHcvfdd2/cuPG7774zejywoxc+Rg/HLW/I5RuaR52XPVXl6LrCPClyKKTQUbhOK+nHiBHRnVIfaPyoBpoWBxWvXVs8SIsJGTH3zVphmbMwUKhIJYPQ+JeW/Dewa+WkhVuMDBBs5zE/2Z0rLrbAEax0sMZB2oWM2PWQ6HsgIYSQTiaNyhxYpye8W98AFyMlxF720aTOpRhjHKrcUVfREHeFBn66ztuvdoeEXvtvGVtR7QsUzN0ciLW1iuZm0pbeRLQuihBC2szIkSOzsrJeeOGF4FIEFtjRCx9jioFvyLaOEZPdqrTvW5k5cGg0VzdK2pGfP/gvukbx5dGc/HxtMnsu0K5caXZLJN8qMSL/9kEStXKl2uaxcpfdtWG2W6ysRjKT4+gfZSuI0hurn1/T0LBmZmm19CUFSXeOr102zagwfFTTkPP9lKopCl9pw6uyxkEIIYSQzidtyhzRdSuq9AaNIcPHuucyzAEQILs64m4MFaf4Bw+qWKlCRP0XaKh7K6wh7HGFsjsEY4qac+uI3Zvek4IGYt0rQYaosy+JjtIUVNqLVJPMBLSlVwhOL5UoQgjpMObMmXP27NlHHnlk27Ztx48fv3jxIlrIsMCOXuPXY/i+c/SjRsfZtTM6+PvGZNnijFcbJZZN22K2fMRoWDNTFysmTVq4xZYaGqKDn/JurNi1cmFU77YYf3SN+x+j8ZGcg4qfmjtixNw31xab3mQMKl4bv2Xjy6MNI6KvyyxSOLNyVBOUWeMghBBCSJfQ1WWOKrMzeaC6aUL/Hk/2IStTsVOtf2+nbydVlkf3jxgrYY4ztsRRzxvMKx9RHdvSnDNne7XcwBFvB+pmDEmres1gqligryAtmCojDNzqlJiaitQstLs7EU1BZZI7Q2SqSJhkJqAtvYbA9FKKIoSQjqJPnz7z5s176KGHduzYcf/990+YMAEtZFhgR6/x6zHc/H3n6JdO41+c/NtvNibLiMHadPPgEVHZ8hHDc2hl2pbXzaEV2dZhUWdKxDJuvN2DYSxhOVvKuPm1Tz2laia1tW8Ofj3VyzniYY2DEEIIIV1Fl5Y57L5kRayQgAW7mOxa3Thur6zcbgof25WsjeKkLDqBzRlY6Nu0wB1MeyvFDaushGBCYwHa4B3CjVdYu0Ylsm6eaIXX09cbnyRxr8cPYpxT2IiEENK5jBw58umnn37rrbe2bduGFnLYWZWewbjxzs7qj2qc1E9/xDNu/LSGo18apbMZNMjOuhVVE9Y4CCGEENKFpN8VpIQQQkh34ObBTk1NzvhUrvAMY9fOLdPCgwd9P6ehRp2IUT5ialfiHrripHhLhz2uwhoHIYQQQrqWdi5zjG4O40cIIaR7cenSpdWrVz/xxBMff/zx+fPnr7rqKrSQYYH922+/NX49iEG3D3YcOZ6SOp67OZxliZ5yMm7+shztt9OJXRwajyqFpHgFaQCkdxbKJJ53nkrpUSsuvhrHYI10EUIIIYR0Dr3Gj7/j3Xc74pdBJFPZvHnzgw8+eOLECaMTQhLAD4uXVatWXXvttfPnz+/Vq5cxaS5fvoyukydPPvHEE8akiZSpp1+DkurASTu3z9cV1U+UrXOP7ikvJxjcPsgjY9B6+c4D1EuXLn2ruXDhwrlz5+Y+8/tVT82U8M6isbr0eeepFJ8x28789a9/9f32IriPQ2oc9lJS8Mknn3zve9+DUFtbe9Ozz4qxEyg1f3d/8AHEP06jEELaiWc78fsVIaTt8NAKIYSQtrJv377GxsYFCxZgiRWJRO69997bbrsNLWRY5s+fj174GG8QKVMVCkW1U+x7NhT6GtRjutXF0XFdOfqqZXMHtGTooVcRmcfJTpo0syb/qS6pcQThWZU0gTUOQgghhGUOQgghbeWdd94pKiqCsGPHjvLy8mg0evHiRbSQIxFVqUDv5s2bta+moDJhhSL6RcPY6XfmOE7OndPHNnwR/1wr/bCr1REnum6F04OfKTVuvn4MCuiajRwBQvdx2OMqXpkQQgghpKNhmYMQQkhb+fTTT8eNU1c4rF+/XiyWV199Fe3o0aM/++wzsVii6wr1M7HjyxWH9u8ecas8W+rWEfKEby8FldVO8cC8/Qt6bpEj3Qjdx+E9qAJ8KiE9Ft+xPkIIIR0ByxyEEELaytdff33jjTdCOHbsmFgsYhk4cODJkyfFYpHnYk/dOtB3aiU50S8aSkpKqra2JIZ0GEnOqtjSBmschFh4qogQQjqB9ixzTE4N400IIaS7cMMNN3z11VcQbrnlFrFYxNLU1HTdddeJxceQ4fFHU2K6Or4yfIg2WqLrHt00fV7lPP+9HaQraPY+jqMaoxBCCCGEdArtvJvjk+YwfoQQQroRP/rRj3bv3g1h1qxZYrH8wz/8A9q9e/f+8Ic/FIsiUma3cMQOqQjqqMqm96KOE31vU3yPKXK8PCfHyZnzMgsdXc8PfvAD3jlKSLvDgy2EENJG0uLQCn7cLZSb8xMSKWvOI4TousJWRLU+TiPBJkUK027TYKEgoywfWvWmEUJIy7n77rs3btz43Xff/eQnP1m6dGl2dnafPn3QQi4sLIQdvfAx3kBu2NCsGF6nr9mwlQ99zWjewIF55SPiru3AN7c8KXIopNBRuE4rpGv45JNPzp8/L7/GSBETSQhJDA+2EEJIG+mkMsexY8fuuuuu9957z+he1H35FdM3rU72S7noFw1Gagk5c7ZvNz8Pt4Doukf3L2hFXBwydOum3W4UVC7Yb568SAghHcnIkSOzsrJeeOEF/HReWFhYXV39b//2b2ghwwI7euFjvDUFlfp5sk1N7vdbz8NX3L74W0bVVR7eb86iG4V0Ot9rLSaeEEIIIaRj6Iwyx7Fjx2bNmjVkyJAJEyYYk4fI6vIRU+fcOb0hdp1cbIODSNF1j5bv3l2ep41qr4ImsFPB9rhdJk+kzJgVpsvaAlueI6s3TZ9nfrI2XoXr1skvGf0TM5J2ik+l+svK3Gkj3HgD+wvLGPtXSw7XHsgZM8TlEXxRhav3iw4K5jVTPyKEkHZizpw5Z8+efeSRR7Zt23b8+PGLFy+ihQwL7Og1foQQQgghhHQkHV7msDWOFStWDBgwwFhjRLZWlUwtcHLunN6wwq7gfaityWPHVtSp/RHrHi0fUa1+yVc9ojx+p4Kql+ge1eVd29tfGVaXjK1Q252j6wpXDK8Tk+M72435uEfBI2XFDRXK7WVnU5W2BNHnxHWq6sC9/8PnudOeM6/CMVOKrluhX7CX3VXOAmSoMwfNgzmDLy34Euw78/LwBnVAXlDvKx9HQAjpBPr06TNv3ryHHnpox44d999//4QJE9BChgV29Bo/QgghhBBCOpJ2LnO89957d911l32gYHM1DrXob6jQeydy5iyIL06Ec2j/blMkKJhasnv/IW0UhgwfW6VPepc5sZ3PMSJlA7dOle3OSLJbnfsGxVVO3A3/nnv9VQFmgfbH3Eq0KUjOnO0vO4+GZYoj587pY3XFIvreJkdesBd5ScpJpQjmDL60wEuIJQ7MNvG0CCGknRk5cuTTTz/91ltvbdu2DS1k31kVQgghhBBCOpR2LnNMmDBhyJAhs2bNOqZJXuPQuxTsal0t16v8GzqwmjdS86hT2mpLhFQE4vdoyOYHT+2jRDZHKLwnvVPGnVikbGDefrUVo6k6USVEo2oPVVsjqhgx/c5mxgvmDH1pbX0JhBBCCCGEEEJId6OdyxwDBgxYsWKFVDqaq3HIfonYWl2t4x39EEEgGzWCV3iqfQ1yCAPB7r4LjbqZoiwiFYHqkrgtDJGyvLhLRVUSKaiYoBjqQYZmj0jB1BK37IKxtAkEJyZbMTwu4eh0j24aIRtE4pGX5Hl2YnzOkJcWeAk5d053z8XETeWQ70mNhBBCCCGEEEJI96XX+PF3vPvuFqO1jcmTJ8uz4s6ePbtgwQIIwRrH6NGjd+zYIfK6wrJbt8efLtEnS5oqC/B3MdbqY0uwqB/+8vY5Odqg77lAWF652kpRUu0/mmKigHuRR+GjzssL9ucZq0J6Yq6BLJGywi/mmZqI61VSUlLlqHm5Ft/EjEuVg2RD9KAvO4+i3X7ravSaIVVBQu3S8E1aTXL/CKeqCq/JTCaQ044L3Gwxk/sSVH71zowdO3b3CDMObKv9b3JzbN68+cEHHzxx4oTRCSEJ4IfFgrfCSJlJ8OsoD3RE6+U7D1AvXbr0rebChQvnzp2b+8zvVz01U8JT4a9//auRegDBB6zU1tbe9OyzRul4Ss3fhBDSGp7txO9XhJC20yFljiR4yxxpSlhlIGLKL0ZtFaqe4ajKiNE7A2/NJmW4ciMkRfhhschbYZTMpEvKHPg/0SjdGvxswDIHISSjYZmDkMyCZY4QggWJtpY5ZOdFcP9Jx9KqIgdXbinw6aefGqm787d/+7dGImHww9KNucwyR/vBMkc60KtXL/yjNQohpIWwzEFIZtHOZQ4jJSX9yxw9HK7cmuXTTz+99tprjdJ9+eabb1jmSA4/LN0YWRCq2oYHU+HQQGWZI0VY5iCEZDoscxCSWbTnFaQ7UsN4E0II6Xbs27fvueee+8UvfjFlyhS0kGExfYQQQgghhHQ87fykFUIIIa0hurZAP1rbEPcIqA4DgxasjT2Vqm1cunRp9erVf/jDHyZPnvzGG298+OGHaCHDAvu3335r/EizHHntnsGWe147oi3677ZTUy4ZXYJjpYh/SipReY1RCCGEEEK6EJY5CCEkPRiztM48Xbu6pGp5u5UfOovKysr+/fu/+uqrU6ZMuemmm/r27YsWMiwDBgz43e9+Z/wM0XWFpqQTUtOJlIX2qJhCec63Qnl1Tj2o8xm1+IOjmqrhS37dPgUOxZHXXnQWT9uyPq4c0bqxsh5+++2Hs4xCCCGEEJJGsMxBCCHpRsHUkj0HDmnRXfC76/nYrg+7DyNmEh+1R6OsTNsK1kakUzl77P7qgH+UFrNv377GxsYFCxb06tXLmFxgmT9/Pnq9p1ei6x4tH1Gtazp1FQ3F8cNGyoobKupCenLmbK8eUf6oFDrgJQ/c7t5kDx1lJEVs74XdOBE01ZT7DJaa9UuGFz7842n7t4duu4gfS2FSlb/22j0qmdrBUV6uxiuvcXdzmPHvWX/QxBBCCCGEdDEscxBCSLoR2Vo1ZtgQXbBYPky2eFQ7esUfWb0oV6oD1bmLVqsSQHTt7E3TtU91SdVWUxTYUz9sfVNT3VJn0XJHhE3bVG1A7NDrPfWD4Cgt55133ikqKjJKGOjdvHmzUXTBwq1Q5Nw5fWzDF569K9EvGsZOvzMnpAcUVFaPKMcLj65b4VR3+xoHOHxwr5FUReHXW6bpnRdVMzZIpaKmfKIxfbB4f0l5jao6vDhUdmdUOcrgoWb7hhmF+U7Wj6ftfzFs14Z3LEVNecl+vdOj8OASt2fv/qEvwFKRLyqmtGR4FQwvDN0fH0wIIYQQ0lWwzEFIx/LneIy1A+jo/KTD2bMoz+ypKK5fur4U6/xDB/a4xuIqp/5g1BkybExVsdLLnEqpE+SURtY7sz0uijHTp8ijpK0gGDVnyvQxrmvYKC3n008/HTdunFHCGD169GeffWaUOCKry0cs8D75+tD+3SNu1XrOrSN275ddLTEKKqud4oF5+xd06yLH3iUT1R6JwYNL9i9+wT0bkvXw2y84v9bWDc7+w2orxeH9o6b9WHejUxUfDh/c68a6ToYjr724f/FsVZ7Ievjx4UtiB1dCxwKx5PmFM8TkOO5wwuH3tzg2p/UhhBBCCOlSWOYgpAORusNdLtZCSAjmbo7qEm9xokT2bigipTmqqAGpbqkUO/T+jrKBeQeeVP0IbC2+UVrO119/feONNxolDMz25MmTRomB2a8YXteygkX0i4aSktjOle6JvS/jqOcCjJrywRMPPq6MVclKCjPU7grBG7x+iS2AqArIBruhI3QsQgghhJCMhWUOQjoPW+wgJDEFlXXTN+XpsyNq74bcRaru34DJ/KWLHdUl7s6LkqmqTBDZWqWUpOyRsyvRbZv25A51yxmBUVrBDTfc8NVXXxkljKampuuuu84ogrpQdMXwuu3enRyKIcPdoyrq+MrwIdpoia57dNP0eZXzAjd69AzUoRN9+kTUrOzhe7e8L+UKeYZK9tBRpoChLs2IHVpRB1Zi5Q91xsVxAxMRS27H85P942mO2ReS0IcQQgghpJNhmYOQrkEfMTEELUCMwOgaY0pgJN2EnNInS6qKC9ZGc0oj1bn6PEneolx1E4UyOPrQij3ZUjAVvkrf6pQ47sWliRiTe0CdbzHZDIFRWsGPfvSj3bt3GyWMvXv3/vCHPzQKiK4rzNu/oClQ4wDqqMqm96LweW+Te3zFRRc5XkZQzpyXe16hI79wxoYStRljuzPD2XvwsDJVfDBtizmj4lS9/XBW1sNvVw3XmzYmLhleFbtC40XHKhrfwZVQ8itMKjVeOFkPv7B4v57Ti/v995cSQgghhHQNvcaPv+Pdd7cYjRDH2bx584MPPnjixAmjkwCffvrptddea5SkSA0i+Q4O62MLFlb2CmhTN7YL33zzzd/+7d8ahYSRYR+W6NqC2c761h1KaY59+/b94Q9/eOWVV664IqR6/t13382aNeuhhx4aOXKkWCJl6h4Qy9iKuu1zDpUN3DpVLhxxu0viHqWiSiObpse2f4jetH2OqO3L5cuXpfWCF2KBeunSpW81Fy5cOHfu3Nxnfr/qqZkSngp//etfR48ebZS05shr9/zaeaH1R1o++eST733ve0Zxqa2tNRIhhBBCSLvC3RyEdA1/djG6S5I6Bbq8vaHhhHQJI0eOzMrKeuGFF7D4NyYXWGBHr61xgIJKuQnEoCsXsLk1Dbc7fmuJejyLd/uH6EYh7Y99Mu3ELdO8d5MSQgghhKQ1LHMQ0gVIecJXtmgpEi4YEyFJyCmNdMxWDmHOnDlnz5595JFHtm3bdvz48YsXL6KFDAvs6DV+JGPIr5B7PHg3KSGEEEIyCpY5COk82rj/IjQ81EhI59OnT5958+Y99NBDO3bsuP/++ydMmIAWMiywo9f4EUIIIYQQ0pHwbg7ih3dzNEvqd3MAXw3C7rwI2sUiDkFZCA33hSTPYzM0C+/maBZ+WLoxcvoGrRdzLYcGatvv5jBSD4B3cxBCCCGk02CZg/jhyq1ZWlTmyFxY5mgWfli6MZc7vszRw2GZgxBCCCEdBA+tEEIIIYQQQgghpJvAMgchhBBCCCGEEEK6CSxzEEIIIYQQQgghpJvAMgchhBBCCCGEEEK6CSxzEEIIIYQQQgghpJvAMgchhBBCCCGEEEK6CXygLPHDZ2Q2y6effmqk7g4fKJscfli6MZfb9YGyTzzxhJGSsmrVKiP1APhAWUIIIYR0ECxzED9cuRGSIs1+WHbs2GEkkmlc1mUOEUSW0gYQYcKECS0qc3zyySdGScDo0aNZ5iCEEEIIaTsscxA/LHMQkiKplDmwdjUKySgux+/mgKz3cKgCB9q9e/eyzNFGWOYghBBCSAfBuzkIIYSQNKRx49xJwspdrmHuxkYttoFdK5tNsmulGVjh81azMvMhhBBCCElLWOYghBBC0o3GjXNn1uS/WatY5ixsh/KGofHYYSMlZdoyPTRYUzTI2AghhBBCMgKWOQghhJA0o/HjGuexRabAMO6Xbz5wm5YEu83DLX7E9n3EyiF2R0bc1ovGjUtfqq9/aab2C+RJhnGe+8cjxmCHWLlx41wzSPighBBCCCGdCu/mIH7kuoFevXoZnRCSgKqqKt7N0V2R+zj0vRwKyJ16N8eulZN2jq+dP86oQuPGuUudRYucpTOPPKD64PRG1ptrir60zm6YeOp9GP5MtguCL4/dtQHDQvcHg9zHVI91VsJL2csg2Sjl7cByc+JBw6jl3RyEEEII6Ri4m4OEIz/ZE0KSYD4thHQmXx6pnzZeFxDGjZ9Wf+RLx7k5K3fLQr2HwpkvtQX41L80U++rWLjFOXwsbLNGMI8Xe2hFly305pJfKudBRQ9M0w6Nxw7n5t+mKiMI15ZUBiWEEEII6XhY5iCEEELSjJuzclOvEwwqWlNbW/vmY1LsMOdFYpdrdOLtGl0yKCGEEEJIPCxzEJKOvPLTob169Rr601dimqt8VPbTso+0RAjprgy6Ld95aam5MmPXSu/1GWrvxk5dyti1c0tu1s361oyVu6TYsWya3kahfN7QEaYzhECeJOjp/NF1FtMt2fU1H6shXEsqgxJCCCGEdDwscxCSfrzy0xXOgsuX/68Fzoqyj5yPyrQmivPKcwfurrzdOBJCuimDitYsy3aPgBzW92PYnkWPHdZnVBY6y5RZuTraoF3VxaWxaHWRRtwdGao8oa8gDeSJQ07BaFTBIub8xuFc8Rg33wyx05FDK0kGJYQQQgjpRHgFKfEjV5AahXQFH5UNfW7EwT/N0ts4Gp5+3XlQqY7Iz711759Y5kgTXn/99W5wBemR18p/vWTDXkijZlS9UJGfBcs9E5cMrzpakS8ePo7UlP+6RAfEQtpATfngkg2jFn/w9sNtStPeyN0rcgkLgNypV5BmEo2xq0dbQi2vICWEEEJIx8DdHISkHfsOOMNGGhncXrnAWdGr1wpnwb3OWweG3csaB2lHjrymahwzqo4erZqxd0PJr1874jhZP542ytnwohKDIKBkg6MCjn4QC1EdNa+Vv1ajRRLC6OYwfhmDOkqjmVmT7z76lhBCCCEkDWCZg5D0Z9afDl6+fPBPs/Y9d+Due/d5L+ogpI1kPfz20aN630b20FGOs/fgYWVUdY69W94Pq3McPqj2cQzNRpOVX4FY2YWhqh9LNhxUHiTIqtQw3pnBuPly1yhvGyWEEEJImsEyByFpx8hhzoF9RvbwUdnmYU+PfMt7UQch7cYRXb+YUagPqmRlD3cS1TkUe5f8urzG06n2hKjqx4aSwYPL1Y6OI6+V3zPYcE95bF+Ix36PdvRSU67sATMhhBBCCCEtgGUOQtKO20cMPbj5Fcf56JXNB6faMyq8e5R0IDXlE0s2jJpRNdtcx+HZ2uEjf/ZidDl7N5RMVAUMKXZkPfyCtqqzLBX5KtuSDcOrPjgK1MGWJeZgS8wu513u8ZyLOfzaPSUbnFGLP0hwIwghhBBCCCEpwTIHIenHrD/p2zj+boWzwC1s6K0cs7wXdbDkQdoRdfykaviGkomm8qC3czj7D8fKEJash9/+oGqGKmo4ezcssRFeVLYPCp33y8vvUbULt2BSsx3yjEJ1Y6n3vIti75KSJXudGVVpdg9pu/FEahhvQgghhBDSBljmICQd0bdxqOs4jO7cXuk+X8W9qEMrhLQf+YUznGQnVWJk5Ve8ffSDqsW62LF3yfrg6ZN7Bk8sefHg0MIXXqhCUuHI4f1GSsSG7d34wMonzWH8CCGEEEJI22CZgxBCSIzh2Snup8jKf7hCjqr4qdm+Qe/MqHg4P0uSjVJXlsoOkQTMqFL1kESPdyGEEEIIISRVWOYg4fQihDSH+bRkMkf0tZ/63MkR90yJtuudFyElD/eaUF2NOPL+Fvfa0kANQ3ZmHHntxdihFb1dxFQyYuNqRg3Nzq+omqHuNu1phY5jx47ddddd7733ntGFxo1zzeNaNSt3GXuzIHDuxkajEEIIIYT0RFjmIISQnktW/uyqxaOcJRMHD55Ysn9GlXsBqH7sit6D4SO/4oPFM0ap+0fBxCXODPfO0PzCGaPMk1ayK9TdHUoePHHLcH20RW750MF6sMH6wtMX4m/i0LebhpyB6cYcO3Zs1qxZQ4YMmTBhgjFZch970zywddm0LW+wdEEIIYQQkiIscxBCSE8mK//ht98+qnm7Qt0OqtCbOUZN+3HY+ZWshyuMP3i7wlYq1H0dCpXElbWDkt2rRT3B7miey0izHladPeZRK7bGsWLFigEDBhhrCOPGT6s/8qUWd62M29+h9m6sXCkbP+J3fMS2g1h70OTLRgghhBDSLWCZg5B04fbK2MWivitI49W4S0hjd5MS0m6ozRwJqhyklbz33nt33XXXsWPHRE25xgF27dySm3WzrlO8kSVbPJY5C01pov5w1iIY3nzssGsBjRuX1uRrz2XTtuzU5l0rZxqTcQ3NRgghhBCS+bDMQUhacPusP73+v9xqFN8DZePV+EfKznp62Oayj0wcIe2DuqVjxuPd9NmuXcWECROGDBkya9asY5rmaxz1L800ey0WHn5sUdEgx/nySL1rXLjFOXxMn2PJzb8NXc6g2/JzjUVpRWsWOUu9jo3HDhtP1Vk7f1x4NkIIIYSQzIdlDkLSgVlPL3C2/vkLUW4fMfTg5lcc56NXNh+ceu/tPlV8hNsr7z7wHLoIaVfUOZIec3SksxgwYMCKFSuk0tF8jQOYuzmWTXMrGYppy/T2C8UaVflIwK6Vk2YeeUB5ITwxKWYjhBBCCMkoWOYgJB145adDf/rWAaOMHOYc2Gdk4FM/KlvhLLh8eYGz4i3n3mEH3uJWDkIyBFvpaL7GEWPc/Dfza2bqMyU3Z+Wau0jVNRvuoZWaj7Xl45r67Fs8pYpp48eh3bVzi6iDbsk2nroIMndjY2g2QgghhJDMh2UOQjKOV346tFevoT99ZeTTwza/NdJ7UQchJL0ZMGDAS5rUahyaQUUPTNuycO7GxkFFa5Zl63MmM1/KXjZflTEcJzf7iDqd4rGAceMRoY6j7HSmOXJ9qZRLlG3SQmfZmqJBodkIIYQQQjIfljkISTv2HXCGjTQy8Kku+sDKvnu9F3UQQroJg4rWeI6RjJvvnipRkiZWlsj65RqPxQS6fvPnQzC+6k4OYzXBIdkIIYQQQjIeljkISTs+ajg49O5Z6lrSu4dufesjn2qcePcoIRnF6OYwfoQQQgghpG30Gj/+jnffNUd3CQGbN29+8MEHe/XqZXTSWdxeefDphqE/1TeKzvrTwfV33frFn2eL7lOV75/ufeunqsyhu5xYD+lEqqqq8GE5ceKE0QPs2LGDy9cM5fLly9IKkL/TQEa7d+/eCRMmXLp06VvNhQsXzp07N/eZ3696aqaOJs1TW1trJEIIIYSQdoW7OQhJFz4qi5Uq9PUb6v6NUFX56hoHcC/q0AohhBBCCCGE9Gy4m4P44W4OQlIkld0cRiKZhuzgEEFk2coBROBujjbC3RyEEEII6SBY5iB+WOYgJEWaLXOQzOVy/KEVQZ1acYHKMkdbYJmDEEIIIR0EyxyEEEKIn8ssc3QwLHMQQgghpIPg3RyEEEIIIYQQQgjpJqjdHK+88qrRCCGEEBK/m0ME2cFht3KIILs5Ll68eP78+WdX/5/czZE63M1BCCGEkA6Ch1YIIYQQP7a64UVKGwLU1A+tPPHEE0ZKyqpVq4zUA2CZgxBCCCEdRI87tPLv//7vRkon0nNWhBCSPqT598njx48bKQGfNIfxI4QQQgghbYN3cxBCCCGEEEIIIaSbwDIHIYQQkmY0bpw7adLKXaFaPOibu7HR2bVStVaNZ9fKSS4JsoQRmooQQgghJO1hmYMQQghJP3JzD++UmkTjxzXQtJiIxmOHRRhUtGZN0SCRhcaNcxc6y2o1bz52eCFLF4QQQgjp5gTKHNG1ZWujjhMpK4toPVI2MEaB6opH9RtXYL1jnq7JGxtvi64tENWTqDMJm6EGHSGvuHNI5Z1MxcdP0KG5kMAoKXy9EuRUka4pkDbEEoJySjSsTaBI4KR9An36JSUbth3wvnhCSHsR+j0BRmtL9k0jzcnPzzqmKxJfHsnOz9cmzw4L716LI39c+lJ9/UszYQjdgpGbdbMIg4rW1LpVEHjG7/AIGFzsZpAWbAUhhBBCCOky/GWO6LZNztAcJ3rQGTbEmJwxS+uahEhpjrEp9Npwq1NiVGU4OFUcq3MXzdYrukhZcb0Otxb1M+fyYZJR8h0a+qTW6pbWF3f+D6MhM+x6wt9Jp9prScXHT0iSguQhIaM0+/VKNI3I6kV7jBhMGzKQj8C/txDcf6vVJVUJ/y2NGVO/PD6/Z2IdR05pxPcBIoS0iUTfE6Jrl9cvnVeQ2jeNtOYW58jHjY6za+fhrFuMKZysXy56LDf3sTd9+ziEQUUPZL8001+l2LVyZk3+m+4OD/Q0blxqDMumbTHbSBSNG+e+kaXttcsc5UgIIYQQkuZ4yhz699x5i/ZUFau/qhblNfe7Z7Vua6qcajSQU1qKHywVQ4aN0X9HD9aPmT5FLe0KppbsOXAIQmRr/dL1cau9ggKJyhmafE9uhxAywzQg+E5GtlaVTNW2gnlLnU3boin5+Ag4qKqWXg0kDAmO0uzXK8E0sPJwli41OYJpQwbyEfj3lgR8MZ36gwn++ebmxr9SNeGSzF0IEdJTSfA9Ad/Xcp/U/8m05JtGWnLzLc6RL53GY07+bWY3RusYN19XKWrH77TFjsZjh3Pzb9NFEbXDY/449dciZ6lyWLjFOSzbSBRfHlH7RJTd10EIIYQQkqZ4yhwFleoX9CXq1+HVJSXqt/Gt/93zoQN7cociOGfKdLOidNe++Dv3wGp9rMBfRoktjzuR4Ax9HFK/DvRMNqJOskRSMbYL5p1U1Rh3f03O0Nz4ekwqPopmHZLifk0tCd6w8FGia2cfeLJyirbGEUgbYmk5mJupXoUwbN6TuYtWu3s95Be/sYWQLvdpzHYQ9cUtK8PXFrr+5bC30yU+SrnFHPS/jqj7FyGkQ1FVjk7/n6SjGDfe2bnx4xrnlpBNGl8eqTdSkI/tlaNxuy9UuePNxw6/EXo5x66Vk2YeeUBVQ5ZNMyaXaeZmDxC6X4QQQgghJK3wHVo5dCBwZMVx9izK86zgUkCfA5E9Ajml66dvUuHFTnWl+cGzql7OrNjDCWbtuHVqk+vSiYTNMMaeRcud9Zhr3VIndpIidWNb8byTCUnFJxGqDGEW/FgaJDu44R2l5V+v6NrZm6aHzTE4+ba8nNi/VcwtWZGuYGpJ1Vb5x6w2tMQVRFS5T1FdUmXPtuypH4avbWVBZPWiXH0cRynSZYiPyil90g6gy0Hyq2VCSIejPqXdpsrhODdnOTU12ePHGVVTf+RLtPbO0TBuM9s3atU2DXWzhq12NH5cU599yyBn0C3Z9TXqRAyAg1znMU0PtGvnFm023JyVu0UKI+ruDh5aIYQQQkj6Eytz6KVrcVXsyIotasTu5khhVauWwMuH1Zk1JrTZevHf1DR1q5vQXfPZUyJ6Y7H26Pxfd4fOMMYYc8BGrVvt7ofUjW0h/p0Mpzkf1S8kqFAVVKobNpTD7AO5+qxISIh/FP/Xq7lRdJEj/qCSIjj5oCUpIePqf6t1S8fYGkOCuRXMWyoXdKglka8GYTZmFFcZHbg7Q4YMG1NVHP5v1BcVK6SoU1qtLtsQQlpGd/vADboty3Hc+0MVg4oemLZl4aRJk5YeyfaeG1RlC30FqdE9jJuvbt+QzR2T1IUc81UxA9b8GnMWxVm2pmjQuPGSeNJOZ5oppWgGFa1ZJnd7zHwpe5mOJYQQQghJa2JlDixdsTxUh1WqS6Sw0fKtFVhTqpqBXaZ6f1Pu+QV6Agoqqzv9doyUZxg9GLI9OHVjS/G/k94zJu6pkBR8TEHCfDHDkliXyFRHnxWJDwmOEsN+vZoZ5eDqRXvMLos8Lak6QTBt4oES4Z+qS07pelPESOKjDytF3JsKLZiFuT8VnwZji6GzrXdm46XEVU1CokwhRR2JSXh6hhDSvnSjD5z7XFjP36bCYC7aWDN/fpyHNkNwA7zApmMUsc6YVTK7N3jMnw9BmWwqt8c4EkIIIYSkN3GHVg4dUIdVsDRt5dUIgd+MqxWve9mjui0B2VUtQVag+HlU3+0QibgLRuPSmYTMMA63Ux3psBdRpG5sLcE9BmofgdkdsHqRrsyk4uMjiUOisyLBUZr9evlHKTXnOUDd0jFjlqrdGiFpA5Y2kFP6ZILHtVi0S3HgbTp0YI+8JvV1FJOfnNIIXoe+4NS9biMsShdSVq9270IkhHQ4+ACm8QdudHMYP0IIIYQQ0jbiyhwFlepX6VjFxf/iO1WiB+sddebFoNZ/BZV1cvGFvvpC/6LemvIW5erLMIYcXK4dYi6dScgMvYzJPaB+dW8n20JjKwl5J/FVqXa0yUwzFR8/IQ7mrEWiiJBRmv16NTuNsLQhA7UJ9ZCXZgodcBkTuDRDx6l/D+4hnjjcdwtf5LjA0ChV56iq6k63BBCS3qgqR7p+4FalhvEmhBBCCCFtoNf48Xe8+27cdWPdm3//93//m7/5G6O0Bqx0g9dHhBpbQJtnRQgh3Zzmvk9GygoOzmv9t2E/ly9fltbLdx6gXrp06VvNhQsXjh079uzq/3PVUzMlnDRLbW2tkQghhBBC2hXfk1YISRPcjROG8MtNCSHERfYjEkIIIYSQng7LHCQ9cZ/QamjrOSBCCCGEEEIIIT0BljlaCpbfwd8YhhoJIYQQQgghhBDSqfS4Mkd6XoHBizkIISQ5af598j/8h/9gJEIIIYQQ0oU4zv8PmL4ZcjPPbPkAAAAASUVORK5CYII=)
After stacking the above Red 0427UTC channel looks like this at a stack depth of 2000 frames

Then in AstraImage I use the following simple deconvolution settings

I use a python and sikuli script to automate my RGB assembly in GIMP after batch sharpening all mono stacks. Assembly is done with the Blue channel as the midpoint time of capture.
In this case the Red from 0427 goes into 0428UTC:

Of note, this is the whitebalance and exposure settings from the camera, only stacked, lightly sharpened and color assembly.
After this process completes for me I sort out the best looking ones and use as many as I can in WinJUPOS for derotating. This step takes lots of the noise out especially along the edges and limbs. Here's a sample measurement of the RGB image.

After derotating I begin post processing in Photoshop. Here's how it starts:
Derotated only:

I try to use as many layers as possible so I can blink compare things as I go. ALT+L, D will create a duplicate layer dialogue in PS. Each one gets a meaningful name to me, such as Denoise 0.3
Typically I hit with Topaz DeNoise just a bit, depending upon the base level of noise left after drotation. This case I used 0.3

After this I will try to use the InfraRed as a faux Luminisotry but actually it's processed with a High Pass Filter. In most cases I will subsitite the Red channel. Essentially you want to select all, go to CHANNELS, click on the red and copy (CTRL+C), reclick RGB to go back to color and then back to Layers

Back on layers PS will create a new layer simply by pasting:
Then I rename to RasL (Red as Luminosity)

Then grab the High Pass filter, Filters->Other->High Pass (More detailed explanation here - https://www.photoshopessentials.com/photo-editing/sharpen-high-pass/)

Drop the Radius to taste and edit the layer name with your notes. I don't like how it sharpens the edge so typically I will use a selection tool to trim it.

Often I will also use PS Curves with the built in High Contrast (CTRL+M)

Now set the layer mode as Soft Light, toggle it on and off and or set the opacity to taste. In my case I left at 100%
Then I will take both layers and duplicate and flatten them together into a new RRGB layer.

Now I hit this layer with Google Nik (https://nikcollection.dxo.com/nik-collection-2012/?awc=18169_1601087977_64434cdc37e2ddfa2a681866ee67a3fe&utm_source=affiliation&utm_medium=awin)
Nik's output sharpener is fantastic and simple

Here's the settings I used:

Once done, the new layer has the same edge/feather selection removal as the high pass filter section.
Again the new layers are merged and duplicated

Now I will align the RGB and balance the color
Color balance is done with a stare and compare to Damian Peach's photo from nearly the same time - http://www.damianpeach.com/mars2020/m2020_09_22dp.jpg
I noticed the edges were quite mis aligned, likely due to poor seeing. I fixed that and then used the new edge, w/o the misaligned center portion, essentially a reverse selection from the above.
Color balance was moved via levels:
RGB Input UP to 191
RGB Input UP to 229
GREEN unchanged
BLUE Output down to 197
Then Saturation was bumped up 11 points

Next I copy the Color and Sat layer into a new layer and set as Soft Light and bring down the Opacity of the top layer to 20-30%. This helps improve contrast as well as darken the limbs to give a bit more of the original 3d appearance. OF NOTE, I do bring the LD value down in WinJUPOS when performing derotation.
Finally I flatten the new soft edge layer and bring the brightness up to near max with levels.
The rest is all text assembly in GIMP!
Here's the one of the variants of a 'final' processed measurement

Subscribe to:
Posts (Atom)

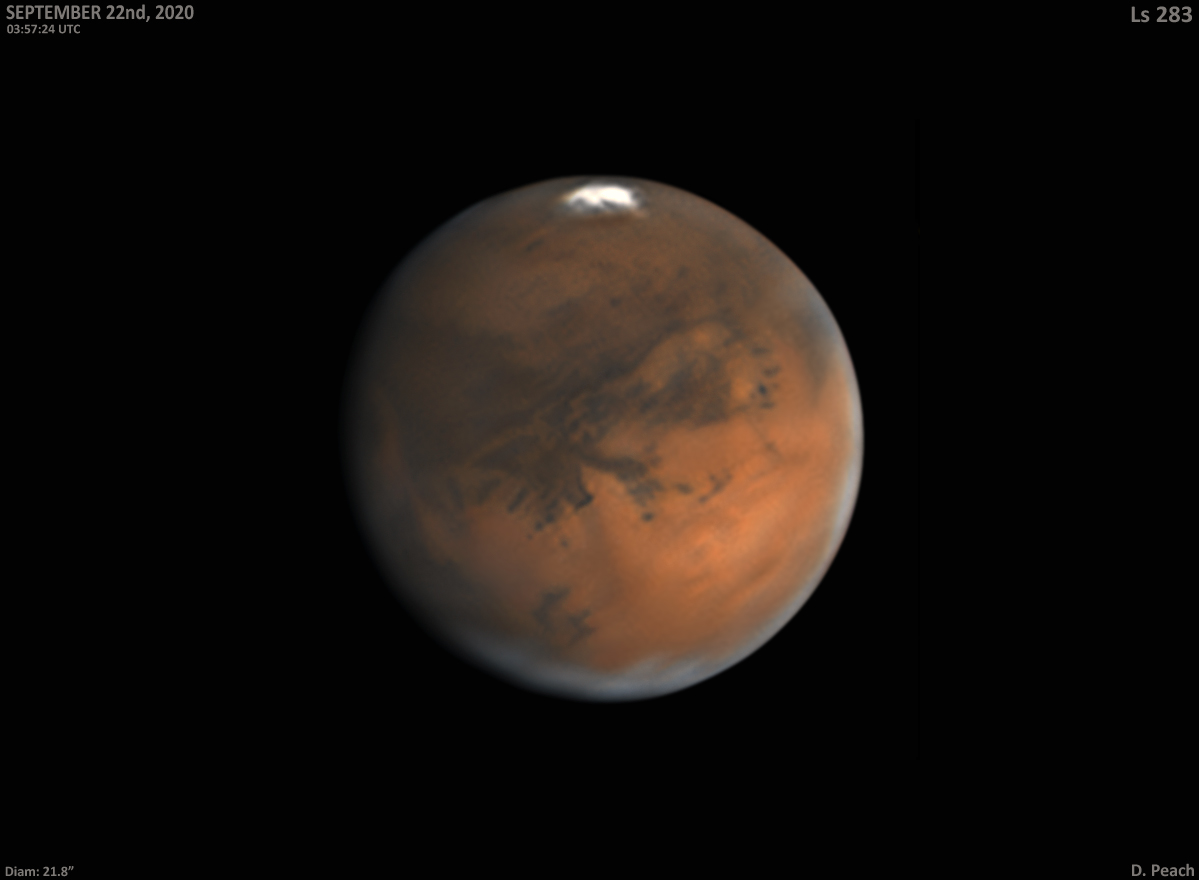